前言
要与Windows操作系统进行交互,软件通常会从动态链接库(DLL)中导入函数。 这些函数往往以明文形式存在“导入表”中,杀毒软件通常会利用此功能来检测和推断恶意行为。 为此我们展示了混淆器的思路和实现,该混淆器允许重构任何C/C ++软件以消除此痕迹,我们研究的重点是Meterpreter。 源代码位于:https://github.com/scrt/avcleaner.
介绍
在先前的文章中,我们展示了如何在不使用正则表达式的情况下准确地替换源代码中的字符串。 目的是减少那些依靠静态签名的二进制和安全性软件的内存占用。
然而,除了源代码本身中的字符串文字外,我们还可以静态地收集和分析许多其他的指纹。 在这篇文章中,我们将展示如何从二进制文件中手动隐藏API导入,然后自动执行C/C ++编写的软件。
API导入问题
让我们编写并构建一个简单的C程序,执行该程序会弹出一个警告框:
#include <Windows.h>
int main(int argc, char** argv) {
    MessageBox(NULL, "Test", "Something", MB_OK);
    return 0;
}
然后,使用你喜欢的编译器进行编译。 在这里,MinGW用于从macOS到Windows的跨版本编译:
x86_64-w64-mingw32-gcc test.c -o /tmp/toto.exe
之后,可以使用rabin2(包含在radare2中)或者GNU的字符串处理工具strings列出字符串:
 205   │ 201  0x00003c92 0x00408692 7   8    .idata        ascii   strncmp
 206   │ 202  0x00003c9c 0x0040869c 8   9    .idata        ascii   vfprintf
 207   │ 203  0x00003ca8 0x004086a8 11  12   .idata        ascii   MessageBoxA
 208   │ 204  0x00003d10 0x00408710 12  13   .idata        ascii   KERNEL32.dll
 209   │ 205  0x00003d84 0x00408784 10  11   .idata        ascii   msvcrt.dll
 210   │ 206  0x00003d94 0x00408794 10  11   .idata        ascii   USER32.dll
...

9557   │ 9553 0x0004f481 0x00458e81 30  31                 ascii   .refptr.__native_startup_state
9558   │ 9554 0x0004f4a0 0x00458ea0 11  12                 ascii   __ImageBase
9559   │ 9555 0x0004f4ac 0x00458eac 11  12                 ascii   MessageBoxA
9560   │ 9556 0x0004f4b8 0x00458eb8 12  13                 ascii   GetLastError
9561   │ 9557 0x0004f4c5 0x00458ec5 17  18                 ascii   __imp_MessageBoxA
9562   │ 9558 0x0004f4d7 0x00458ed7 23  24                 ascii   GetSystemTimeAsFileTime
9563   │ 9559 0x0004f4ef 0x00458eef 22  23                 ascii   mingw_initltssuo_force
9564   │ 9560 0x0004f506 0x00458f06 19  20                 ascii   __rt_psrelocs_start
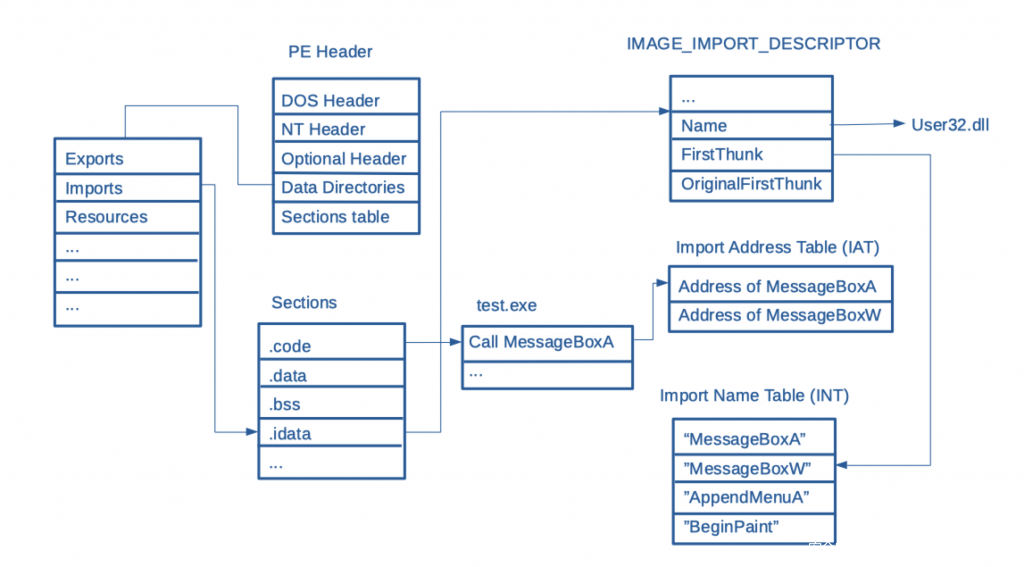
从上面显示的控制台输出中可以明显看出,字符串MessageBoxA出现了3次。 这是因为此函数必须从User32.dll中导入(稍后会对此进行详细介绍)。
当然,该字符串不容易引起反病毒人士的注意,但是对于以下API来说绝对会备受关注:
- InternetReadFile
- ShellExecute
- CreateRemoteThread
- OpenProcess
- ReadProcessMemory
- WriteProcessMemory
- …
隐藏API导入
在继续之前,让我们简要介绍一下开发人员在Windows系统上调用外部库中函数的不同方法:
- 加载时动态链接
- 运行时动态链接
加载时动态链接
这是解析外部库中函数的默认方法,并且实际上由链接程序自动处理。 在编译时,将应用程序链接到它依赖的每个动态链接库(DLL)的导入库(.lib)。 对于每个导入的函数,链接器会分别将对应条目写入关联DLL的IAT(导入地址表)中
启动应用程序后,操作系统将扫描IAT并映射进程地址空间中列出的所有库,并且每个导入函数的地址都将更新为指向DLL的导出地址表中的相应条目。
运行时动态链接
另一种方法是手动执行此操作,方法是先用LoadLibrary加载相应的库,然后用GetProcAddress解析函数的地址。 例如,可以修改前面的示例,使其依赖于运行时动态链接。
首先,必须为API MessageBoxA定义一个函数指针。 在开始之前,让我们分享一个小技巧,以帮助那些不熟悉C的人了解C语言中函数指针的语法:
<return type> (*<your pointer name>)(arg1, arg2, ...);
如你所见,除了星号(*)运算符(因为它是一个函数指针)和括号外,它与定义函数的语法相同。
现在,我们需要MessageBox的原型,该原型可以从Windows SDK的winuser.h中复制粘贴,也可以直接从MSDN复制:
int MessageBox(
  HWND    hWnd,
  LPCTSTR lpText,
  LPCTSTR lpCaption,
  UINT    uType
);
现在,可以使用正确的信息更新上述函数指针语法:
int (*_MessageBoxA)(
    HWND hWnd,
    LPCTSTR lpText,
    LPCTSTR lpCaption,
    UINT uType
);
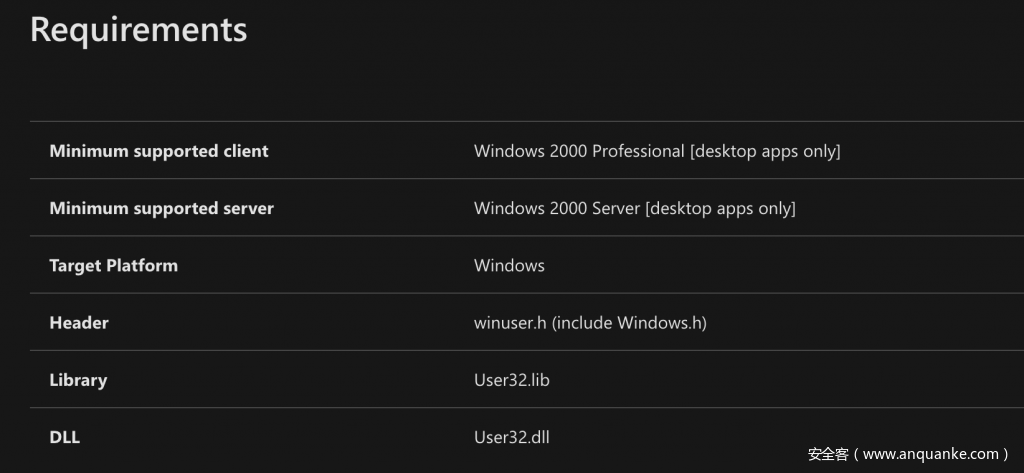
MSDN告诉我们,此函数由User32.dll导出:
因此,应用程序必须首先加载此库:
HANDLE hUser32 = LoadLibrary("User32.dll");
然后,可以最终使用GetProcAddress将正确的地址赋值给上面定义的函数指针:
_MessageBoxA fMessageBoxA = (_MessageBoxA) GetProcAddress(hUser32, "MessageBoxA");
从上述代码位置开始,必须将原始示例改为调用fMessageBoxA而不是MessageBoxA,如下所示:
#include <Windows.h>

typedef int (*_MessageBoxA)(
  HWND    hWnd,
  LPCTSTR lpText,
  LPCTSTR lpCaption,
  UINT    uType
);

int main(int argc, char** argv) {

    HANDLE hUser32 = LoadLibraryA("User32.dll");
    _MessageBoxA fMessageBoxA = (_MessageBoxA) GetProcAddress(hUser32, "MessageBoxA");
    fMessageBoxA(NULL, "Test", "Something", MB_OK);
    return 0;
}
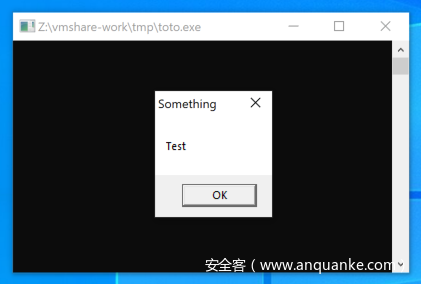
使用数据类型HWND,LPCTSTR和UINT需要在头文件中包含Windows.h 。 如预期的那样,编译并运行此简单示例会生成一个警报框:
最终修改
当然,运行strings命令搜索toto.exe仍然会看到字符串User32.dll和MessageBoxA。 因此,理想情况下,应该对这些字符串进行加密,前面文章中提到的简单混淆技巧运用到此处足以绕过杀软的检测。 所以,最终的结果是:
#include <Windows.h>

typedef int (*_MessageBoxA)(
  HWND    hWnd,
  LPCTSTR lpText,
  LPCTSTR lpCaption,
  UINT    uType
);

int main(int argc, char** argv) {

    char user32[] = {'U','s','e','r','3','2','.','d','l','l',0};
    HANDLE hUser32 = LoadLibraryA(user32);

    char messabox[] = {'M','e','s','s','a','g','e','B','o','x','A',0};
    _MessageBoxA fMessageBoxA = (_MessageBoxA) GetProcAddress(hUser32, messabox);
    fMessageBoxA(NULL, "Test", "Something", MB_OK);
    return 0;
}
这次,使用strings和rabin2都无法找到该字符串(尽管逆向工程师肯定会找到):
➜  x86_64-w64-mingw32-gcc test.c -o /tmp/toto.exe
➜  strings /tmp/toto.exe | grep MessageBox
➜  rabin2 -zz /tmp/toto.exe | grep MessageBox
➜
自动化源代码重构
上一篇文章中大篇幅描述的方法同样可以用于重构现在的代码库,以便可疑API在运行时加载,并从导入表中删除其条目。 为此,我们将基于libTooling实现以下工作。
让我们按以下步骤分解此任务:
- 为前面的原始示例生成抽象语法树。 这是了解如何操纵节点以替换函数调用所必需的。
- 使用ASTMatcher在代码库中找到给定API的所有函数调用。
- 用另一个函数标识符替换所有调用。
- 在每个函数调用之前插入
LoadLibrary/GetprocAddressAPI调用。- 检查它是否有效。
- 广泛化和混淆所有可疑API。
MessageBox应用程序的抽象语法树
要查看原始MessageBox应用程序的Clang抽象语法树,可以使用以下脚本(根据环境不同需要调整Windows SDK的路径):
WIN_INCLUDE="/Users/vladimir/dev/avcleaner"
CLANG_PATH="/usr/local/Cellar/llvm/9.0.1"

clang -cc1 -ast-dump "$1" -D "_WIN64" -D "_UNICODE" -D "UNICODE" -D "_WINSOCK_DEPRECATED_NO_WARNINGS"\
  "-I" "$CLANG_PATH/include" \
  "-I" "$CLANG_PATH" \
  "-I" "$WIN_INCLUDE/Include/msvc-14.15.26726-include"\
  "-I" "$WIN_INCLUDE/Include/10.0.17134.0/ucrt" \
  "-I" "$WIN_INCLUDE/Include/10.0.17134.0/shared" \
  "-I" "$WIN_INCLUDE/Include/10.0.17134.0/um" \
  "-I" "$WIN_INCLUDE/Include/10.0.17134.0/winrt" \
  "-fdeprecated-macro" \
  "-w" \
  "-fdebug-compilation-dir"\
  "-fno-use-cxa-atexit" "-fms-extensions" "-fms-compatibility" \
  "-fms-compatibility-version=19.15.26726" "-std=c++14" "-fdelayed-template-parsing" "-fobjc-runtime=gcc" "-fcxx-exceptions" "-fexceptions" "-fseh-exceptions" "-fdiagnostics-show-option" "-fcolor-diagnostics" "-x" "c++"
然后运行:
bash clang-astdump.sh test/messagebox_simple.c > test/messagebox_simple.c.ast
在源代码中定位函数调用基本上等于查找CallExpr类型的AST节点。 如上面的截图所示,实际调用的函数名是在其某个子节点中被指定的,因此后面应该可以访问它。
找到给定API的函数调用
为了枚举给定函数的每个函数调用,根据需要我们选择了ASTMatcher。 首先,正确使用这个匹配器的语法很重要,因为它比上一篇文章中使用的语法要复杂一些。 为了得到正确的结果,我们选择依靠clang-query来完成,这是一个非常有价值的交互式工具,允许在源代码上运行自定义查询。 有趣的是,它也基于libTooling,并且其功能远比在本文章中展示的功能要强大得多(更多细节请参阅此处)。
clang-query> match callExpr(callee(functionDecl(hasName("MessageBoxA"))))

Match #1:

/Users/vladimir/dev/scrt/avcleaner/test/messagebox_simple.c:6:5: note: "root" binds here
    MessageBoxA(NULL, "Test", "Something", MB_OK);
    ^~~~~~~~~~~~~~~~~~~~~~~~~~~~~~~~~~~~~~~~~~~~~
1 match.
clang-query>
反复试验可以迅速找到到有效的解决方案。 现在通过验证我们发现匹配器工作良好,我们可以像前面的文章中提到的一样创建一个新的ASTConsumer。 基本上,它是复制我们对clang-query所做的工作,只不过是在C++中:
class ApiCallConsumer : public clang::ASTConsumer {
public:

    ApiCallConsumer(std::string ApiName, std::string TypeDef, std::string Library)
            : _ApiName(std::move(ApiName)), _TypeDef(std::move(TypeDef)), _Library(std::move(Library)) {}

    void HandleTranslationUnit(clang::ASTContext &Context) override {

        using namespace clang::ast_matchers;
        using namespace AVObfuscator;

        llvm::outs() << "[ApiCallObfuscation] Registering ASTMatcher for " << _ApiName << "\n";
        MatchFinder Finder;
        ApiMatchHandler Handler(&ASTRewriter, _ApiName, _TypeDef, _Library);

        const auto Matcher = callExpr(callee(functionDecl(hasName(_ApiName)))).bind("callExpr");

        Finder.addMatcher(Matcher, &Handler);
        Finder.matchAST(Context);
    }

private:
    std::string _ApiName;
    std::string _TypeDef;
    std::string _Library;
};
我们发现此实现最重要的细节是能否提供匹配许多不同函数的能力,并且由于最终的目标是为每个替换的API函数前面插入LoadLibrary/GetProcAddress,因此我们需要能够在函数原型中提供要加载的DLL名称。
这样做可以优雅地注册与要替换的API一样多的ASTConsumers。 此ASTConsumer的实例化必须在ASTFrontendAction中完成:
这是我们在上一篇文章中对现有代码所做的唯一修改。 从这里开始,其他东西都可以通过我们将要添加的一组代码来实现,首先创建ApiMatchHandler.cpp,匹配器必须提供一个回调函数,所以让我们给它一个:
void ApiMatchHandler::run(const MatchResult &Result) {

    llvm::outs() << "Found " << _ApiName << "\n";

    const auto *CallExpression = Result.Nodes.getNodeAs<clang::CallExpr>("callExpr");
    handleCallExpr(CallExpression, Result.Context);
}
在本文开始的任务分解步骤的具体实现过程中,我们可以在代码层面给他做一些位置调换,例如使用以下方法:
bool handleCallExpr(const clang::CallExpr *CallExpression, clang::ASTContext *const pContext);

bool replaceIdentifier(const clang::CallExpr *CallExpression, const std::string &ApiName,
                        const std::string &NewIdentifier);
bool
addGetProcAddress(const clang::CallExpr *pCallExpression, clang::ASTContext *const pContext,
                    const std::string &NewIdentifier, std::string &ApiName);

clang::SourceRange findInjectionSpot(clang::ASTContext *const Context, clang::ast_type_traits::DynTypedNode Parent,
                                        const clang::CallExpr &Literal, uint64_t Iterations);
替换函数调用
这是最琐碎的部分。 目的是用随机标识符替换AST中的MessageBoxA。 此随机变量的初始化会在后续部分中完成。
bool ApiMatchHandler::handleCallExpr(const CallExpr *CallExpression, clang::ASTContext *const pContext) {

    // generate a random variable name
    std::string Replacement = Utils::translateStringToIdentifier(_ApiName);

    // inject Run-time dynamic linking
    if (!addGetProcAddress(CallExpression, pContext, Replacement, _ApiName))
        return false;

    // MessageBoxA -> random identifier generated above
    return replaceIdentifier(CallExpression, _ApiName, Replacement);
}
ReplaceText Clang AP用于重命名函数标识符:
bool ApiMatchHandler::replaceIdentifier(const CallExpr *CallExpression, const std::string &ApiName,
                                        const std::string &NewIdentifier) {
    return this->ASTRewriter->ReplaceText(CallExpression->getBeginLoc(), ApiName.length(), NewIdentifier);
}
插入 LoadLibrary / GetProcAddress
为我们要添加的API注入运行时动态链接是一个多步骤过程:
- 我们可以选择将API原型插入翻译单元的顶部或封闭函数中。 为了更方便简单,我们选择后者,但是我们需要确保它没有被添加,以防在同一个函数中多次调用该API(如果后面调用相同的API,就会发生这种情况)。
- 插入行 HANDLE <random identifier> LoadLibrary(<library name>);
- 插入对
GetProcAddress的调用。
当然,为了避免在执行此操作时插入明显的敏感字符串,必须将每个字符串写为堆栈字符串的形式。 这会使代码阅读起来有些冗杂,但并太复杂:
bool ApiMatchHandler::addGetProcAddress(const clang::CallExpr *pCallExpression, clang::ASTContext *const pContext,
                                        const std::string &NewIdentifier, std::string &ApiName) {

    SourceRange EnclosingFunctionRange = findInjectionSpot(pContext, clang::ast_type_traits::DynTypedNode(),
                                                           *pCallExpression, 0);

    std::stringstream Result;

    // add function prototype if not already added
    if(std::find(TypedefAdded.begin(), TypedefAdded.end(), pCallExpression->getDirectCallee()) == TypedefAdded.end()) {

        Result << "\t" << _TypeDef << "\n";
    }

    // add LoadLibrary with obfuscated strings
    std::string LoadLibraryVariable = Utils::translateStringToIdentifier(_Library);
    std::string LoadLibraryString = Utils::generateVariableDeclaration(LoadLibraryVariable, _Library);
    std::string LoadLibraryHandleIdentifier = Utils::translateStringToIdentifier("hHandle_"+_Library);
    Result << "\t" << LoadLibraryString << std::endl;
    Result << "\tHANDLE " << LoadLibraryHandleIdentifier << " = LoadLibrary(" << LoadLibraryVariable << ");\n";

    // add GetProcAddress with obfuscated string: TypeDef NewIdentifier = (TypeDef) GetProcAddress(handleIdentifier, ApiName)
    std::string ApiNameIdentifier = Utils::translateStringToIdentifier(ApiName);
    std::string ApiNameDecl = Utils::generateVariableDeclaration(ApiNameIdentifier, ApiName);
    Result << "\t" << ApiNameDecl << "\n";
    Result << "\t_ "<< ApiName << " " << NewIdentifier << " = (_" << ApiName << ") GetProcAddress("
           << LoadLibraryHandleIdentifier << ", " << ApiNameIdentifier << ");\n";

    TypedefAdded.push_back(pCallExpression->getDirectCallee());

    // add everything at the beginning of the function.
    return !(ASTRewriter->InsertText(EnclosingFunctionRange.getBegin(), Result.str()));
}
测试
git clone https://github.com/scrt/avcleaner
mkdir avcleaner/CMakeBuild && cd avcleaner/CMakeBuild
cmake ..
make
cd ..
为了测试一切是否如预期运行,我们使用以下测试文件:
#include <Windows.h>

int main(int argc, char** argv) {

    MessageBoxA(NULL, "Test", "Something", MB_OK);
    MessageBoxA(NULL, "Another test", "Another something", MB_OK);
    return 0;
}
运行混淆器:
./CMakeBuild/avcleaner.bin test/messagebox_simple.c --strings=true --api=true -- -D _WIN64 -D _UNICODE -D UNICODE -D _WINSOCK_DEPRECATED_NO_WARNINGS\
 -I /usr/local/Cellar/llvm/9.0.1\
 -I /Users/vladimir/dev/scrt/avcleaner/Include/msvc-14.15.26726-include\
 -I /Users/vladimir/dev/scrt/avcleaner/Include/10.0.17134.0/ucrt\
 -I /Users/vladimir/dev/scrt/avcleaner/Include/10.0.17134.0/shared\
 -I /Users/vladimir/dev/scrt/avcleaner/Include/10.0.17134.0/um\
 -I /Users/vladimir/dev/scrt/avcleaner/Include/10.0.17134.0/winrt -w -fdebug-compilation-dir -fno-use-cxa-atexit -fms-extensions -fms-compatibility -fms-compatibility-version=19.15.26726 -std=c++14 -fdelayed-template-parsing -fobjc-runtime=gcc -fcxx-exceptions -fexceptions -fdiagnostics-show-option -fcolor-diagnostics -x c++ -ferror-limit=1900 -target x86_64-pc-windows-msvc19.15.26726 -fsyntax-only -disable-free -disable-llvm-verifier -discard-value-names -dwarf-column-info -debugger-tuning=gdb -momit-leaf-frame-pointer -v
检查结果:
#include <Windows.h>

int main(int argc, char** argv) {

    const char  hid_Someth_lNGj92poubUG[] = {'\x53','\x6f','\x6d','\x65','\x74','\x68','\x69','\x6e','\x67',0};

    const char  hid_Anothe_UP7KUo4Sa8LC[] = {'\x41','\x6e','\x6f','\x74','\x68','\x65','\x72','\x20','\x74','\x65','\x73','\x74',0};

    const char  hid_Anothe_ACsNhmIcS1tA[] = {'\x41','\x6e','\x6f','\x74','\x68','\x65','\x72','\x20','\x73','\x6f','\x6d','\x65','\x74','\x68','\x69','\x6e','\x67',0};
    typedef int (*_MessageBoxA)(HWND hWnd, LPCTSTR lpText, LPCTSTR lpCaption, UINT uType);
    TCHAR hid_User___Bhk5rL2239Kc[] = {'\x55','\x73','\x65','\x72','\x33','\x32','\x2e','\x64','\x6c','\x6c',0};

    HANDLE hid_hHandl_PFP2JD4HjR8w = LoadLibrary(hid_User___Bhk5rL2239Kc);
    TCHAR hid_Messag_drqxgJLSrxfT[] = {'\x4d','\x65','\x73','\x73','\x61','\x67','\x65','\x42','\x6f','\x78','\x41',0};

    _MessageBoxA hid_Messag_1W70P1kc8OJv = (_MessageBoxA) GetProcAddress(hid_hHandl_PFP2JD4HjR8w, hid_Messag_drqxgJLSrxfT);
    TCHAR hid_User___EMmJBb201EuJ[] = {'\x55','\x73','\x65','\x72','\x33','\x32','\x2e','\x64','\x6c','\x6c',0};

    HANDLE hid_hHandl_vU1riOrVWM8g = LoadLibrary(hid_User___EMmJBb201EuJ);
    TCHAR hid_Messag_GoaJMFscXsdw[] = {'\x4d','\x65','\x73','\x73','\x61','\x67','\x65','\x42','\x6f','\x78','\x41',0};

    _MessageBoxA hid_Messag_6nzSLR0dttUn = (_MessageBoxA) GetProcAddress(hid_hHandl_vU1riOrVWM8g, hid_Messag_GoaJMFscXsdw);
hid_Messag_1W70P1kc8OJv(NULL, "Test", hid_Someth_lNGj92poubUG, MB_OK);
    hid_Messag_6nzSLR0dttUn(NULL, hid_Anothe_UP7KUo4Sa8LC, hid_Anothe_ACsNhmIcS1tA, MB_OK);
    return 0;
}
可以看到,字符串混淆和API混淆的组合非常强大。字符串“Test”被忽略了,因为我们预先决定忽略小字符串。然后,可以编译混淆后的源代码:
$ cp test/messagebox_simple.c.patch /tmp/test.c
$ x86_64-w64-mingw32-gcc /tmp/test.c -o /tmp/toto.exe
在Windows 10虚拟机上进行的测试表明,程序原本的功能可以正常执行。 然后通过搜索,我们发现混淆后的二进制文件中没有MessageBox字符串:
$ rabin2 -zz /tmp/toto.exe | grep MessageBox | wc -l
  0
概述
在绕过杀软ESET Nod32的过程中,我们发现隐藏与samlib.dll相关的API导入非常重要,尤其是下面列表中的API:
- SamConnect
- SamConnectWithCreds
- SamEnumerateDomainsInSamServer
- SamLookupDomainInSamServer
- SamOpenDomain
- SamOpenUser
- SamOpenGroup
- SamOpenAlias
- SamQueryInformationUser
- SamSetInformationUser
- SamiChangePasswordUser
- SamGetGroupsForUser
- SamGetAliasMembership
- SamGetMembersInGroup
- SamGetMembersInAlias
- SamEnumerateUsersInDomain
- SamEnumerateGroupsInDomain
- SamEnumerateAliasesInDomain
- SamLookupNamesInDomain
- SamLookupIdsInDomain
- SamRidToSid
- SamCloseHandle
- SamFreeMemory
据我们所知,这些函数并未在AV引擎中被列入黑名单,但它们确实以某种方式降低了杀软对其信任度。 因此,我们必须为每个函数注册一个ApiCallConsumer,这意味着我们需要它们的名称和函数原型:
static std::map<std::string, std::string> ApiToHide_samlib = {
    {"SamConnect",                     "typedef NTSTATUS (__stdcall* _SamEnumerateDomainsInSamServer)(SAMPR_HANDLE ServerHandle, DWORD * EnumerationContext, PSAMPR_RID_ENUMERATION* Buffer, DWORD PreferedMaximumLength,DWORD * CountReturned);"},
    {"SamConnectWithCreds",            "typedef NTSTATUS(__stdcall* _SamConnect)(PUNICODE_STRING ServerName, SAMPR_HANDLE * ServerHandle, ACCESS_MASK DesiredAccess, BOOLEAN Trusted);"},
    {"SamEnumerateDomainsInSamServer", "typedef NTSTATUS(__stdcall* _SamConnectWithCreds)(PUNICODE_STRING ServerName, SAMPR_HANDLE * ServerHandle, ACCESS_MASK DesiredAccess, LSA_OBJECT_ATTRIBUTES * ObjectAttributes, RPC_AUTH_IDENTITY_HANDLE AuthIdentity, PWSTR ServerPrincName, ULONG * unk0);"},
    ...
}
这里的std :: make_unique是无比完美的,因为它允许我们在此循环中实例化堆上的对象,同时省去了稍后手动释放这些对象的工作。 当不再使用它们时,它们将被自动释放。
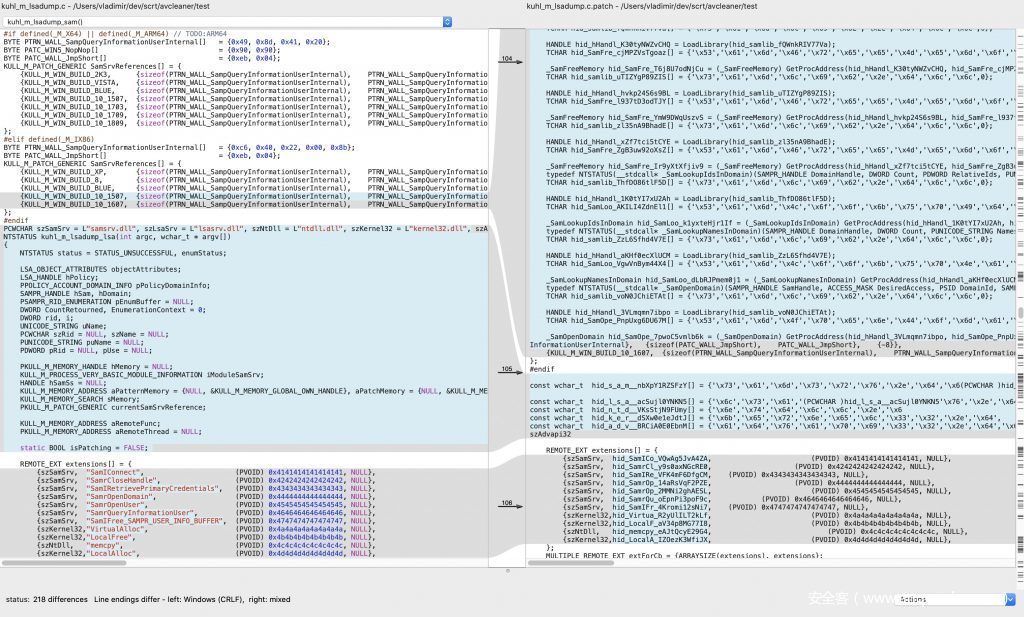
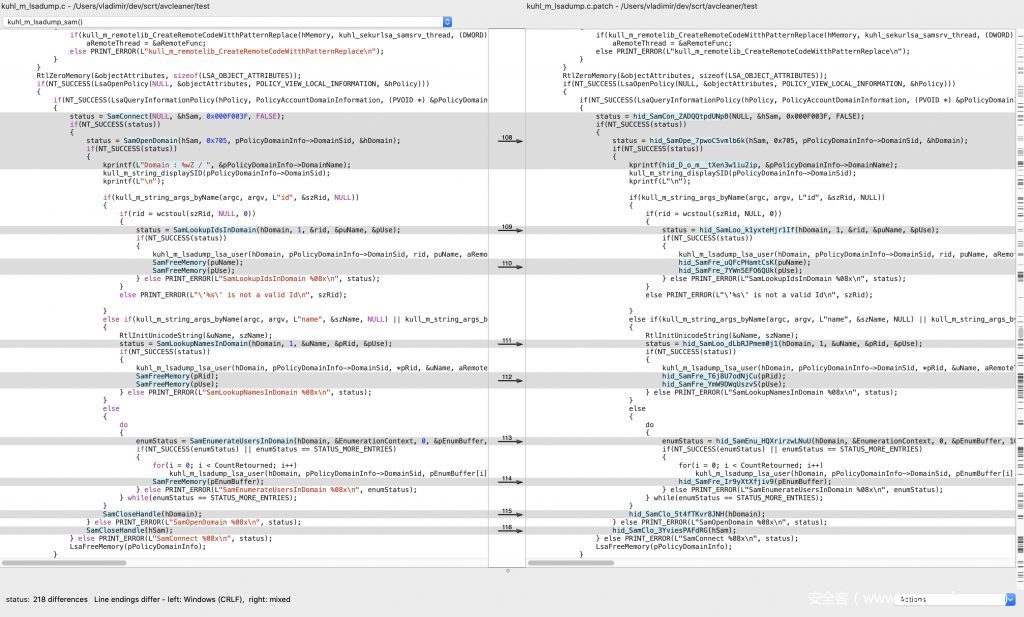
最后,我们可以对mimikatz(尤其是kuhl_m_lsadump.c)进行混淆测试:
bash run_example_mimikatz.sh test/kuhl_m_lsadump.c
产生一个有趣的结果:
可以看到,实际的函数调用已正确替换:
宏“ PRINT_ERROR”内的字符串被省略了,因为我们用do{}while(0)取消了该宏。 附带说明一下,我们没有找到比mimikatz更好的项目,可以用来测试和发现混淆器中的bug。 它的代码风格确实很奇特。
改进措施
这是一些留给读者的练习
更隐蔽
实际上不需要 LoadLibrary / GetProcAddress这些API,也可执行运行时动态链接。
我们最好选择重新实现这些功能以避免hooks,并且已经有开源项目允许你来执行这样操作(ReflectiveDLLInjection)。
如果你已经读到了这里,那么根据前面的介绍你只需要在翻译单元的顶部(使用findInjectionSpot)注入这些函数的具体实现,并更新addGetProcAddress方法即可使用,从而替换掉原来的WinAPI。
错误处理
如果失败,LoadLibrary将返回NULL,因此可以为此添加检查并让其从错误中正常恢复。 在当前未加入检测的情况下,此应用程序很可能会崩溃。
如果发生错误,GetProcAddress也将返回NULL,所以也必须进行检查。
总结
在本文中,我们展示了如何在不使用正则表达式的情况下准确替换C/C ++代码库中的函数调用。 所有这些都是为了防止杀毒软件静态收集我们在渗透测试中使用的Meterpreter或其他软件的行为信息。
在ESET Nod32上进行测试,这是使每个Meterpreter模块都能绕过其未检测网络的关键步骤,并且对于绕过更高级的杀软产品绝对有帮助。
隐藏API导入是一回事,但是一旦恶意软件执行完成,安全软件便可以通过监视API调用来收集行为信息。
有鉴于此,在下一篇文章中我们将涉及可疑Win32 API的自动重构以直接进行系统调用。 这是规避运行时检测的又一关键步骤,该运行时检测是通过Cyland,Traps和Kaspersky等AV用户界面hooks来实现的。






发表评论
您还未登录,请先登录。
登录