0x01.从uart 进入uboot shell
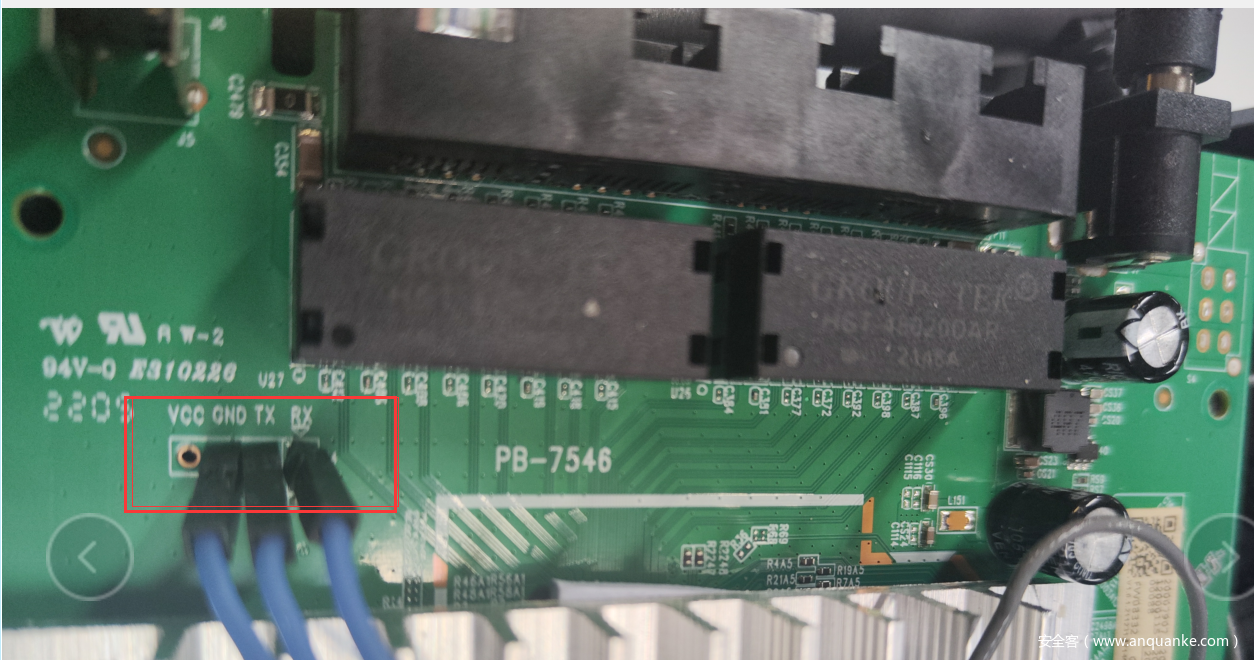
某路由器设备拆开后定位到uart接口,将uart引脚通过TTL接入到电脑,路由器上电启动,观察启动日志.
Boot SPI NAND
start read bootheader
start read secondboot
non secure boot
Jump
ddr init enter, rate is 1333 mbps
ddr size is 0x10000000
U-Boot 2013.04 (Feb 14 2022 - 16:16:39)
......
eth0
Hit 1 to upgrade software version
Hit any key to stop autoboot:  1
......
*****************pc start********************
*****************echo 5000 > /proc/sys/vm/min_free_kbytes********************
close console
从上面设备的部分启动日志可以看出,uboot shell可以被中断,路由器上电后快速按任意键可进入。路由器启动后关闭了console 控制台,不能通过console登录路由器。为了方便后续逆向工作,最好是能够进入路由器系统,但目前是console已关闭,且未发现telnet、ssh等服务,只能从uboot shell为切入点进一步分析。
路由器reset,快速按下任意键进入boot shell,可以看到当前uboot shell支持的命令
=> h
?       - alias for 'help'
base    - print or set address offset
bdinfo  - print Board Info structure
boot    - boot default, i.e., run 'bootcmd'
bootd   - boot default, i.e., run 'bootcmd'
bootk   - boot kernel
bootm   - boot application image from memory
bootz   - boot Linux zImage image from memory
cmp     - memory compare
coninfo - print console devices and information
cp      - memory copy
dhcp    - boot image via network using DHCP/TFTP protocol
downver - upgrade software downloaded from TFTP server
echo    - echo args to console
erase   - erase FLASH memory
fdt     - flattened device tree utility commands
flinfo  - print FLASH memory information
go      - start application at address 'addr'
gpiotest- gpiotest dir [num] [in/out]
gpiotest value [num] [1/0]
gpiotest gvalue [num]
help    - print command description/usage
imxtract- extract a part of a multi-image
itest   - return true/false on integer compare
mcupg   -  multicast upgrade
md      - memory display
mii     - MII utility commands
mtddebug- mtddebug operate
mtest   - simple RAM read/write test
mw      - memory write (fill)
nand    - NAND sub-system
ping    - send ICMP ECHO_REQUEST to network host
printenv- print environment variables
protect - enable or disable FLASH write protection
reset   - Perform RESET of the CPU
run     - run commands in an environment variable
saveenv - save environment variables to persistent storage
setenv  - set environment variables
sleep   - delay execution for some time
snumber - Get or set serial number for zte boards
tftp    - boot image via network using TFTP protocol
version - print monitor, compiler and linker version
watchdog- watchdog reset && disable
xmodem  - xmodem
0x02.修改内核启动参数
printenv查看当前环境变量
=> printenv
baudrate=115200
bome=aclcle) root=/dev/mtdblock8 rw rootfstype=jffs2 mem=256M single
bootcmd=setenv bootargs console=$(console) root=/dev/mtdblock8 ro rootfstype=jffs2  mem=$(memsize);bootm 0x440001e0;
bootdelay=1
bootfile=uboot.bin
bootloaderfile=bootloader.bin
console=ttyAMA0,115200n8
ethact=eth0
ethaddr=00:41:71:00:00:50
fileaddr=44000000
filesize=13bfb78
gatewayip=192.168.1.1
ipaddr=192.168.1.1
linuzfile=vmlinuz.bin
loadaddr=0x44000000
memsize=256M
nand_erasesize=20000
nand_oobsize=40
nand_writesize=800
netmask=255.255.255.0
netretry=5
serverip=192.168.1.100
bootargs为内核启动参数,这里没有看到init参数,一般来说,通过设置init参数来指定内核启动后第一个执行的脚本,可以尝试添加init=/bin/sh进入linux shell。
setenv bootcmd 'setenv bootargs console=$(console) root=/dev/mtdblock8 rw rootfstype=jffs2 mem=$(memsize) init=/bin/sh;bootm 0x440001e0;'
用setenv修改bootcmd参数,保存环境变量。
=> save
Saving Environment to NAND...
Erasing 0x180000 - 0x200000:<nand_erase_skip_bad_,1560>!mtdpart=0x1,start=0x0,mtdpartoffset=0x180000,mtdPartsize=0x80000,length=0x80000
        [Done]
Writing to Nand:<nand_write_skip_bad_,1455>!mtdpart=0x1,offset=0x0,mtdpartoffset=0x180000,mtdPartsize=0x80000,length=0x20000
        [Done]
环境变量修改后,bootm启动失败,这里报错can't get kernel image!
=> bootm 0x440001e0
Wrong Image Format for bootm command
ERROR: can't get kernel image!
网上下载一份u-boot-2013源码,搜索can't get kernel image字符串,定位到关键代码。
uboot首先会检测kernel的uimage头部信息,不正确会输出上面错误。kernel uimage是在kernel image前加上一段长度为64字节的头,用于描述内核的版本、加载位置等信息 ,uimage魔数一般是0x27051956,很明显0x440001e0地址的数据不符合,所以加载报错。
typedef struct image_header {
    __be32        ih_magic;    /* Image Header Magic Number    */
    __be32        ih_hcrc;    /* Image Header CRC Checksum    */
    __be32        ih_time;    /* Image Creation Timestamp    */
    __be32        ih_size;    /* Image Data Size        */
    __be32        ih_load;    /* Data     Load  Address        */
    __be32        ih_ep;        /* Entry Point Address        */
    __be32        ih_dcrc;    /* Image Data CRC Checksum    */
    uint8_t        ih_os;        /* Operating System        */
    uint8_t        ih_arch;    /* CPU architecture        */
    uint8_t        ih_type;    /* Image Type            */
    uint8_t        ih_comp;    /* Compression Type        */
    uint8_t        ih_name[IH_NMLEN];    /* Image Name        */
} image_header_t;
#define IH_MAGIC    0x27051956    /* Image Magic Number        */
#define IH_NMLEN        32    /* Image Name Length        */
=> md.b 440001e0 100
440001e0: ff d7 ff ff bf fe fd f7 7f ff 7f df 5f bd ff ff    ............_...
440001f0: f6 a2 b7 f7 5f fe fe fe 77 f5 db ff 3f bf fa 76    ...._...w...?..v
44000200: fc ed ef fd 7f ff ff fd 7b ee ff ee fd 7b ff 75    ........{....{.u
44000210: 67 7d e8 bf ee ef ed a1 cd fb 63 fe 67 ee f7 9e    g}........c.g...
44000220: f3 df af f5 ea ff f7 fb 78 77 ea fd df ff ef fb    ........xw......
44000230: d3 dd e9 ff b3 3f e7 ef 76 f6 f6 ed cf b3 bd fb    .....?..v.......
44000240: bf eb 97 fb 9f ef ff ef d9 59 b9 3e 5f 3f ff 32    .........Y.>_?.2
正常情况下0x440001e0地址应该存放着kernel的uimage数据,这里不知什么原因kernel uimage未能正确加载到内存。这里尝试手动从nand flash中读取内核加载到内存中。
0x000000000000-0x000008000000 : "whole flash"
0x000000000000-0x000000200000 : "u-boot"
0x000006800000-0x000006b00000 : "parameter tags"
0x000000200000-0x000000700000 : "kernel0"
0x000000700000-0x000000c00000 : "kernel1"
0x000000c00000-0x000001400000 : "usercfg"
0x000001400000-0x000001500000 : "others"
0x000001500000-0x000001800000 : "wlan"
0x000001800000-0x000003800000 : "rootfs0"
0x000003800000-0x000005800000 : "rootfs1"
0x000005800000-0x000006000000 : "framework"
0x000006000000-0x000006800000 : "framework1"
0x000006b00000-0x000008000000 : "apps"
路由器正常启动的日志中,可以看到nand flash的13个分区,其中0x000000200000-0x000000700000 、0x000000700000-0x000000c00000存放这kernel数据,其中一个应该是做备份用。
nand dump查看nand flash中kernel分区数据,uimage从0x2001e0开始
=> nand dump 0x200000
Page 00200000 dump:
    99 99 99 99 44 44 44 44  55 55 55 55 aa aa aa aa
    00 00 00 00 00 00 00 00  00 00 00 00 00 00 00 00
    00 00 00 00 56 31 2e 30  2e 31 2e 32 32 30 33 31
    35 2e 31 37 30 39 33 33  00 00 00 00 00 00 00 00
    00 00 00 00 00 00 00 00  00 00 00 00 00 00 00 00
    01 00 00 00 00 5a 64 01  17 58 24 00 e0 01 00 00
    dc e0 50 82 00 00 3c 01  00 5a 24 00 d2 2c 67 09
    00 00 20 00 00 00 50 00  00 00 80 01 00 00 00 02
    00 00 70 00 00 00 50 00  00 00 80 03 00 00 00 02
    5a 58 49 43 20 33 36 30  54 36 47 56 32 20 55 4e
    49 20 56 31 2e 30 2e 31  2e 32 32 30 33 31 35 2e
    31 37 30 39 33 33 00 00  00 00 00 00 00 00 00 00
    00 00 00 00 00 00 00 00  00 00 00 00 00 00 00 00
    00 00 00 00 00 00 00 00  00 00 00 00 00 00 00 00
    00 00 04 00 00 5a 60 01  31 52 b8 ea 56 32 5f 56
    32 2e 00 00 00 00 00 00  00 00 00 00 00 00 00 00
    01 00 00 00 47 9b 29 1d  32 30 32 32 30 33 32 31
    31 38 32 35 32 31 00 00  00 00 00 00 ff ff ff ff
    ff ff ff ff 00 00 00 10  ff ff 01 00 56 31 2e 30
    00 00 00 00 00 00 00 00  00 00 00 00 33 36 30 54
    36 47 56 32 00 00 00 00  00 00 00 00 15 56 24 56
    5a 58 30 31 03 30 00 00  00 e0 00 02 43 57 46 57
    31 37 30 33 32 38 31 30  30 31 00 00 ff ff ff ff
    ff ff ff ff ff ff ff ff  ff ff ff ff ff ff ff ff
    ff ff ff ff ff ff ff ff  ff ff ff ff ff ff ff ff
    ff ff ff ff ff ff ff ff  ff ff ff ff ff ff ff ff
    ff ff ff ff ff ff ff ff  ff ff ff ff ff ff ff ff
    ff ff ff ff ff ff ff ff  ff ff ff ff ff ff ff ff
    ff ff ff ff ff ff ff ff  ff ff ff ff ff ff ff ff
    ff ff ff ff ff ff ff ff  ff ff ff ff ff ff ff ff
    27 05 19 56 3c 35 3b 72  62 38 52 83 00 24 57 d7
    40 00 80 00 40 00 80 00  cc 1f fd e3 05 02 02 00
    4c 69 6e 75 78 20 4b 65  72 6e 65 6c 20 49 6d 61
使用nand read将nand flash中kernel分区数据加载到内存中,addr是ram的地址,off指的是nand flash的地址, size指要读取nand flash的数据大小。
nand read - addr off|partition size

=>nand read 0x44000000 0x200000 500000
NAND read: device 0 offset 0x200000, size 0x500000
 5242880 bytes read: OK
=> md.b 0x440001e0 60
440001e0: 27 05 19 56 3c 35 3b 72 62 38 52 83 00 24 57 d7    '..V<5;rb8R..$W.
440001f0: 40 00 80 00 40 00 80 00 cc 1f fd e3 05 02 02 00    @...@...........
44000200: 4c 69 6e 75 78 20 4b 65 72 6e 65 6c 20 49 6d 61    Linux Kernel Ima
44000210: 67 65 00 00 00 00 00 00 00 00 00 00 00 00 00 00    ge..............
44000220: 00 00 a0 e1 00 00 a0 e1 00 00 a0 e1 00 00 a0 e1    ................
44000230: 00 00 a0 e1 00 00 a0 e1 00 00 a0 e1 00 00 a0 e1    ................
=> bootm 0x440001e0
## Booting kernel from Legacy Image at 440001e0 ...
   Image Name:   Linux Kernel Image
   Image Type:   ARM Linux Kernel Image (uncompressed)
   Data Size:    2381783 Bytes = 2.3 MiB
   Load Address: 40008000
   Entry Point:  40008000
   Verifying Checksum ... OK
   Loading Kernel Image ... OK
OK
----------------------
|-->setup versioninfo tag...

Starting kernel ...
再次bootm,成功启动,但是当内核尝试启动我们添加的启动参数init=/bin/sh时失败了,未能成功进入linux shell,之后又重新用了默认启动参数重启。
Set_Trap_Pkt_Pps_Limit is NULL.Set_Trap_Pkt_Pps_Limit is NULL.
VFS: Mounted root (jffs2 filesystem) on device 31:9.
Freeing unused kernel memory: 176K (c05b4000 - c05e0000)
This architecture does not have kernel memory protection.
Kernel panic - not syncing: Requested init /bin/sh; failed (error -2).
CPU: 1 PID: 1 Comm: swapper/0 Not tainted 4.1.25 #2
添加init参数未能成功启动,后面尝试修改文件系统,开启console、修改root密码,修改后的文件系统重新打包通过tftp上传到设备。
0x03.uboot tftp通信环境搭建
uboot shell 支持tftp通信功能,这里先在ubuntu 18 PC机上安装tftp服务
sudo apt install tftpd-hpa
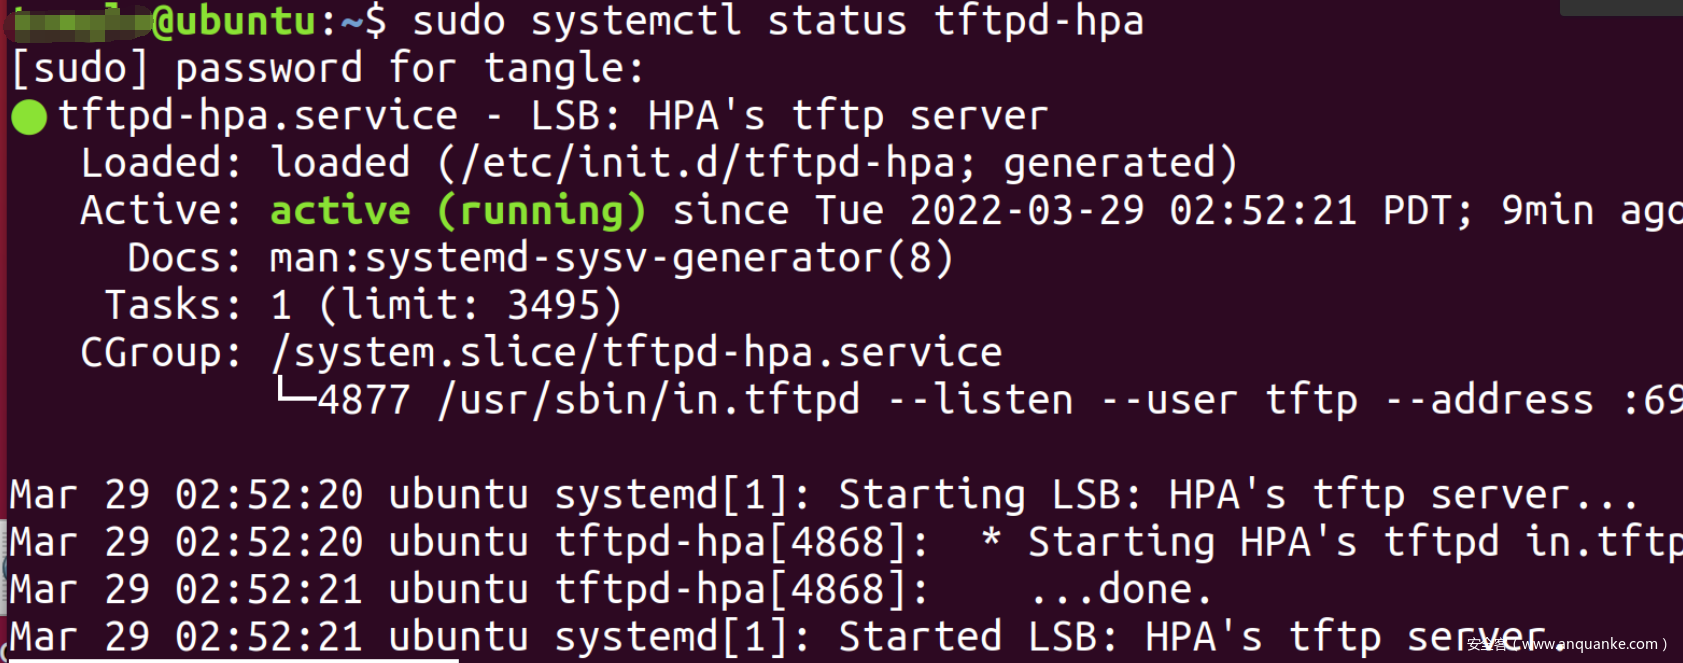
检查tftpd-hpa服务是否正在运行
sudo systemctl status tftpd-hpa
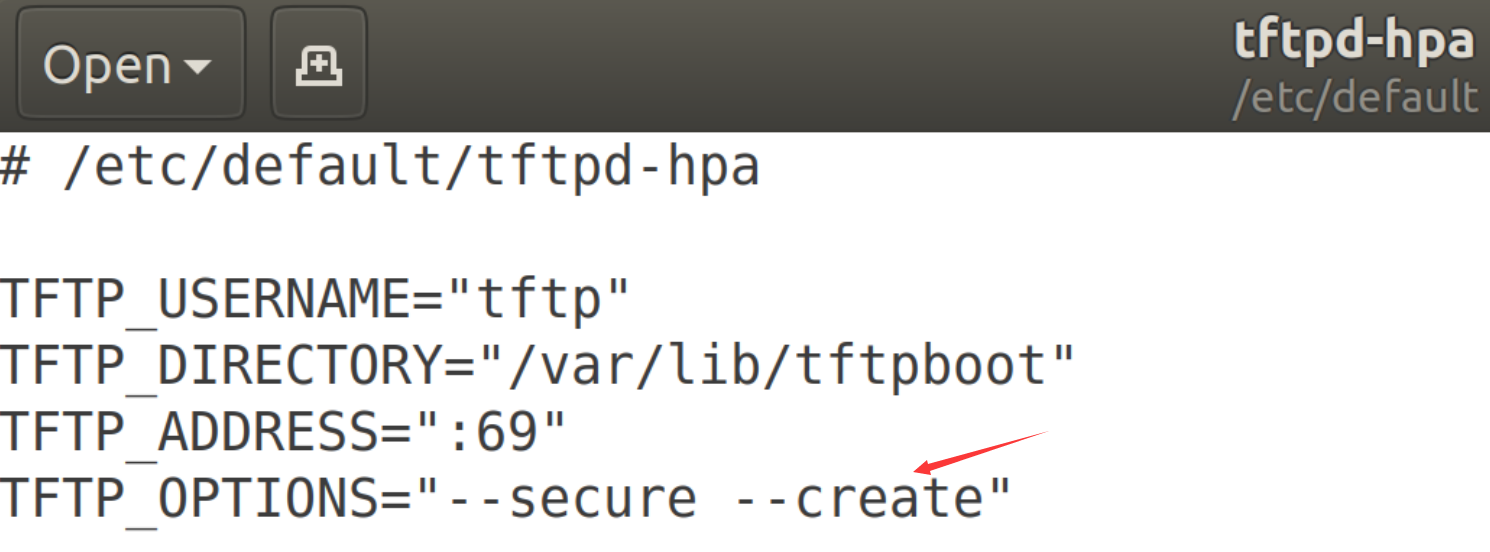
tftpd-hpa服务器的默认配置文件是/etc/default/tftpd-hpa。TFTP_DIRECTORY是TFTP服务器访问目录。
给TFTP_OPTIONS选项添加—create选项,否则无法创建新文件或将新文件上传到 TFTP 服务器。
修改/var/lib/tftpboot访问属性
chmod 777 /var/lib/tftp
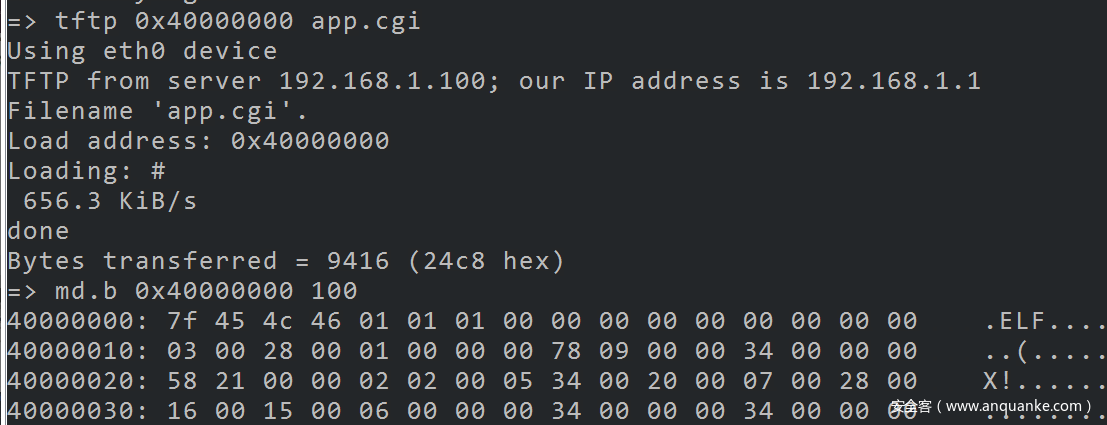
uboot shell环境变量中tftp的 serverip默认为192.168.1.100,这里我们直接将上面装有tftp服务器的ubuntu的ip地址设为192.168.1.100,
pc与路由器通过网线连接,从tftp服务器成功下载测试文件app.cgi到uboot,至此tftp通信环境已建立,下面修改文件系统上传到uboot。
0x04.修改文件系统进入linux shell
已经从网上下载到了设备固件,另外通过uboot也可以从flash的rootfs分区dump出文件系统。当前想通过修改固件开启console并修改登录密码,修改后的固件重新打包通过tftp上传到uboot,最后在刷到nand flash的文件系统分区。
前面了解到路由器正常启动时,串口日志最后打印了close console,可见根文件系统启动后直接关闭了console,导致不能通过串口登录到linux shell。解包设备固件,在程序中搜索close console字符串,发现该字符串出现在/bin/cspd程序中。
找到关闭console的代码,直接patch掉。开启console后想要登录进linux shell还需要知道用户名、密码,可以考虑直接将/etc/passwd文件中root用户密码字段置空,后面登录时直接输入用户名root即可登录。
从上面的环境变量信息可以知道设备使用的是jffs2文件系统,将上面修改后的文件重新打包为jffs2格式,打包后的文件系统通过tftp下载到uboot,此时文件系统还只是在RAM中,断电或者重启后数据就会丢失,所以后面还需要将RAM中的文件系统数据用nand write命令写入到nand flash的文件系统分区。
mkfs.jffs2 -d ./fs_1/ -l -e 0x20000 -o jffs2.img --no-cleanmarkers
通过上面步骤将修改后的文件系统刷入 nand flash文件系统分区后,重启设备,成功开启console,进入linux shell。
0x05.telnet server 移植
上面通过修改文件系统实现了从本地console进入到linux shell。设备默认没有telnet服务,为了方便后续管理设备,考虑移植个telnet server到设备中。
查看固件中程序信息,发现程序是使用buildroot编译,所以尝试使用Buidroot 2017.05编译一个带有telnetd的busybox移植到设备。
objdump -s --section=.comment Simulator
https://buildroot.org/downloads/ 下载buildroot 2017.05版本
make menuconfig
进入编译配置界面
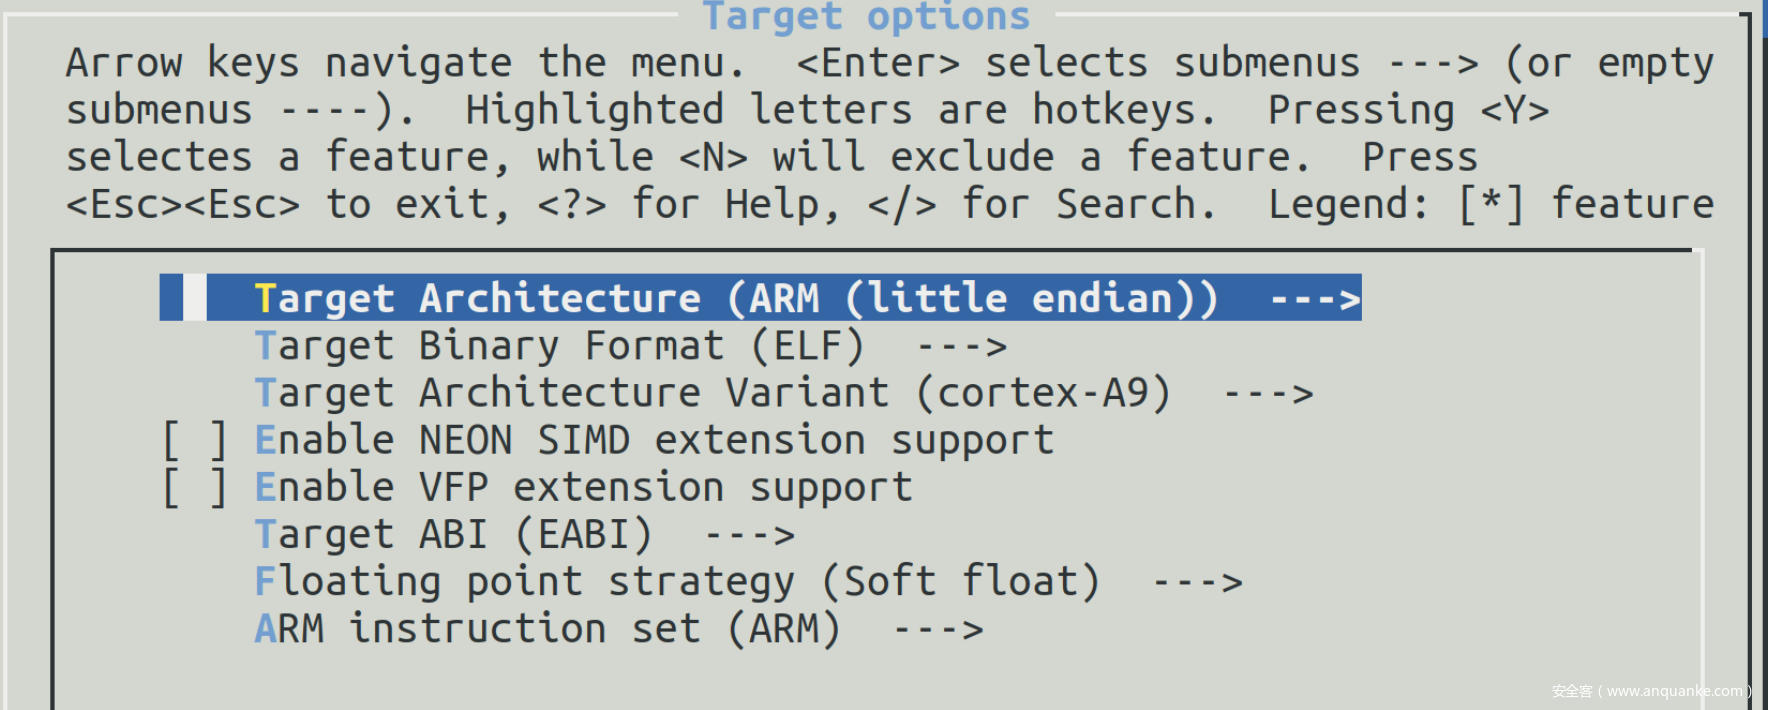
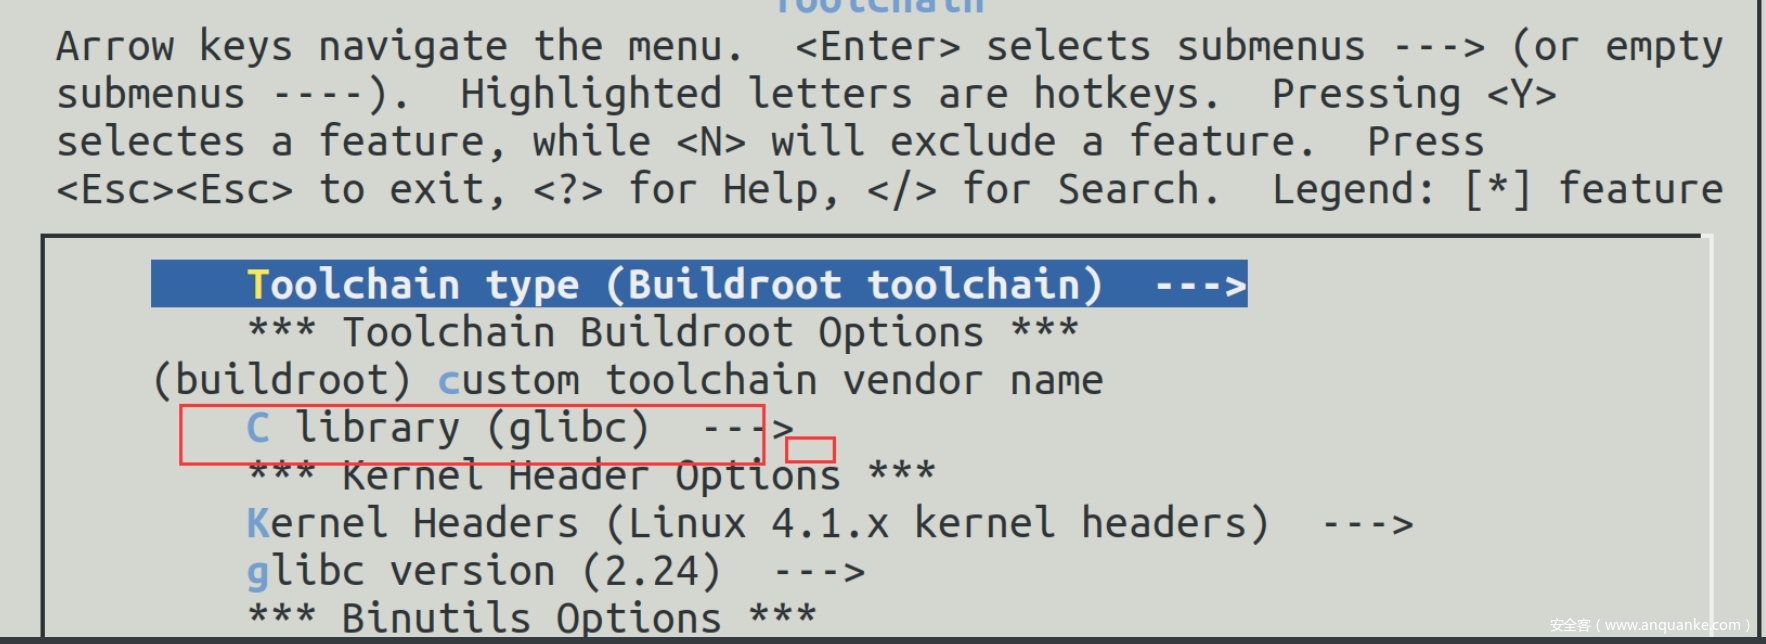
配置界面选项主要根据下图固件中文件的信息,ARM 、ELF32、LSB、EABI5 等配置,ld-linux.so.3说明用的是glibc库 。
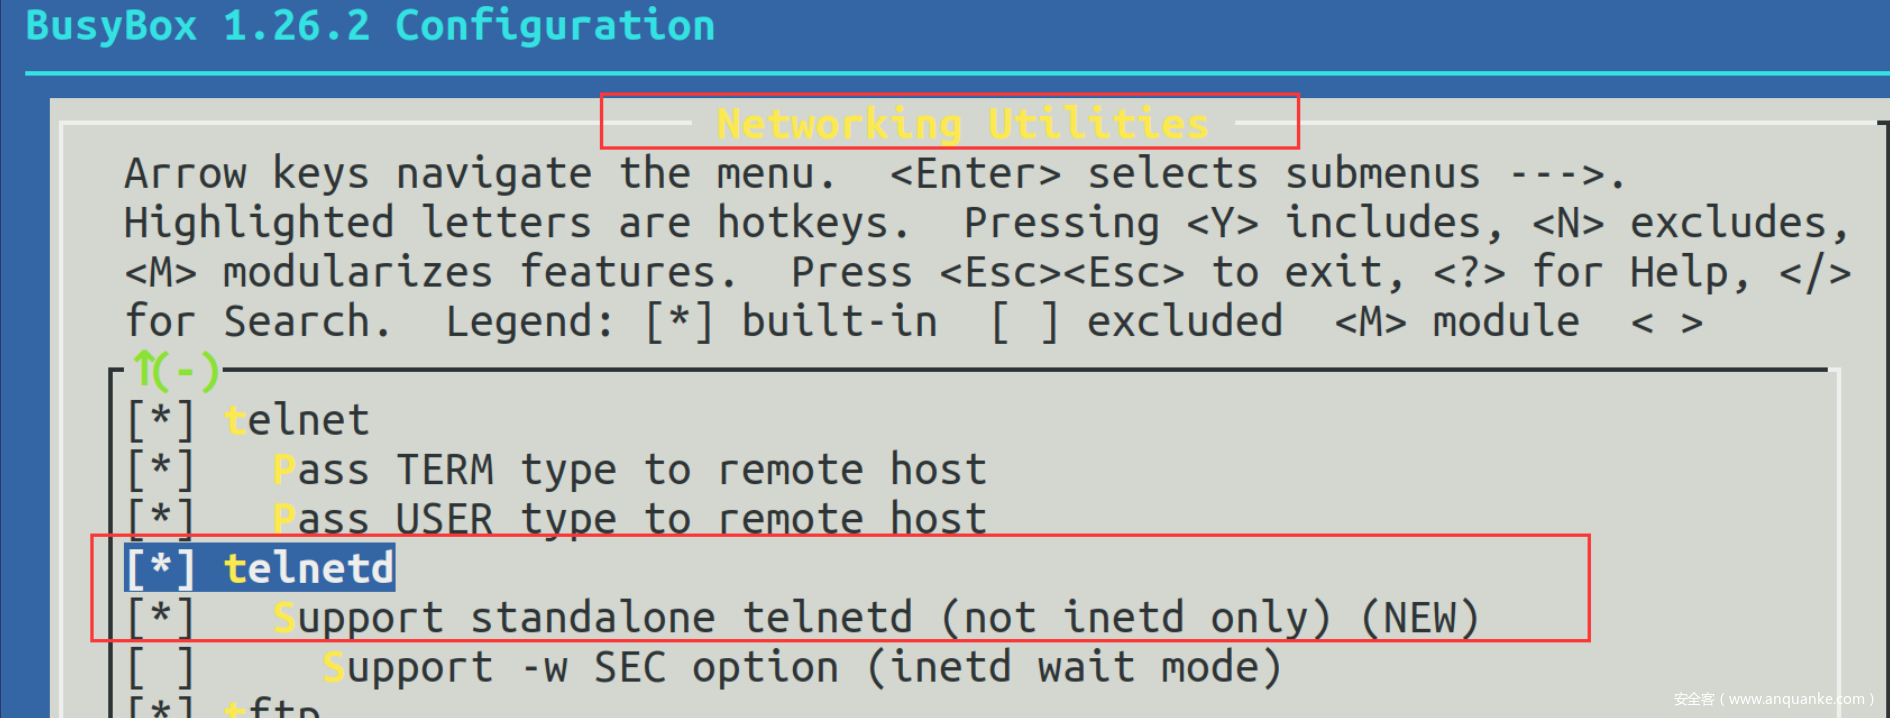
接着设置busybox相关选项,添加telnetd
make busybox-menuconfig
以上设置完成后执行make进行编译,编译完成后在当前目录会生成output文件夹,编译好的busybox在output文件夹中,生成的telnetd是链接到busybox的,所以这里直接将生成的busybox移植到路由器即可。将编译的busybox复制到固件文件系统/bin目录并重命名为busybox2
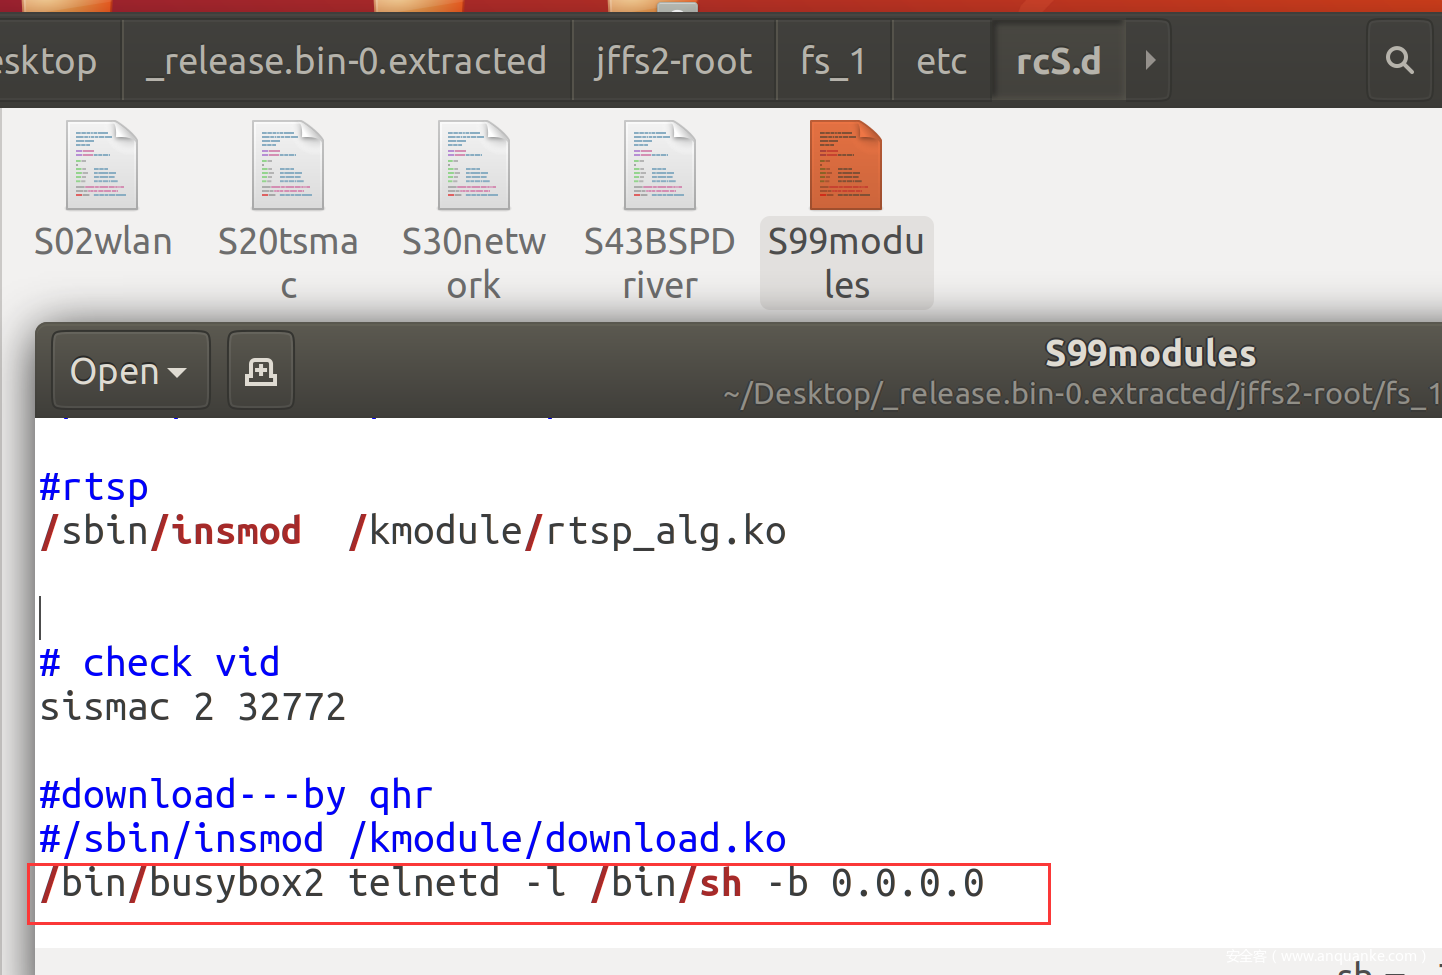
在路由器文件系统自启动目录/etc/rcS.d下找个文件,加入busybox2 telnetd的启动命令
上面修改完成后,重新将文件打包成jffs2文件系统,然后通过tftp下载到uboot,最后nand write写入到nand flash文件系统,重启设备,telnet服务会自动启动,通过telnet客户端成功连接到路由器,后续动态调试移植gdbserver也可使用类似方法。
0x06.总结
通过uart打断uboot进入uboot shell,给内核启动参数添加init未能成功启动;根据启动日志搜索关键字符串定位到关闭console的程序,patch二进制程序开启console,修改root密码,将修改后的文件重新打包通过tftp下载到uboot中,最后使用nand write写入到nand flash文件系统分区,实现从本地console进入到linux shell。最后使用Buidroot编译一个带有telnetd的busybox移植到设备,实现telnet登录到设备。










发表评论
您还未登录,请先登录。
登录