原始的BPF汇编
https://www.kernel.org/doc/html/latest/networking/filter.html#networking-filter
原始的BPF又称之为class BPF(cBPF), BPF与eBPF类似于i386与amd64的关系, 最初的BPF只能用于套接字的过滤,内核源码树中tools/bpf/bpf_asm可以用于编写这种原始的BPF程序,
cBPF架构的基本元素如下
| 元素 | 描述 |
|---|---|
| A | 32bit宽的累加器 |
| X | 32bit宽的X寄存器 |
| M[] | 16*32位宽的杂项寄存器寄存器, 又称为临时寄存器, 可寻找范围:0~15<br />类似于一个int32_t M[16];的小内存<br /> |
cBPF汇编的一条指令为64字节, 在头文件<linux/filter.h>中有定义 . 如下. 这种结构被组装为一个 4 元组数组,其中包含code、jt、jf 和 k 值. jt 和 jf 是用于提供代码的跳转偏移量, k为通用值
struct sock_filter {    /* Filter block */
        __u16   code;   /* 16位宽的操作码 */
        __u8    jt;     /* 如果条件为真时的8位宽的跳转偏移  */
        __u8    jf;     /* 如果条件为假时的8位宽的跳转偏移 */
        __u32   k;      /* 杂项参数 */
};
对于套接字过滤,把struct sock_filter数组的指针通过setsockopt(2) 传递给内核。例子:
#include <sys/socket.h>
#include <sys/types.h>
#include <arpa/inet.h>
#include <linux/if_ether.h>
/* ... */

/* From the example above: tcpdump -i em1 port 22 -dd */
struct sock_filter code[] = {
        { 0x28,  0,  0, 0x0000000c },
        { 0x15,  0,  8, 0x000086dd },
        { 0x30,  0,  0, 0x00000014 },
        { 0x15,  2,  0, 0x00000084 },
        { 0x15,  1,  0, 0x00000006 },
        { 0x15,  0, 17, 0x00000011 },
        { 0x28,  0,  0, 0x00000036 },
        { 0x15, 14,  0, 0x00000016 },
        { 0x28,  0,  0, 0x00000038 },
        { 0x15, 12, 13, 0x00000016 },
        { 0x15,  0, 12, 0x00000800 },
        { 0x30,  0,  0, 0x00000017 },
        { 0x15,  2,  0, 0x00000084 },
        { 0x15,  1,  0, 0x00000006 },
        { 0x15,  0,  8, 0x00000011 },
        { 0x28,  0,  0, 0x00000014 },
        { 0x45,  6,  0, 0x00001fff },
        { 0xb1,  0,  0, 0x0000000e },
        { 0x48,  0,  0, 0x0000000e },
        { 0x15,  2,  0, 0x00000016 },
        { 0x48,  0,  0, 0x00000010 },
        { 0x15,  0,  1, 0x00000016 },
        { 0x06,  0,  0, 0x0000ffff },
        { 0x06,  0,  0, 0x00000000 },
};

struct sock_fprog bpf = {
        .len = ARRAY_SIZE(code),
        .filter = code,
};

sock = socket(PF_PACKET, SOCK_RAW, htons(ETH_P_ALL));    //建立套接字
if (sock < 0)
        /* ... bail out ... */

ret = setsockopt(sock, SOL_SOCKET, SO_ATTACH_FILTER, &bpf, sizeof(bpf)); //把bpf程序附加到套接字上
if (ret < 0)
        /* ... bail out ... */

/* ... */
close(sock);
由于性能有限, 因此后面cBPF由发展成为eBPF, 有新的指令和架构. 原始的BPF指令会被自动翻译为新的eBPF指令
eBPF虚拟机
eBPF虚拟机是一个RISC指令, 带有寄存器的虚拟机, 内部有11个64位寄存器, 一个程序计数器(PC), 以及一个512字节的固定大小的栈. 9个通用寄存器可以读写, 一个是只能读的栈指针寄存器(SP), 以及一个隐含的程序计数器, 我们只能根据PC进行固定偏移的跳转. 虚拟机寄存器总是64位的(就算是32位物理机也是这样的), 并且支持32位子寄存器寻址(寄存器高32位自动设置为0)
-
r0: 保存函数调用和当前程序退出的返回值 -
r1~r5: 作为函数调用参数, 当程序开始运行时,r1包含一个指向context参数的指针 -
r6~r9: 在内核函数调用之间得到保留 -
r10: 只读的指向512字节栈的栈指针
加载BPF程序时提供的的程序类型(prog_type)决定了内核里面哪些函数子集可以调用, 也决定了程序启动时通过r1提供的context参数. r0中保存的返回值含义也由程序类型决定.
对于eBPF到eBPF, eBPF到内核, 每个函数调用最多5个参数, 保存在寄存器r1~r5中. 并且传递参数时, 寄存器r1~r5只能保存常数或者指向堆栈的指针, 不能是任意内存的指针. 所有的内存访问必须先把数据加载到eBPF堆栈中, 然后才能使用. 这样的限制简化内存模型, 帮助eBPF验证器进行正确性检查
BPF可以访问内核核心提供(除去模块扩展的部分)的内核助手函数, 类似于系统调用, 这些助手函数在内核中通过BPF_CALL_*宏进行定义. bpf.h文件提供了所有BPF能访问的内核助手函数的声明.
以bpf_trace_printk为例子, 这个函数在内核中通过BPF_CALL_5进行定义, 并且有5对类型与参数名, 定义参数的类型对于eBPF很重要, 因为每一个eBPF程序加载时eBPF验证器都要确保寄存器数据类型与被调用函数的参数类型匹配.
BPF_CALL_5(bpf_trace_printk, char *, fmt, u32, fmt_size, u64, arg1, u64, arg2, u64, arg3)
{
    ...
}
这样设计是为了让虚拟机指令与原生的指令集(x86 arm)尽可能匹配, 这样JIT编译出的指令可以更简单高效, 所有寄存器都一对一地映射到硬件寄存器。例如,x86_64 JIT 编译器可以将它们映射为
R0 - rax
R1 - rdi
R2 - rsi
R3 - rdx
R4 - rcx
R5 - r8
R6 - rbx
R7 - r13
R8 - r14
R9 - r15
R10 - rbp
eBPF指令编码
每个eBPF指令都是固定的8字节, 大概有100条指令, 被划分为8个类型. 虚拟机支持从通用内存(映射, 栈, contexts比如数据包, ..)中进行1-8字节的读写, 支持前后有无条件的跳转, 支持数据与逻辑操作(ALU指令), 支持函数调用.
一个eBPF程序就是64位指令的序列, 所有的eBPF指令都有同样的基础格式:
- 8bit操作码
- 4bit目标寄存器
- 4bit源寄存器
- 16bit偏移
- 32bit立即数
msb最高bit                                                    lsb最低bit
+------------------------+----------------+----+----+--------+
|immediate               |offset          |src |dst |opcode  |
+------------------------+----------------+----+----+--------+
|       32               |    16          | 4  | 4  |    8   |
大多数指令并不会使用全部的区域, 不使用的区域应该设置为0
操作码的最低3bit表示指令类别, 这个把相关的操作码组合在一起
LD/LDX/ST/STX操作码有如下结构
msb      lsb
+---+--+---+
|mde|sz|cls|
+---+--+---+
| 3 |2 | 3 |
sz区域表示目标内存区域的大小, mde区域是内存访问模式, uBPF只支持通用MEM访问模式
ALU/ALU64/JMP操作码的结构
msb      lsb
+----+-+---+
|op  |s|cls|
+----+-+---+
| 4  |1| 3 |
如果s是0, 那么源操作数就是imm, 如果s是1, 那么源操作数就是src. op部分指明要执行哪一个ALU或者分支操作
bpf.h中使用struct bpf_insn来描述一个eBPF指令, 其定义与上文是一致的. 因此一段eBPF程序也可以用一个struct bpf_insn数组来描述
struct bpf_insn {
    __u8    code;        /* 操作码 opcode */
    __u8    dst_reg:4;    /* 目标寄存器 dest register */
    __u8    src_reg:4;    /* 源寄存器 source register */
    __s16    off;        /* 有符号的偏移 signed offset */
    __s32    imm;        /* 有符号的立即数 signed immediate constant */
};
ALU指令: 64-bit
操作对象为64位
| 操作码 | 助记符 | 伪代码 |
|---|---|---|
| 0x07 | add dst, imm | dst += imm |
| 0x0f | add dst, src | dst += src |
| 0x17 | sub dst, imm | dst -= imm |
| 0x1f | sub dst, src | dst -= src |
| 0x27 | mul dst, imm | dst *= imm |
| 0x2f | mul dst, src | dst *= src |
| 0x37 | div dst, imm | dst /= imm |
| 0x3f | div dst, src | dst /= src |
| 0x47 | or dst, imm | dst |
| 0x4f | or dst, src | dst |
| 0x57 | and dst, imm | dst &= imm |
| 0x5f | and dst, src | dst &= src |
| 0x67 | lsh dst, imm | dst <<= imm |
| 0x6f | lsh dst, src | dst <<= src |
| 0x77 | rsh dst, imm | dst >>= imm (logical) |
| 0x7f | rsh dst, src | dst >>= src (logical) |
| 0x87 | neg dst | dst = -dst |
| 0x97 | mod dst, imm | dst %= imm |
| 0x9f | mod dst, src | dst %= src |
| 0xa7 | xor dst, imm | dst ^= imm |
| 0xaf | xor dst, src | dst ^= src |
| 0xb7 | mov dst, imm | dst = imm |
| 0xbf | mov dst, src | dst = src |
| 0xc7 | arsh dst, imm | dst >>= imm (arithmetic) |
| 0xcf | arsh dst, src | dst >>= src (arithmetic) |
ALU指令:32-bit
这些操作码只使用了他们操作数的低32位, 并且用0初始化目标寄存器的高32位(操作对象是32位)
| 操作码 | 助记符 | 伪代码 |
|---|---|---|
| 0x04 | add32 dst, imm | dst += imm |
| 0x0c | add32 dst, src | dst += src |
| 0x14 | sub32 dst, imm | dst -= imm |
| 0x1c | sub32 dst, src | dst -= src |
| 0x24 | mul32 dst, imm | dst *= imm |
| 0x2c | mul32 dst, src | dst *= src |
| 0x34 | div32 dst, imm | dst /= imm |
| 0x3c | div32 dst, src | dst /= src |
| 0x44 | or32 dst, imm | dst |
| 0x4c | or32 dst, src | dst |
| 0x54 | and32 dst, imm | dst &= imm |
| 0x5c | and32 dst, src | dst &= src |
| 0x64 | lsh32 dst, imm | dst <<= imm |
| 0x6c | lsh32 dst, src | dst <<= src |
| 0x74 | rsh32 dst, imm | dst >>= imm (logical) |
| 0x7c | rsh32 dst, src | dst >>= src (logical) |
| 0x84 | neg32 dst | dst = -dst |
| 0x94 | mod32 dst, imm | dst %= imm |
| 0x9c | mod32 dst, src | dst %= src |
| 0xa4 | xor32 dst, imm | dst ^= imm |
| 0xac | xor32 dst, src | dst ^= src |
| 0xb4 | mov32 dst, imm | dst = imm |
| 0xbc | mov32 dst, src | dst = src |
| 0xc4 | arsh32 dst, imm | dst >>= imm (arithmetic) |
| 0xcc | arsh32 dst, src | dst >>= src (arithmetic) |
字节交换指令
| 操作码 | 助记符 | 伪代码 |
|---|---|---|
| 0xd4 (imm == 16) | le16 dst | dst = htole16(dst) |
| 0xd4 (imm == 32) | le32 dst | dst = htole32(dst) |
| 0xd4 (imm == 64) | le64 dst | dst = htole64(dst) |
| 0xdc (imm == 16) | be16 dst | dst = htobe16(dst) |
| 0xdc (imm == 32) | be32 dst | dst = htobe32(dst) |
| 0xdc (imm == 64) | be64 dst | dst = htobe64(dst) |
内存指令
| 操作码 | 助记符 | 伪代码 |
|---|---|---|
| 0x18 | lddw dst, imm | dst = imm |
| 0x20 | ldabsw src, dst, imm | See kernel documentation |
| 0x28 | ldabsh src, dst, imm | … |
| 0x30 | ldabsb src, dst, imm | … |
| 0x38 | ldabsdw src, dst, imm | … |
| 0x40 | ldindw src, dst, imm | … |
| 0x48 | ldindh src, dst, imm | … |
| 0x50 | ldindb src, dst, imm | … |
| 0x58 | ldinddw src, dst, imm | … |
| 0x61 | ldxw dst, [src+off] | dst = (uint32_t ) (src + off) |
| 0x69 | ldxh dst, [src+off] | dst = (uint16_t ) (src + off) |
| 0x71 | ldxb dst, [src+off] | dst = (uint8_t ) (src + off) |
| 0x79 | ldxdw dst, [src+off] | dst = (uint64_t ) (src + off) |
| 0x62 | stw [dst+off], imm | (uint32_t ) (dst + off) = imm |
| 0x6a | sth [dst+off], imm | (uint16_t ) (dst + off) = imm |
| 0x72 | stb [dst+off], imm | (uint8_t ) (dst + off) = imm |
| 0x7a | stdw [dst+off], imm | (uint64_t ) (dst + off) = imm |
| 0x63 | stxw [dst+off], src | (uint32_t ) (dst + off) = src |
| 0x6b | stxh [dst+off], src | (uint16_t ) (dst + off) = src |
| 0x73 | stxb [dst+off], src | (uint8_t ) (dst + off) = src |
| 0x7b | stxdw [dst+off], src | (uint64_t ) (dst + off) = src |
分支指令
| 操作码 | 助记符 | 伪代码 |
|---|---|---|
| 0x05 | ja +off | PC += off |
| 0x15 | jeq dst, imm, +off | PC += off if dst == imm |
| 0x1d | jeq dst, src, +off | PC += off if dst == src |
| 0x25 | jgt dst, imm, +off | PC += off if dst > imm |
| 0x2d | jgt dst, src, +off | PC += off if dst > src |
| 0x35 | jge dst, imm, +off | PC += off if dst >= imm |
| 0x3d | jge dst, src, +off | PC += off if dst >= src |
| 0xa5 | jlt dst, imm, +off | PC += off if dst < imm |
| 0xad | jlt dst, src, +off | PC += off if dst < src |
| 0xb5 | jle dst, imm, +off | PC += off if dst <= imm |
| 0xbd | jle dst, src, +off | PC += off if dst <= src |
| 0x45 | jset dst, imm, +off | PC += off if dst & imm |
| 0x4d | jset dst, src, +off | PC += off if dst & src |
| 0x55 | jne dst, imm, +off | PC += off if dst != imm |
| 0x5d | jne dst, src, +off | PC += off if dst != src |
| 0x65 | jsgt dst, imm, +off | PC += off if dst > imm (signed) |
| 0x6d | jsgt dst, src, +off | PC += off if dst > src (signed) |
| 0x75 | jsge dst, imm, +off | PC += off if dst >= imm (signed) |
| 0x7d | jsge dst, src, +off | PC += off if dst >= src (signed) |
| 0xc5 | jslt dst, imm, +off | PC += off if dst < imm (signed) |
| 0xcd | jslt dst, src, +off | PC += off if dst < src (signed) |
| 0xd5 | jsle dst, imm, +off | PC += off if dst <= imm (signed) |
| 0xdd | jsle dst, src, +off | PC += off if dst <= src (signed) |
| 0x85 | call imm | Function call |
| 0x95 | exit | return r0 |
https://github.com/iovisor/bpf-docs/blob/master/eBPF.md
汇编编写eBPF程序
根据上表我们可以直接写eBPF字节码
struct bpf_insn bpf_prog[] = {
    { 0xb7, 0, 0, 0, 0x123 },   // mov r0, 0x123
    { 0xb7, 1, 0, 0, 0x456 },   // mov r1, 0x456
    { 0x0F, 0, 1, 0, 0 },       // add r0, r1
    { 0x95, 0, 0, 0, 0x0 },     // exit
};
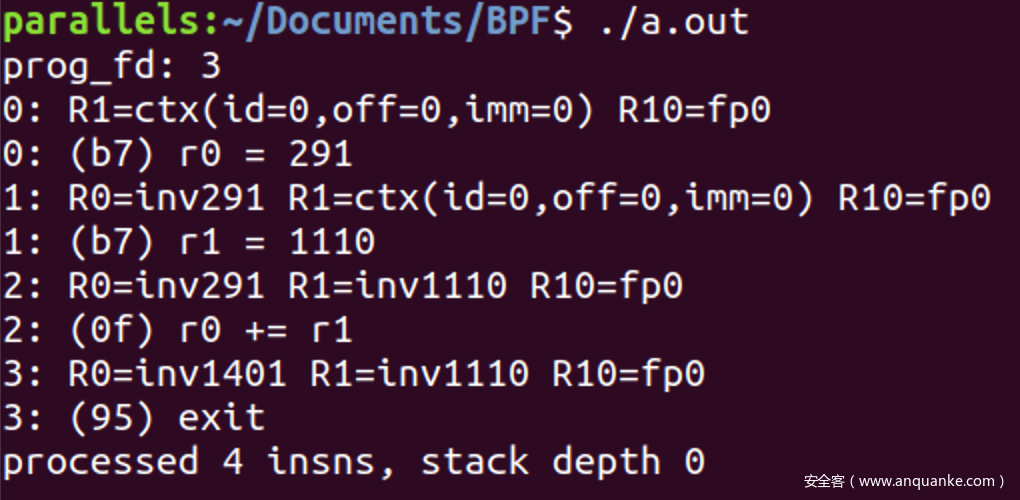
利用上一章说过的方法加载BPF程序, 验证器输出的日志如下, 表示已经接受了此程序
用字节码很不直观, 我们可以通过对初始化struct bpf_insn进行一个包裹, 以方便编写, 不明白的话可以对照上面的指令编码
首先进行指令类型sc的定义, 表示指令属于那个大类
#define BPF_CLASS(code) ((code) & 0x07) //指令种类为指令操作码的低3bit
#define BPF_ALU64    0x07    /* 操作64位对象的ALU指令种类 */
#define    BPF_JMP        0x05  //跳转指令类别
接着进行操作码op部分的定义, 这部分表示具体是哪个操作码, 也就是指令要干什么
#define BPF_OP(code)    ((code) & 0xf0)  //操作数为操作码的高4bit
#define BPF_MOV        0xb0    /* 把寄存器移动到寄存器 */
#define    BPF_ADD        0x00     //加法操作
#define BPF_EXIT    0x90    /* 从函数中返回 */
对于ALU与JMP指令的操作码, 还有1bit的s需要定义, 表示操作的来源
#define BPF_SRC(code)   ((code) & 0x08)    //只占用第4bit一个bit
#define        BPF_K        0x00    //源操作数是立即数, 立即数的值在imm中表示
#define        BPF_X        0x08    //源操作数是寄存器,具体是哪一个寄存器在src字段表示
下一步对于寄存器进行定义, 就是用枚举类型对r0~r10从0~10进行编码
enum {
    BPF_REG_0 = 0,
    BPF_REG_1,
    BPF_REG_2,
    BPF_REG_3,
    BPF_REG_4,
    BPF_REG_5,
    BPF_REG_6,
    BPF_REG_7,
    BPF_REG_8,
    BPF_REG_9,
    BPF_REG_10,
    __MAX_BPF_REG,
};
基本元素都有了之后就可组合为表示指令的宏
/*
    给寄存器赋值, mov DST, IMM
    操作码: BPF_ALU64 | BPF_MOV表示要进行赋值操作, BPF_K表示要源是立即数IMM
*/
#define BPF_MOV64_IMM(DST, IMM)                    \
    ((struct bpf_insn) {                    \
        .code  = BPF_ALU64 | BPF_MOV | BPF_K,        \
        .dst_reg = DST,                    \
        .src_reg = 0,                    \
        .off   = 0,                    \
        .imm   = IMM })


/*
    两个寄存器之间的ALU运算指令: OP DST, SRC;
    OP可以是加减乘除..., DST SRC表示是那个寄存器
    操作码: BPF_ALU64|BPF_OP(OP)表示执行什么ALU64操作, BPF_X表示源操作数是寄存器
*/
#define BPF_ALU64_REG(OP, DST, SRC)                \
    ((struct bpf_insn) {                    \
        .code  = BPF_ALU64 | BPF_OP(OP) | BPF_X,    \
        .dst_reg = DST,                    \
        .src_reg = SRC,                    \
        .off   = 0,                    \
        .imm   = 0 })

/*
    退出指令: exit
    操作码: BPF_JMP|BPF_EXIT表示要进行跳转指令类比中的退出指令
*/
#define BPF_EXIT_INSN()                        \
    ((struct bpf_insn) {                    \
        .code  = BPF_JMP | BPF_EXIT,            \
        .dst_reg = 0,                    \
        .src_reg = 0,                    \
        .off   = 0,                    \
        .imm   = 0 })
借用以上宏定义, 我们可以不用令人困惑的常数重新编写这个eBPF程序, 效果与之前一样
    struct bpf_insn bpf_prog[] = {
        BPF_MOV64_IMM(BPF_REG_0, 0x123),                 //{ 0xb7, 0, 0, 0, 0x123 },  mov r0, 0x123
        BPF_MOV64_IMM(BPF_REG_1, 0x456),                 //{ 0xb7, 1, 0, 0, 0x456 },  mov r1, 0x456
        BPF_ALU64_REG(BPF_ADD, BPF_REG_0, BPF_REG_1),    //{ 0x0F, 0, 1, 0, 0 }, add r0, r1
        BPF_EXIT_INSN()                                  //{ 0x95, 0, 0, 0, 0x0 } exit
    };
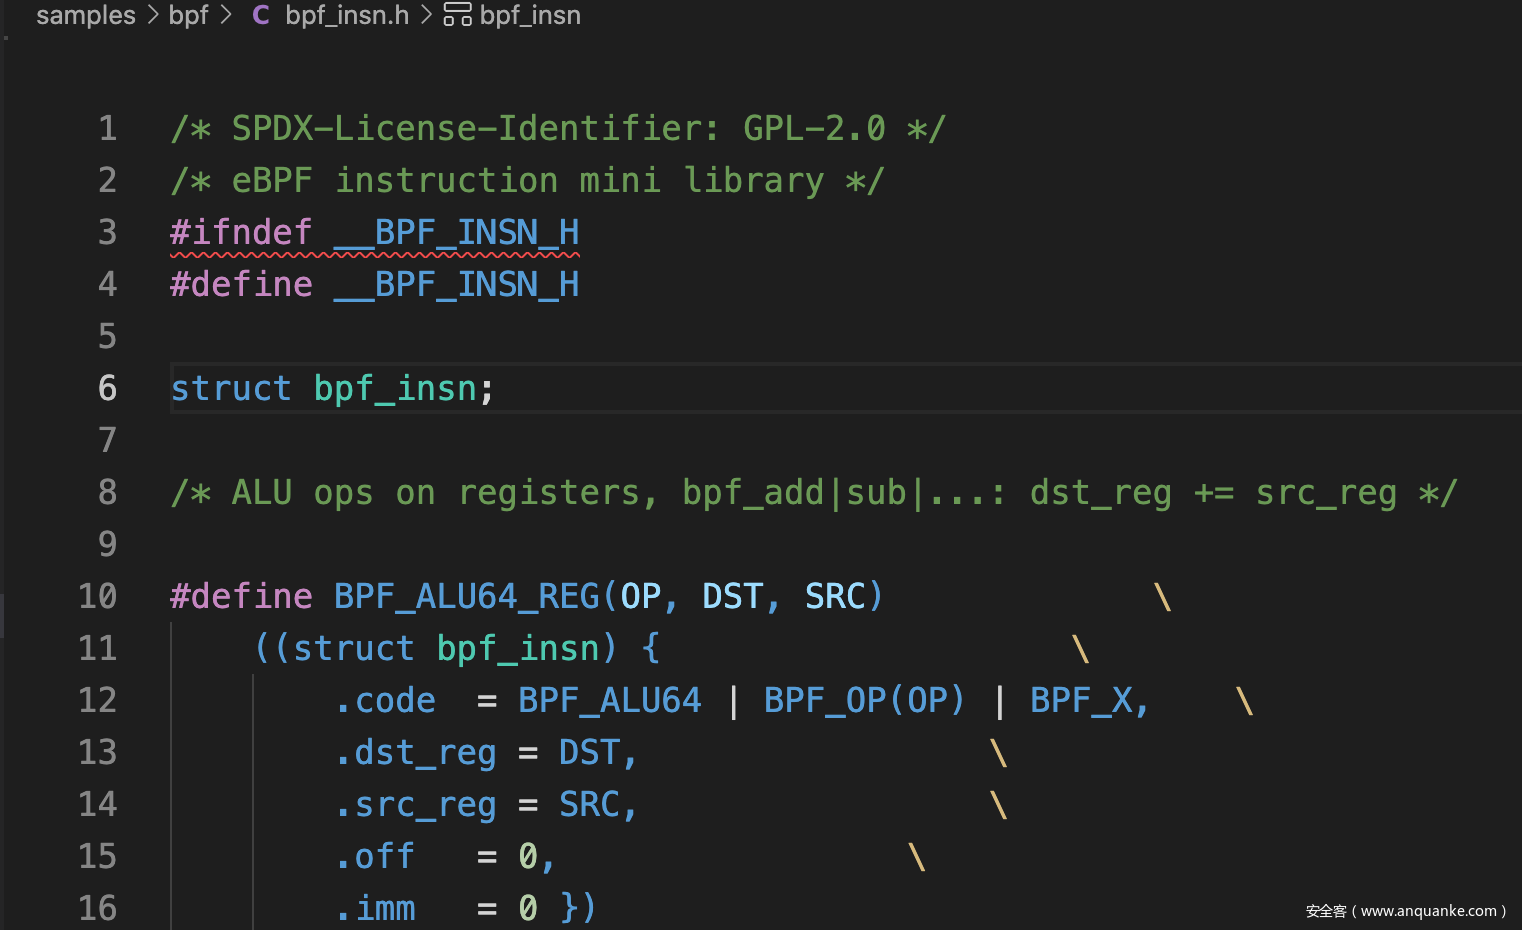
实际上, 在#include <linux/bpf.h>中含有指令操作码等常数的定义, 在内核的源码目录samples/bpf/bpf_insn.h就含有上述指令的宏定义, 而且更全面, 我们只要把此文件与源码放在同一目录, 然后#include "./bpf_insn.h"就可以直接使用这些宏来定义eBPF指令的字节码
C编写eBPF指令
还是一样的程序, 我们换成C写, 由于gcc不支持编译BPF程序, 因此要用clang或者llvm来编译, -target bpf表示编译为eBPF字节码, -c表示编译为目标文件即可, 因为eBPF是没有入口点的, 没法编译为可执行文件. 转换过程: C---llvm--->eBPF---JIT--->本机指令
//clang -target bpf -c ./prog.c -o ./prog.o
unsigned long prog(void){
    unsigned long a=0x123;
    unsigned long b=0x456;
    return a+b;
}
编译出来的目标文件是ELF格式, 通过readelf可以看到最终编译出的字节码
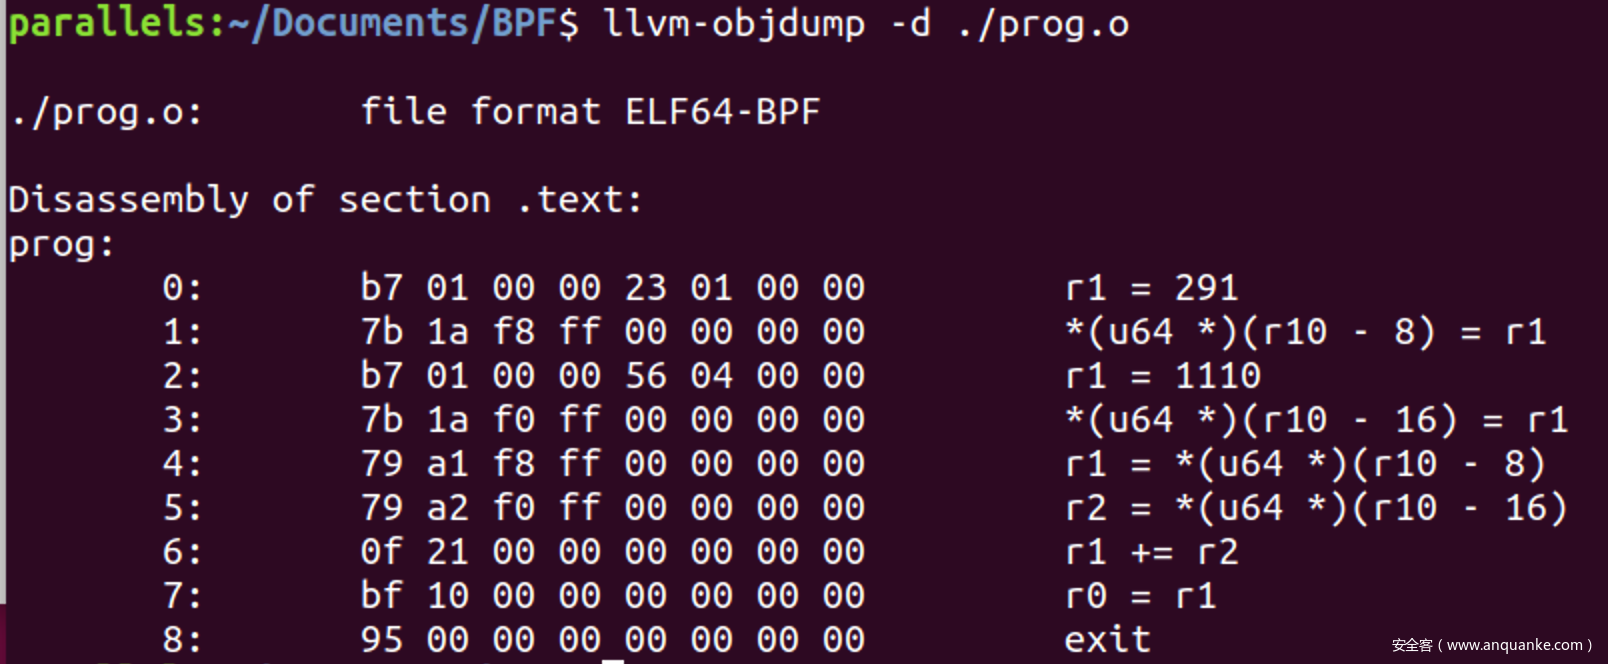
objdump不支持反汇编eBPF, 可以使用llvm-objdump对字节码进行反编译, r10是栈指针, *(u32 *)(r10-4) = r1是在向栈中写入局部变量, 整体结构与之前用汇编写的类似
如果想要执行eBPF字节码的话需要先从ELF格式的目标文件中提取.text段, 利用llvm-objcopy可以做到
如何从elf中提取指定段https://stackoverflow.com/questions/3925075/how-to-extract-only-the-raw-contents-of-an-elf-section
之后编写一个加载器负责从prog.text中读入字节码, 放入缓冲区中, 然后使用BPF_PROG_LOAD命令进行bpf系统调用, 从而把字节码注入内核, 加载器代码如下, 整体与之前类似. 不明白的可以看前一篇文章
//gcc ./loader.c -o loader
#include <stdio.h>
#include <stdlib.h>  //为了exit()函数
#include <stdint.h>    //为了uint64_t等标准类型的定义
#include <errno.h>    //为了错误处理
#include <linux/bpf.h>    //位于/usr/include/linux/bpf.h, 包含BPF系统调用的一些常量, 以及一些结构体的定义
#include <sys/syscall.h>    //为了syscall()

//类型转换, 减少warning, 也可以不要
#define ptr_to_u64(x) ((uint64_t)x)

//对于系统调用的包装, __NR_bpf就是bpf对应的系统调用号, 一切BPF相关操作都通过这个系统调用与内核交互
int bpf(enum bpf_cmd cmd, union bpf_attr *attr, unsigned int size)
{
    return syscall(__NR_bpf, cmd, attr, size);
}

//用于保存BPF验证器的输出日志
#define LOG_BUF_SIZE 0x1000
char bpf_log_buf[LOG_BUF_SIZE];

//通过系统调用, 向内核加载一段BPF指令
int bpf_prog_load(enum bpf_prog_type type, const struct bpf_insn* insns, int insn_cnt, const char* license)
{
    union bpf_attr attr = {
        .prog_type = type,        //程序类型
        .insns = ptr_to_u64(insns),    //指向指令数组的指针
        .insn_cnt = insn_cnt,    //有多少条指令
        .license = ptr_to_u64(license),    //指向整数字符串的指针
        .log_buf = ptr_to_u64(bpf_log_buf),    //log输出缓冲区
        .log_size = LOG_BUF_SIZE,    //log缓冲区大小
        .log_level = 2,    //log等级
    };

    return bpf(BPF_PROG_LOAD, &attr, sizeof(attr));
}

//BPF程序就是一个bpf_insn数组, 一个struct bpf_insn代表一条bpf指令
struct bpf_insn bpf_prog[0x100];

int main(int argc, char **argv){
    //用法 loader <保存字节码的文件> <字节码长度, 字节为单位>

    //读入文件中的内容到bpf_prog数组中
    int text_len = atoi(argv[2]);
    int file = open(argv[1], O_RDONLY);
    if(read(file, (void *)bpf_prog, text_len)<0){
        perror("read prog fail");
        exit(-1);
    }
    close(file);

    //加载执行
    int prog_fd = bpf_prog_load(BPF_PROG_TYPE_SOCKET_FILTER, bpf_prog, text_len/sizeof(bpf_prog[0]), "GPL");
    if(prog_fd<0){
        perror("BPF load prog");
        exit(-1);
    }
    printf("prog_fd: %d\n", prog_fd);
    printf("%s\n", bpf_log_buf);    //输出程序日志
}
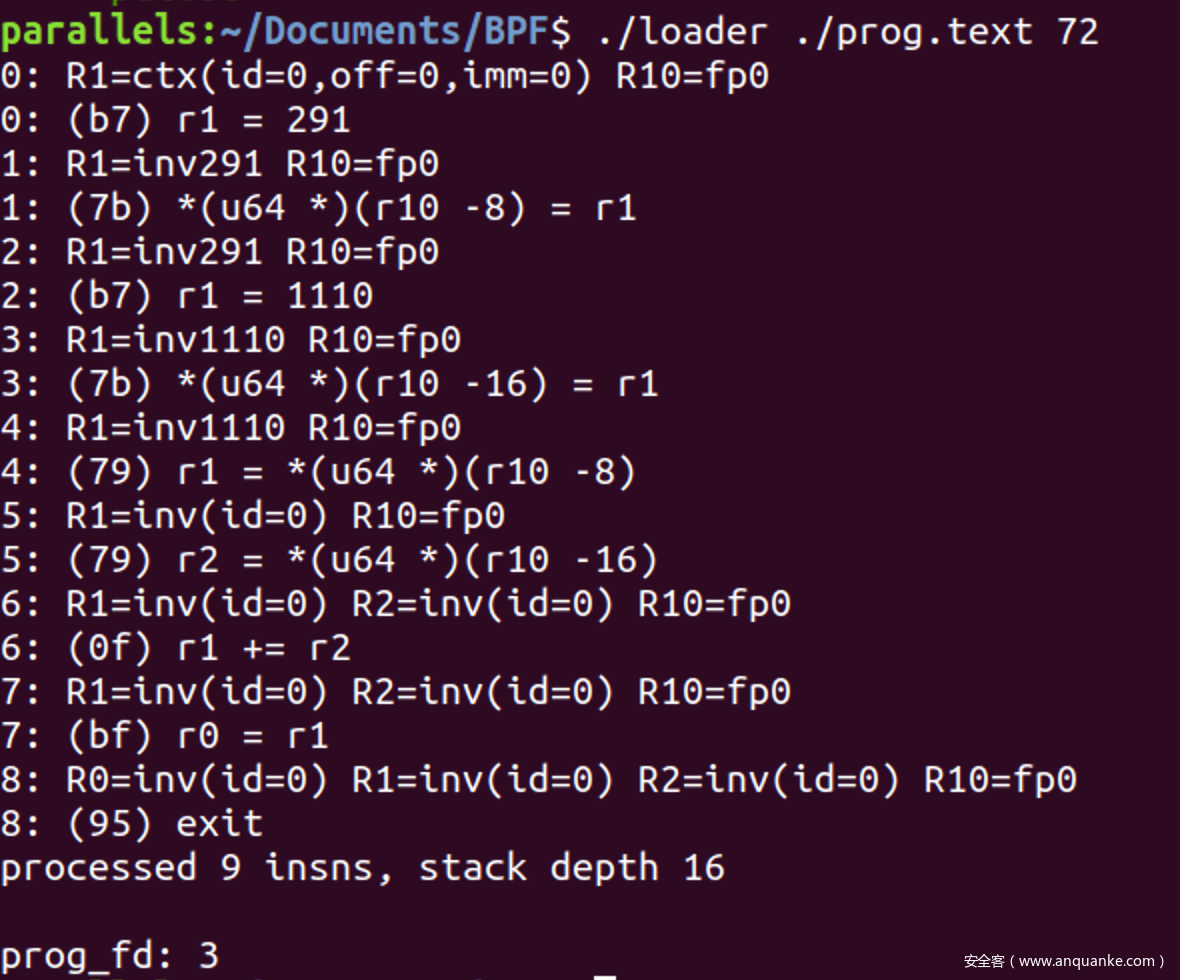
clang编译出9条指令, 一个72字节, 使用命令./loader ./prog.text 72执行的结果如下


发表评论
您还未登录,请先登录。
登录